



Generating a lead takes time, effort, and money. Whether someone fills out your contact form, subscribes to your newsletter, or requests a demo, that lead represents real potential — but capturing it is only the first step. What happens next determines whether they become a customer or lose interest over time.
Most businesses lose leads not because of a bad product, but because follow-up isn’t consistent. Inboxes get crowded, reminders are missed, and by the time someone receives a response, the opportunity may already be gone.
This is where follow-up automation helps. Instead of manually sending every message, you can create a workflow once that automatically sends timely follow-up emails and continues nurturing leads over time — reducing repetitive manual work.
This tutorial walks through the full process using GemCRM, from organizing contacts and creating email sequences to setting up an automated follow-up system that helps convert more leads.
What Is Customer Follow-Up Automation?
Customer follow-up automation is the process of automatically sending emails to contacts based on a defined schedule or customer activity.
For example, when someone submits a contact form, subscribes to your newsletter, or is added to your CRM, you can organize that contact in GemCRM and include them in an email sequence that sends follow-up messages according to your configured settings.
A typical flow looks like this:
- A visitor submits a contact form.
- The contact is added to GemCRM.
- The contact is organized using Lists or Tags.
- The contact is added to an email sequence.
- Follow-up emails are sent automatically based on the sequence settings.
- After the contact’s status changes, you can manage their future communication based on their customer journey.
This keeps your communication consistent while reducing repetitive manual follow-up tasks.
Why Automate Follow-Ups?
Manual follow-up may work when you are managing only a few leads, but it becomes difficult to maintain consistency as your business grows.
Automating follow-ups helps you:
- Respond to new leads faster.
- Reduce repetitive manual follow-up tasks.
- Provide a consistent communication experience for every prospect.
- Build stronger relationships through timely and relevant messages.
- Improve lead engagement and create more opportunities for conversion.
Instead of manually tracking every follow-up task, GemCRM helps you organize contacts, create email sequences, and manage automated communication while you focus on growing your business.
Before You Start: A Quick Checklist
Before creating your first automated follow-up sequence, make sure your GemCRM setup is ready.
- Install and activate GemCRM Free and GemCRM Pro.
- Go to GemCRM → Settings and configure your Business Settings and Email Settings, including your From Name and From Email.
- Make sure your email settings are properly configured for sending campaigns.
- Create at least one contact list to organize your leads.
- Prepare your contacts by adding them manually, importing a CSV file, or collecting them through supported sources.
Once your setup is complete, you’re ready to create your first automated email sequence.
Step-by-Step: How to Automate Customer Follow-Ups
Step 1: Add or Import Your Contacts
Before creating an automated follow-up sequence, you need to add your contacts to GemCRM. Your contacts are the foundation of your automation workflow because your email sequences will be sent to the subscribers you select.
GemCRM allows you to add contacts manually or import existing contacts using a CSV file.
Add Contacts Manually
If you have a small number of contacts, you can add them individually from your GemCRM dashboard.
To add a new contact:
- Go to the GemCRM Dashboard.
- Navigate to Contacts.
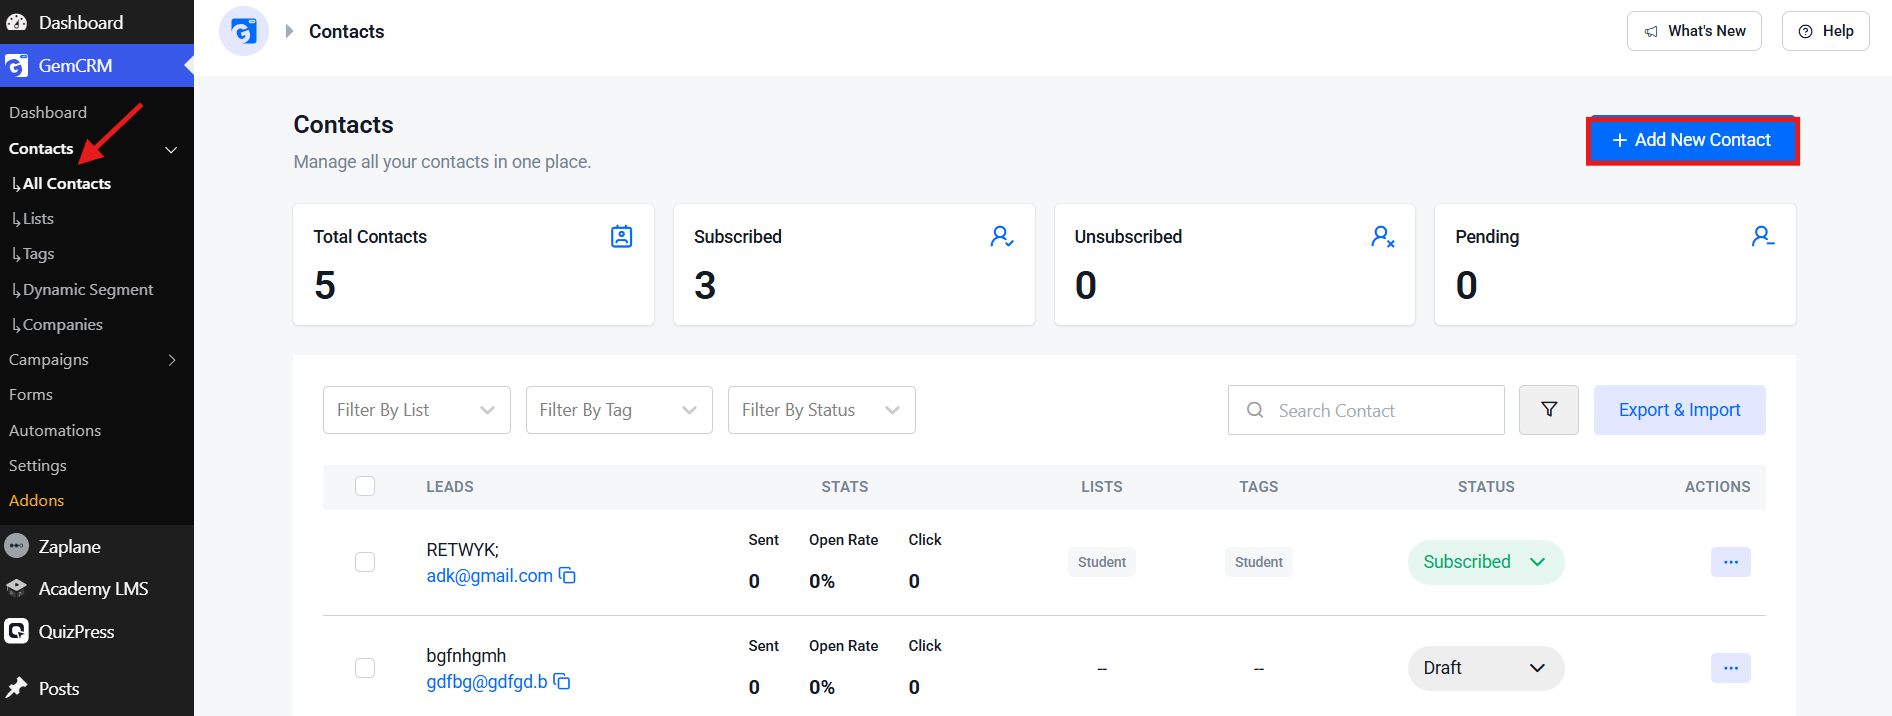
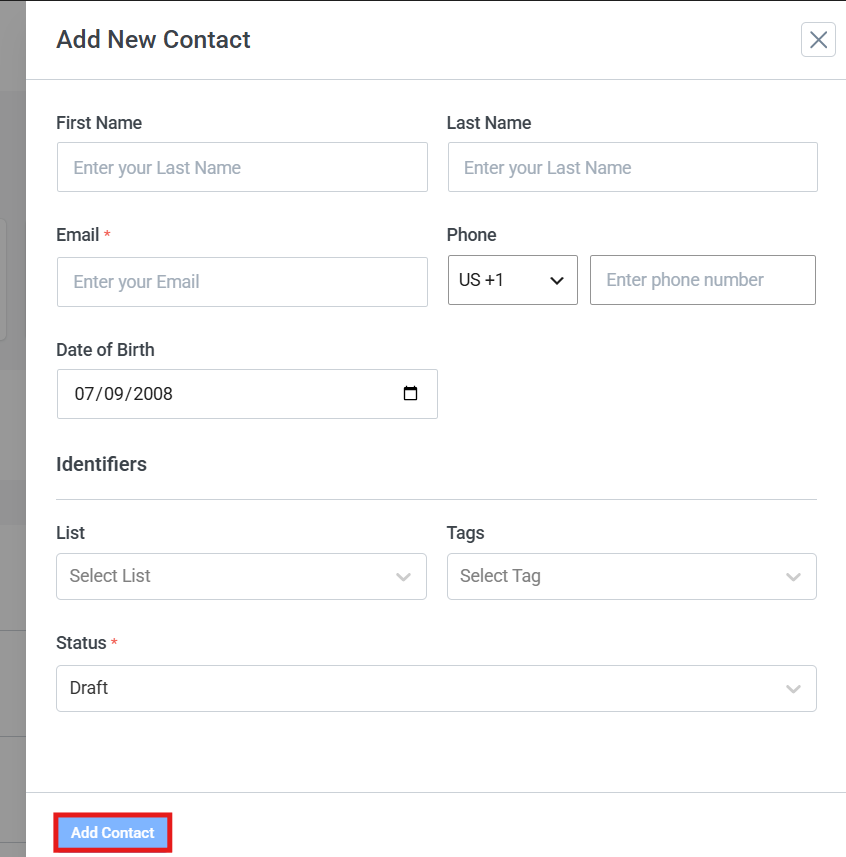
- Click Add New Contact.
- Enter the contact details, such as name and email address.
- Click Save.
After adding contacts, you can organize them using Lists and Tags to create more targeted email campaigns.
Import Contacts Using CSV
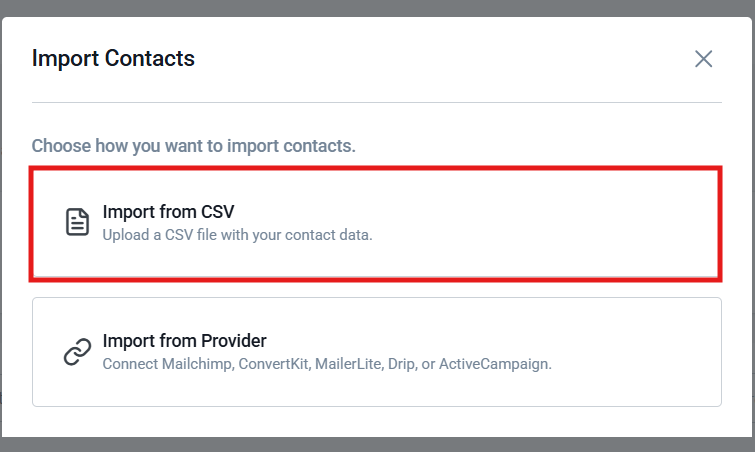
If you already have contacts stored in another platform or spreadsheet, you can import them into GemCRM using a CSV file. Upload your file, map each column to the correct GemCRM fields, and complete the import process.
Once your contacts are added, you can organize them with Lists and Tags and use them in your automated email sequences.
Step 2: Organize Your Contacts with Lists and Tags
Not every contact should receive the same email. A demo request lead may need different communication than a newsletter subscriber or an existing customer.
GemCRM gives you two tools for this: Lists, which group contacts into broad categories, and Tags, which let you label specific attributes.
Creating a List
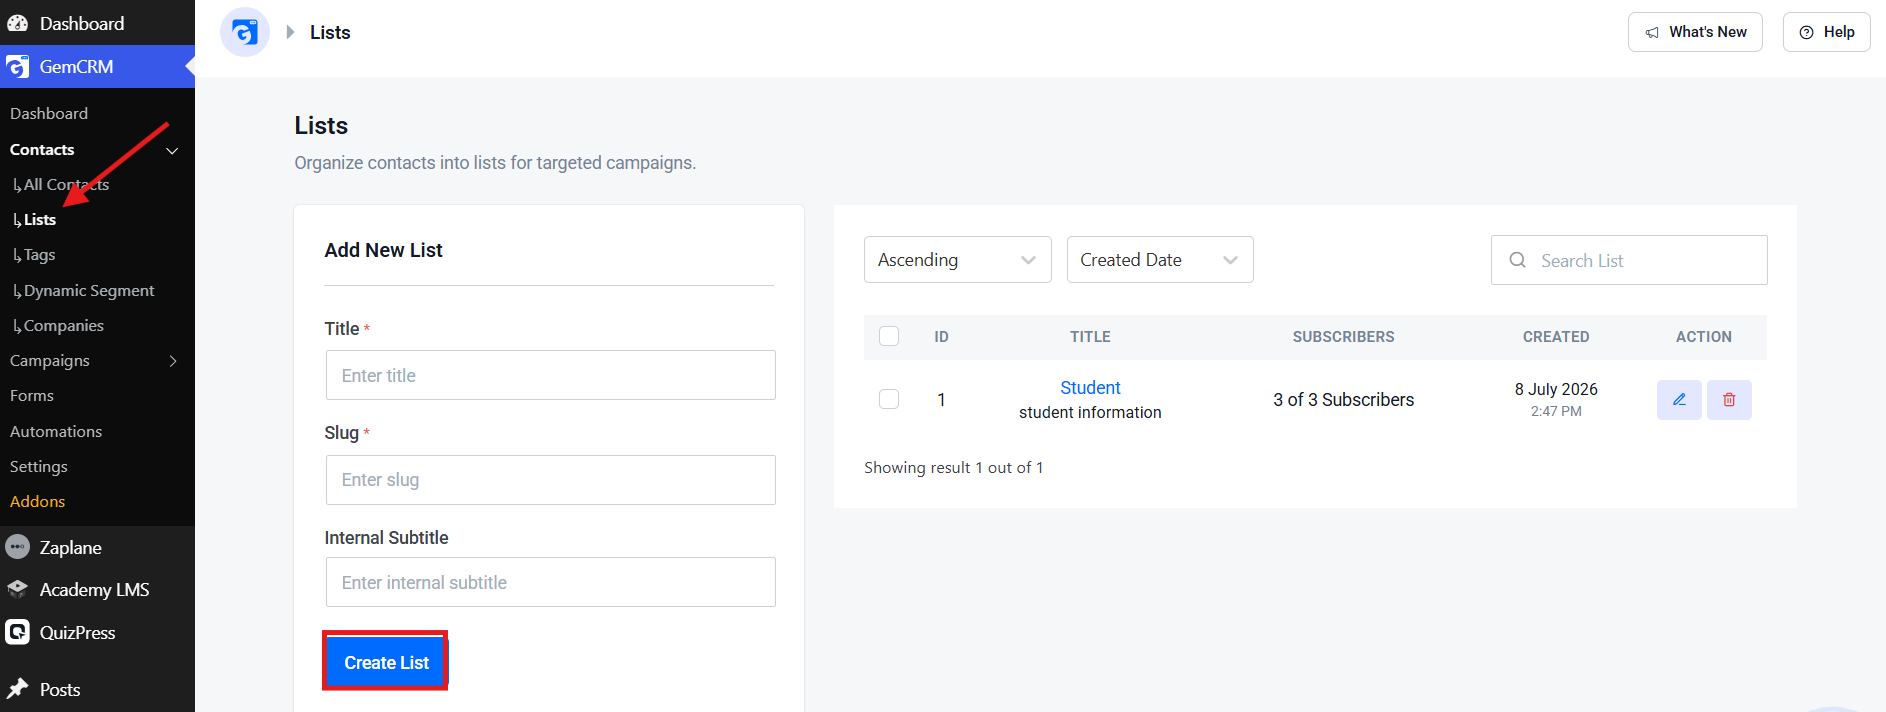
Go to Contacts → Lists. Fill in a Title, Slug, and an optional Internal Subtitle, then click Create List. Every list you create shows up on the right with its subscriber count, creation date, and quick edit/delete actions.
Creating a Tag
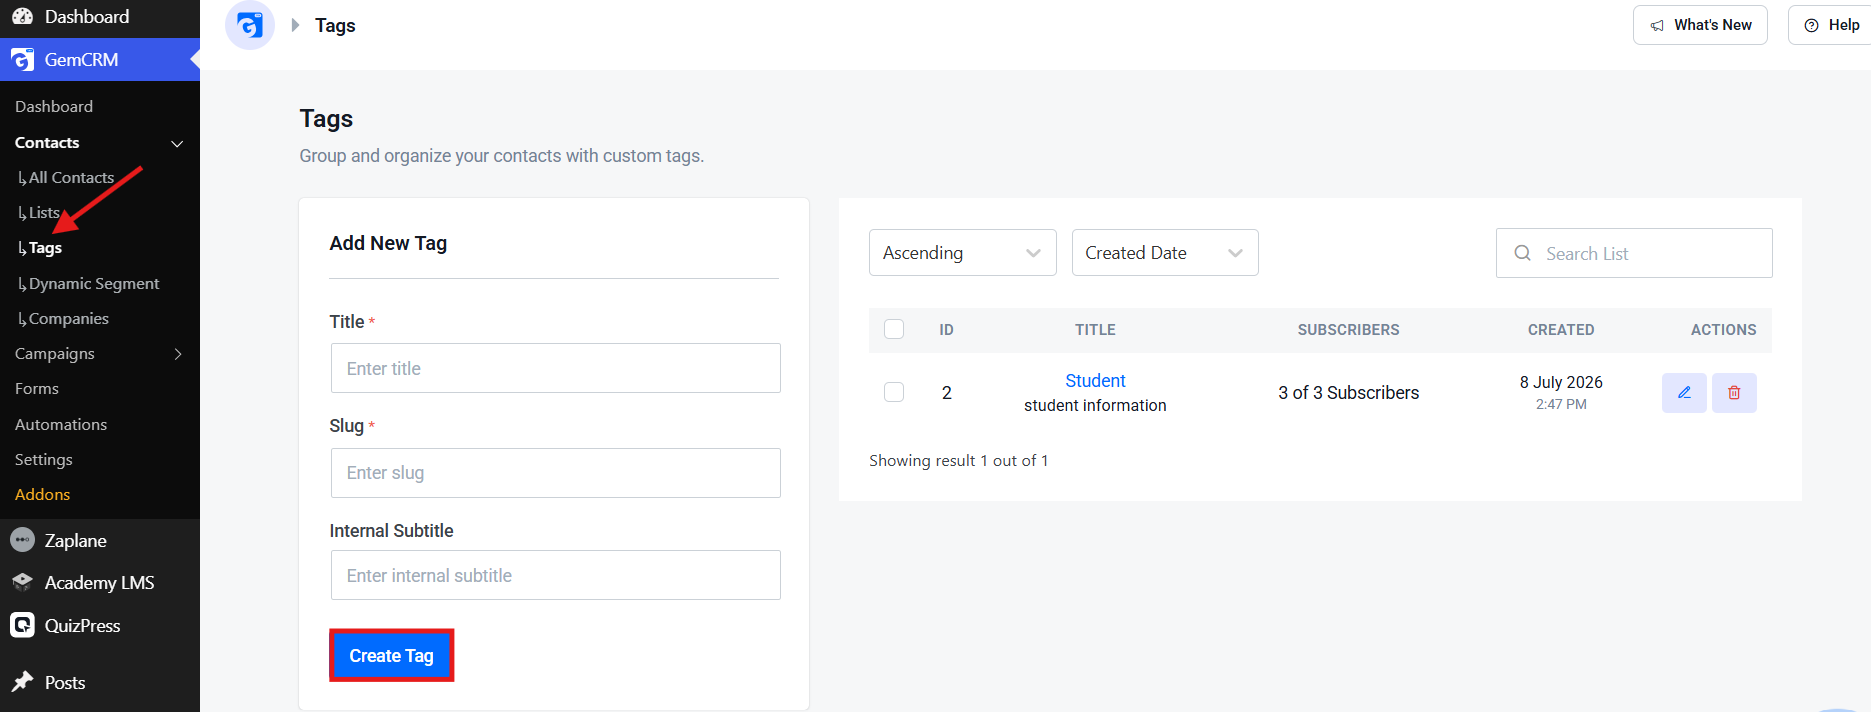
The process is nearly identical — go to Contacts → Tags, fill in a Title, Slug, and optional Internal Subtitle, then click Create Tag.
Sorting contacts before you build a sequence makes it much easier to send messages that actually feel relevant — for instance, running a dedicated sequence just for demo requests, separate from your general customer communications.
Step 3: Create Your First Email Sequence
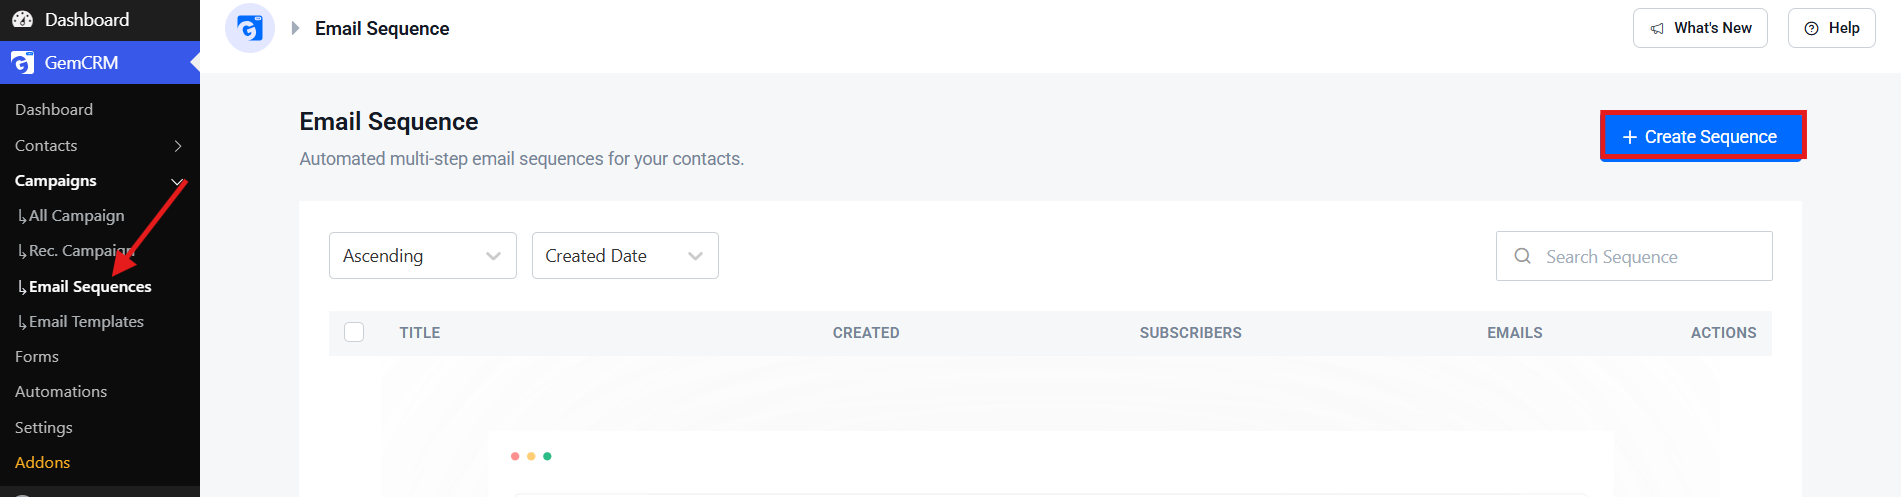
Go to Campaigns → Email Sequences and click + Create Sequence in the top-right corner. This page also shows every sequence you’ve already built, along with its creation date, subscriber count, number of emails, and quick actions.
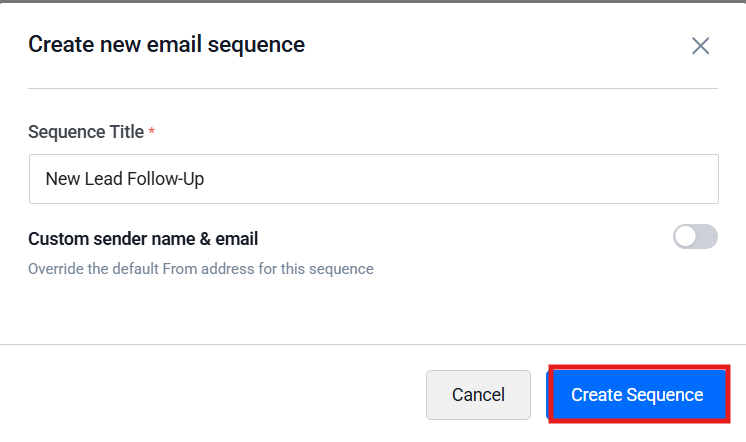
Clicking Create Sequence opens a small form: enter a Sequence Title, and optionally toggle on Custom sender name & email if you want this sequence to send from a different address than your default. Click Create Sequence to save it.
With the sequence created, you’re ready to start adding individual emails and setting their timing.
Step 4: Add Emails to Your Sequence
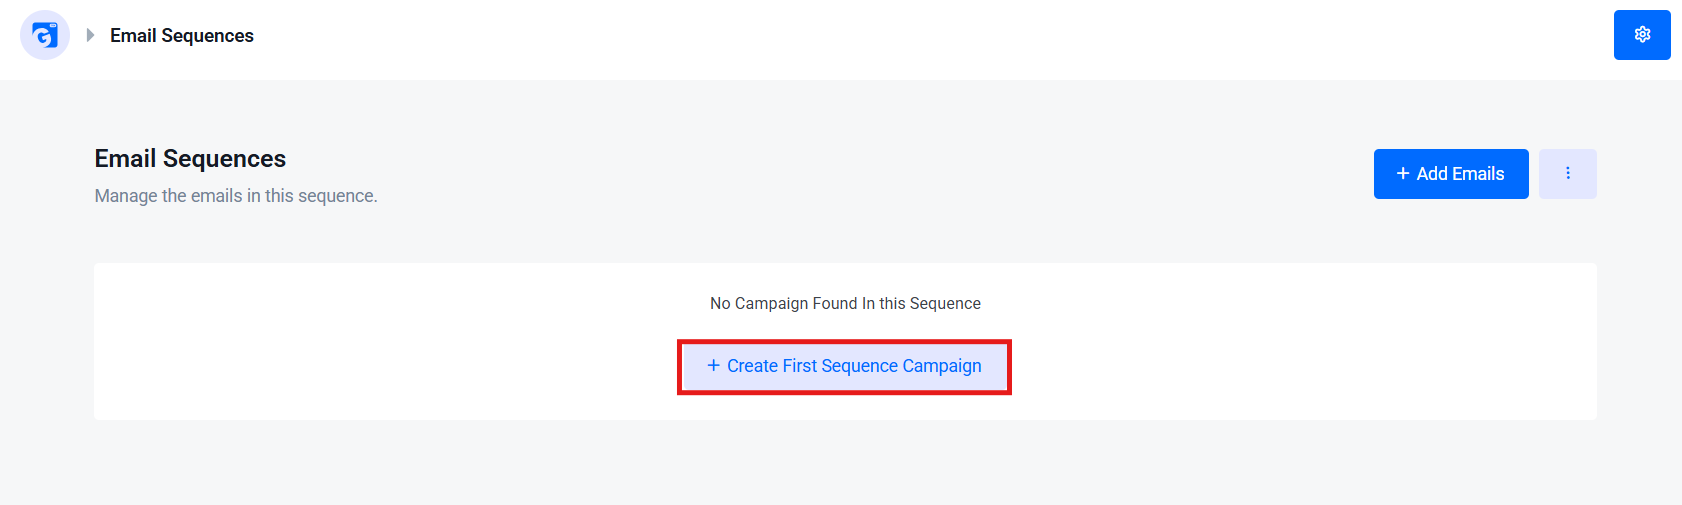
Open the sequence you just created and click + Add Emails in the top-right corner. The first time, you’ll see an empty state — click + Create First Sequence Campaign to add your first email step.
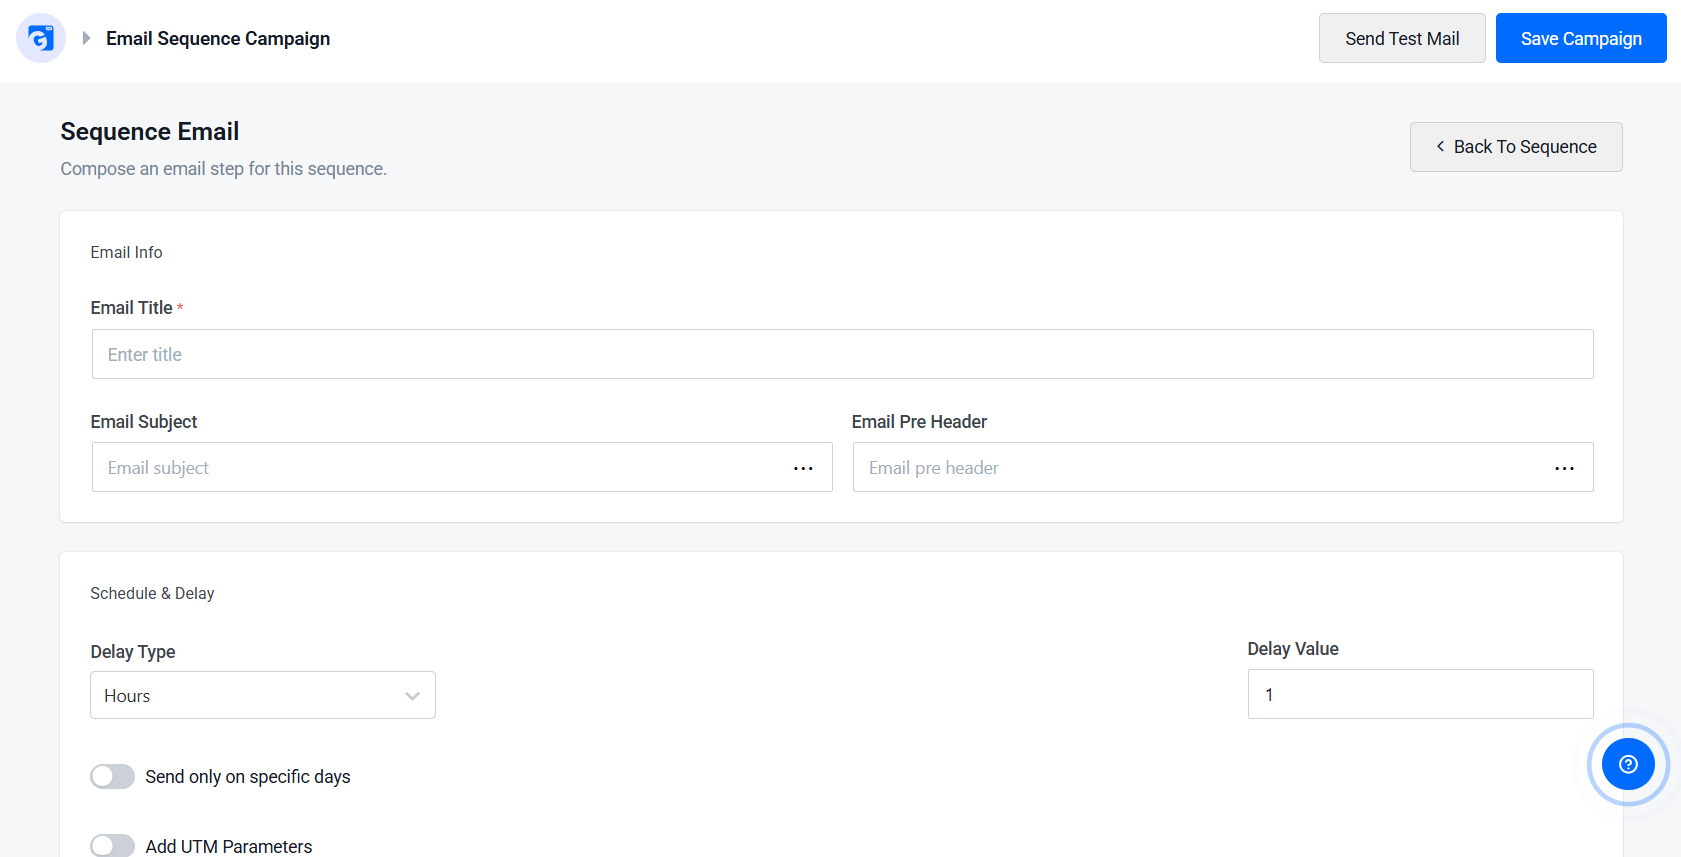
This opens the Sequence Email editor, split into two sections. Under Email Info, fill in:
- Email Title (required) – internal name, for your own reference.
- Email Subject – what recipients see in their inbox.
- Email Pre Header – the preview snippet shown alongside the subject.
Under Schedule & Delay, set:
- Delay Type – choose the unit (e.g., Hours, Days).
- Delay Value – how many of that unit to wait before sending.
- Optional toggles for Send only on specific days and Add UTM Parameters.
Scroll down to the Email Body section to design the actual content using the drag-and-drop block editor. Search or browse Blocks — Structure blocks like Divider, Spacer, Columns, and Section, or Content blocks like Heading and Text — and drop them into the canvas. You can also click Import Template to start from an existing design, or Preview to see how the email will look.
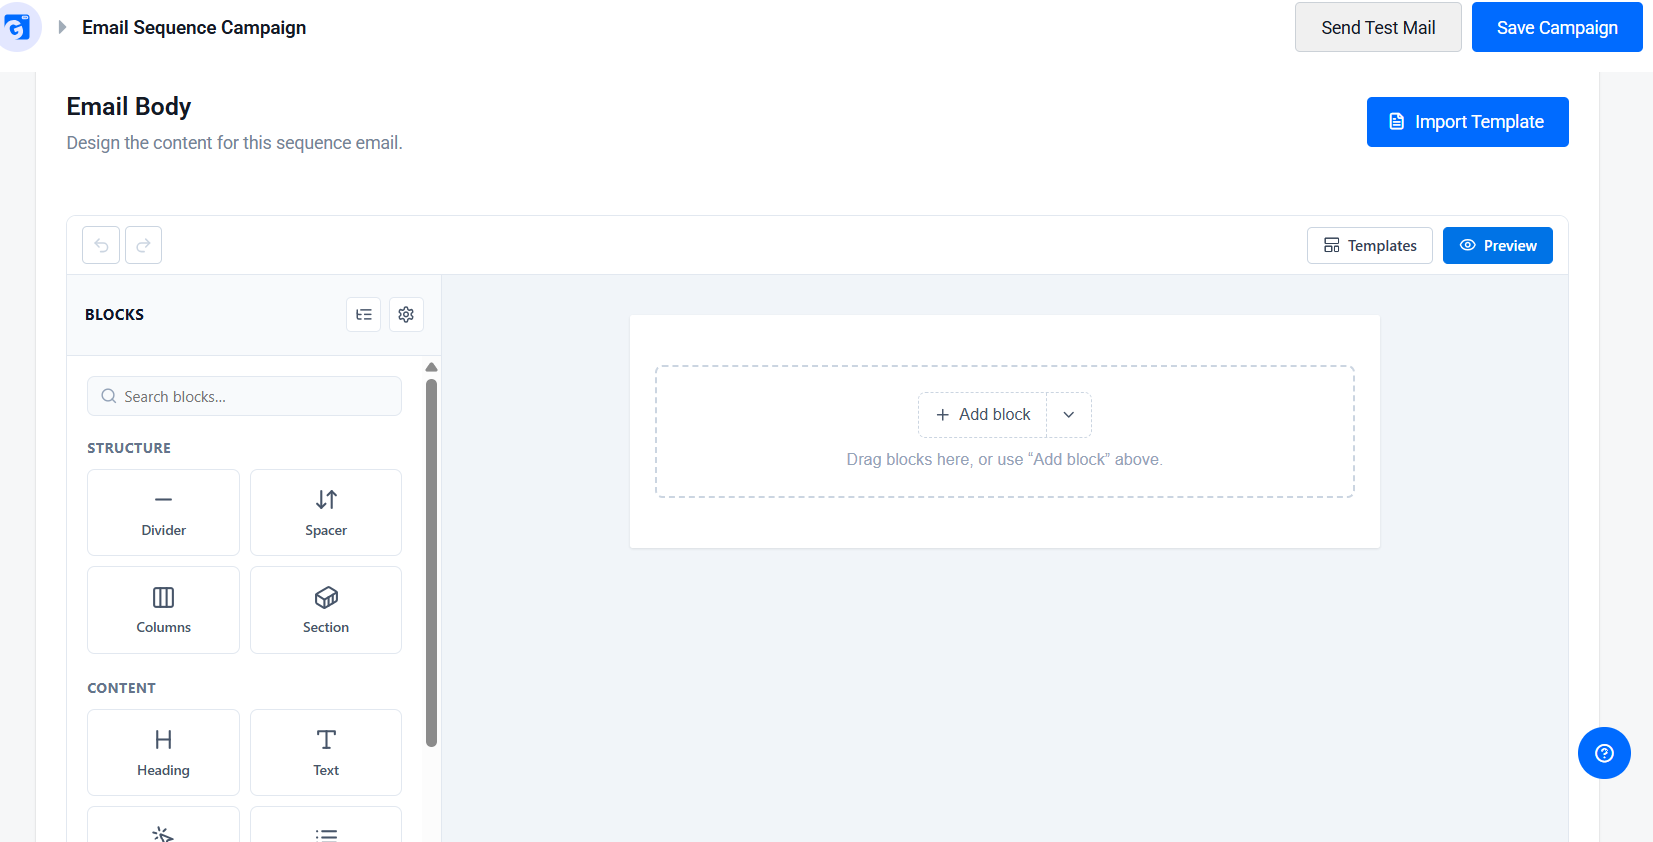
Before locking in each email, click Send Test Mail at the top of the page to check formatting and content ahead of time, then click Save Campaign to save the email step.
Step 5: Configure Delays and Personalize
Set the timing for each email using GemCRM’s delay settings.
|
|
Timing |
|
Welcome Email |
Immediately |
|
Helpful Resource |
After a few days |
|
Engagement Email |
After an additional delay |
|
Final Follow-Up |
Later in the sequence |
Set this in the Delay Type dropdown — choose Minutes, Hours, Days, or Weeks — and pair it with a Delay Value (e.g., Hours + 1 for one hour after the previous email). There’s no universal “correct” timing — it depends on your audience, so keep an eye on performance and adjust as needed.
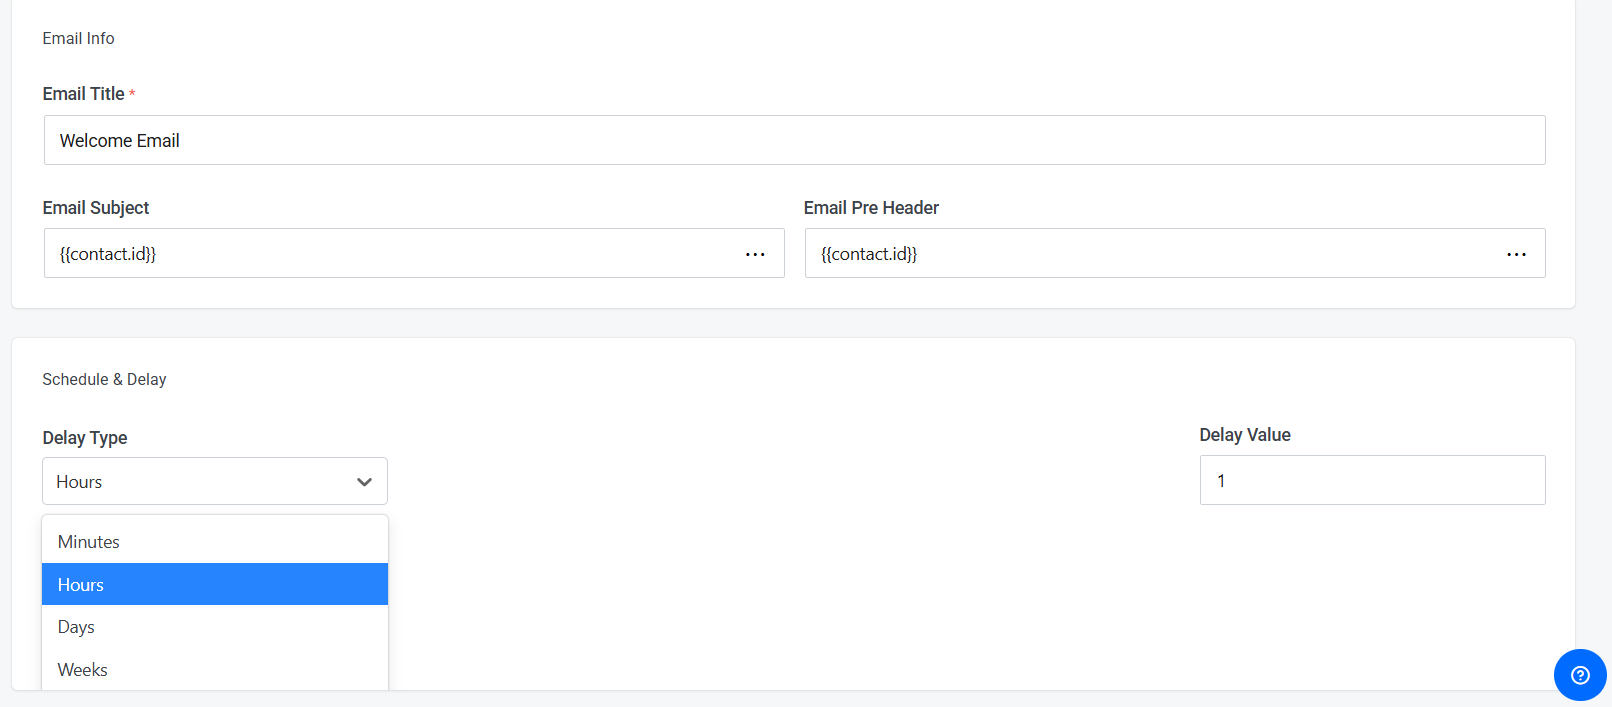
To personalize a message, click the “…” icon next to the Email Subject or Email Pre Header field and insert a merge tag, such as {{contact.id}}, to pull in the contact’s own data automatically. Lean on your Lists and Tags too, to make sure the right message reaches the right person.
Before switching your sequence live, double-check the email content, subject lines, pre-header text, delay timing, test sends, and subscriber list.
Step 6: Select Subscribers and Activate
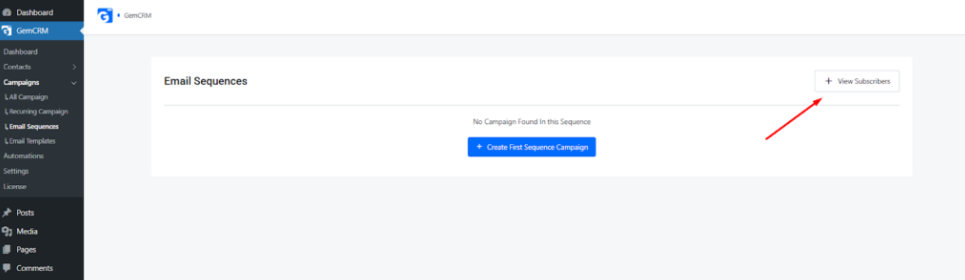
Last step: decide who actually enters the sequence. From your sequence’s Email Sequences page, click + View Subscribers in the top-right corner.
This opens the Included Subscribers and Excluded Subscribers screen. For each row, pick a List and/or a Tag using the dropdowns, then click the + to add another row (or the – to remove one).
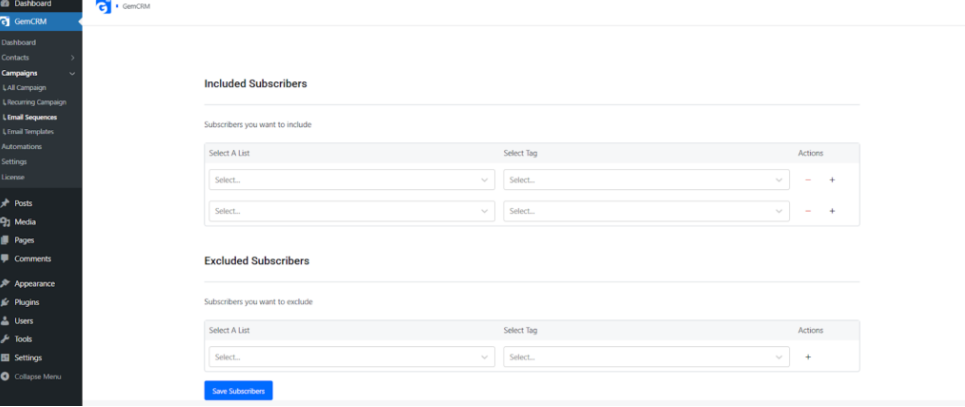
Typically included (in “Included Subscribers”):
- New leads
- Newsletter subscribers
- Demo request contacts
Typically excluded (in “Excluded Subscribers”):
- Existing customers
- Already-converted contacts
- Unsubscribed contacts
Once your audience is set, click Save Subscribers, review the whole sequence one more time, and hit Activate. From that point on, GemCRM handles delivery automatically, based on the delays you configured.
Monitor Your Email Sequence
After activating your sequence, monitor its performance to understand how your campaigns are performing.
Review your campaign reports regularly and keep an eye on important metrics such as:
- Email open rates
- Link click rates
- Subscriber engagement
Use these insights to improve future campaigns by refining your email content, subject lines, and follow-up strategy.
Best Practices
- Start with one sequence. Begin with a simple workflow, such as a new lead follow-up, welcome email, or onboarding sequence before creating more advanced automations.
- Provide value in every email. Share helpful resources, educational content, or useful updates instead of sending only promotional messages.
- Organize your contacts. Use Lists and Tags to group contacts, making it easier to send relevant follow-up emails to different audiences.
- Review before activating. Check your email content, subject lines, pre-header text, delay settings, and subscriber selection. Send a test email to make sure everything is configured correctly.
Common Mistakes to Avoid
Even with the right tools, a few setup mistakes can reduce the effectiveness of your follow-up automation. Avoid these common issues when creating your email sequences in GemCRM.
- Skipping Lists and Tags. Sending the same email to every contact makes your campaigns less relevant. Organize subscribers with Lists and Tags to deliver more targeted follow-ups.
- Not testing your emails before activation. Always use Send Test Email to review your content, formatting, and links before sending emails to subscribers.
- Selecting the wrong subscribers. Double-check your Included Subscribers and Excluded Subscribers to ensure the right audience receives your sequence.
- Ignoring campaign performance. Review your email reports regularly to monitor engagement and identify opportunities to improve future campaigns.
Why Choose GemCRM?
GemCRM brings contact management, audience segmentation, and automated email sequences together inside WordPress, making it easier to manage your follow-up process from one place.
With GemCRM, you can:
- Manage contacts from a centralized CRM.
- Organize subscribers using Lists and Tags.
- Create automated email sequences.
- Configure email delays for each message.
- Personalize your email campaigns.
- Monitor campaign performance from your dashboard.
Whether you’re a small business owner, freelancer, agency, or course creator, GemCRM provides the tools you need to build and manage automated customer follow-up workflows without leaving your WordPress dashboard.
Conclusion
Consistent follow-up plays an important role in converting leads into customers, but managing every follow-up manually becomes difficult as your business grows.
With GemCRM, you can add and organize contacts using Lists and Tags, create automated email sequences, configure delays, and activate your campaigns—all from your WordPress dashboard.
Start with a simple follow-up sequence, monitor its performance, and refine it over time. A well-planned automation workflow helps you save time, maintain consistent communication, and build stronger relationships with your audience.
FAQs
What is customer follow-up automation?
Customer follow-up automation is the process of automatically sending emails to contacts based on predefined actions or scheduled delays, helping businesses communicate consistently with their audience.
Can I create automated email sequences with GemCRM?
Yes. GemCRM allows you to create Email Sequences, add multiple emails, configure delay settings, and send automated follow-up emails to selected subscribers.
Do I need coding knowledge to automate follow-ups?
No. GemCRM provides a user-friendly interface inside WordPress, allowing you to create and manage automated email sequences without writing code.
How do Lists and Tags help with follow-up automation?
Lists and Tags help you organize and segment your contacts, making it easier to send relevant follow-up emails to different groups instead of sending the same message to everyone.
Can I test emails before sending them?
Yes. GemCRM includes a Send Test Email option, allowing you to review your email before activating your sequence.