



Many WordPress site owners quickly learn content creation, SEO, and social media marketing — but email marketing often feels too technical or expensive because of separate platforms and tools.
The good news is you can run your entire email marketing system directly inside WordPress. From collecting subscribers to sending automated and segmented campaigns, everything can be managed from your dashboard.
The setup is simple: use a CRM plugin like GemCRM to manage contacts and campaigns, connect an SMTP service for reliable email delivery, and verify your sending domain to improve inbox placement. Together, these tools give you a complete email marketing system without leaving WordPress.
Why Email Marketing Still Matters
Before diving into the setup, the numbers are worth a moment. According to Litmus, email delivers an average ROI of $36 for every $1 spent — outperforming social media, paid ads, and SEO in terms of direct revenue. Statista reports that the global email user base hit 4.6 billion by the end of 2025, representing roughly 58% of the world’s entire population.
For businesses and content creators alike, this channel consistently delivers. HubSpot’s State of Marketing Report found that, for B2C brands, email marketing is the highest-ROI channel. And according to Omnisend’s 2026 ecommerce report, automated email sequences account for just 2% of total sends but drive 30% of all revenue, earning 16× more per send than standard one-off campaigns.
The platform you send from matters less than having a consistent strategy. But if you are already running on WordPress, keeping everything in one place saves time, money, and data fragmentation.
The Core Components You Need
Sending email campaigns from WordPress requires three things working together:
1. A CRM or email marketing plugin — this manages your contacts, campaigns, and automation logic inside WordPress.
2. An SMTP service — this handles actual email delivery. WordPress’s default PHP mail() function is unreliable, and most hosting providers block it or route it to spam. You need a dedicated sender.
3. A verified sending domain — your emails need to come from a professional address tied to your domain, not a free Gmail or Yahoo account.
Each of these is straightforward to set up. Here is how.
Step 1: Choose Your WordPress Email Marketing Plugin
Several solid options exist depending on your budget and complexity needs:
GemCRM — a newer, WordPress-native plugin that handles contact management, campaigns, sequences, and segmentation with lifetime pricing instead of recurring annual fees. Strong option if you’re focused on keeping long‑term costs low.
MailPoet — beginner-friendly, free for up to 500 subscribers and 5,000 emails per month, good for basic newsletters and WooCommerce stores.
FluentCRM — a widely used self-hosted CRM plugin for WordPress with over 70,000 active users, offering a visual automation builder and deep WooCommerce integration.
Newsletter — lightweight and free, good for simple newsletter campaigns without heavy automation needs.
For most bloggers and small business owners who want automation and segmentation without SaaS pricing, a self-hosted option like GemCRM or FluentCRM makes the most practical sense. Your contacts stay on your server, your data is not exported to a third party, and costs do not scale with your list size.
To install any of these, go to Plugins → Add New in your WordPress dashboard, search by name, and click Install → Activate.
Step 2: Set Up a Reliable SMTP Service
Most WordPress sites fail email deliverability because they use PHP’s default mail() function, which has a poor reputation and often gets blocked or marked as spam.
Solution: Route all emails through a professional SMTP service.
Recommended SMTP Providers:
- Amazon SES — Cheapest for high volume
- SendGrid — Excellent deliverability (100 free emails/day)
- Mailgun — Great for developers
- Brevo — 300 free emails/day
Quick Setup:
- Sign up with your chosen provider and get API key / SMTP credentials.
- Install WP Mail SMTP (most popular) or FluentSMTP.
- Go to plugin settings → Select your mailer.
- Enter your API key or SMTP details.
- Set From Name and From Email (use your own domain, not Gmail).
- Send a test email.
Once configured, all WordPress emails (newsletters, transactional, resets, etc.) will go through the SMTP service with proper authentication — dramatically improving deliverability.
Step 3: Authenticate Your Sending Domain

Email authentication helps receiving mail servers verify that your emails are legitimate. Without it, even good campaigns can end up in spam. The three main DNS records are:
- SPF (Sender Policy Framework) — specifies which servers can send emails for your domain.
- DKIM (DomainKeys Identified Mail) — adds a secure signature to verify emails haven’t been altered.
- DMARC — connects SPF and DKIM, telling providers how to handle failed authentication.
Your SMTP provider supplies these records during setup. Simply add them to your domain’s DNS settings through your registrar, such as Namecheap, Cloudflare, or GoDaddy. Once verified, your sender reputation and inbox delivery rates improve significantly.
Step 4: Build and Organize Your Contact List
Your email campaigns are only as strong as your contact list. With GemCRM, you can manage everything directly inside WordPress without relying on third-party form builders or external SaaS platforms.
Here’s how to grow and organize your subscribers effectively:
- Opt-in forms — Create subscription forms using GemCRM’s built-in form builder and place them in high-visibility areas like blog posts, sidebars, or pop-ups.
- Import existing contacts — Easily migrate contacts from platforms like Mailchimp or HubSpot using CSV import.
- WordPress user sync — Automatically sync registered users into targeted email lists based on purchases, enrollments, or activity.
- Lists and tags — Organize subscribers by interests, behavior, or purchase history for better segmentation later.
Keep your list clean by removing invalid emails and enabling double opt-in confirmation. Well-targeted emails consistently perform better and drive stronger engagement.
Step 5: Create and Send Your First Campaign
With contacts organized and SMTP connected, creating your first GemCRM campaign is easy: Subject & Settings → Compose → Recipients → Review & Send.
1. Go to the Campaigns Section
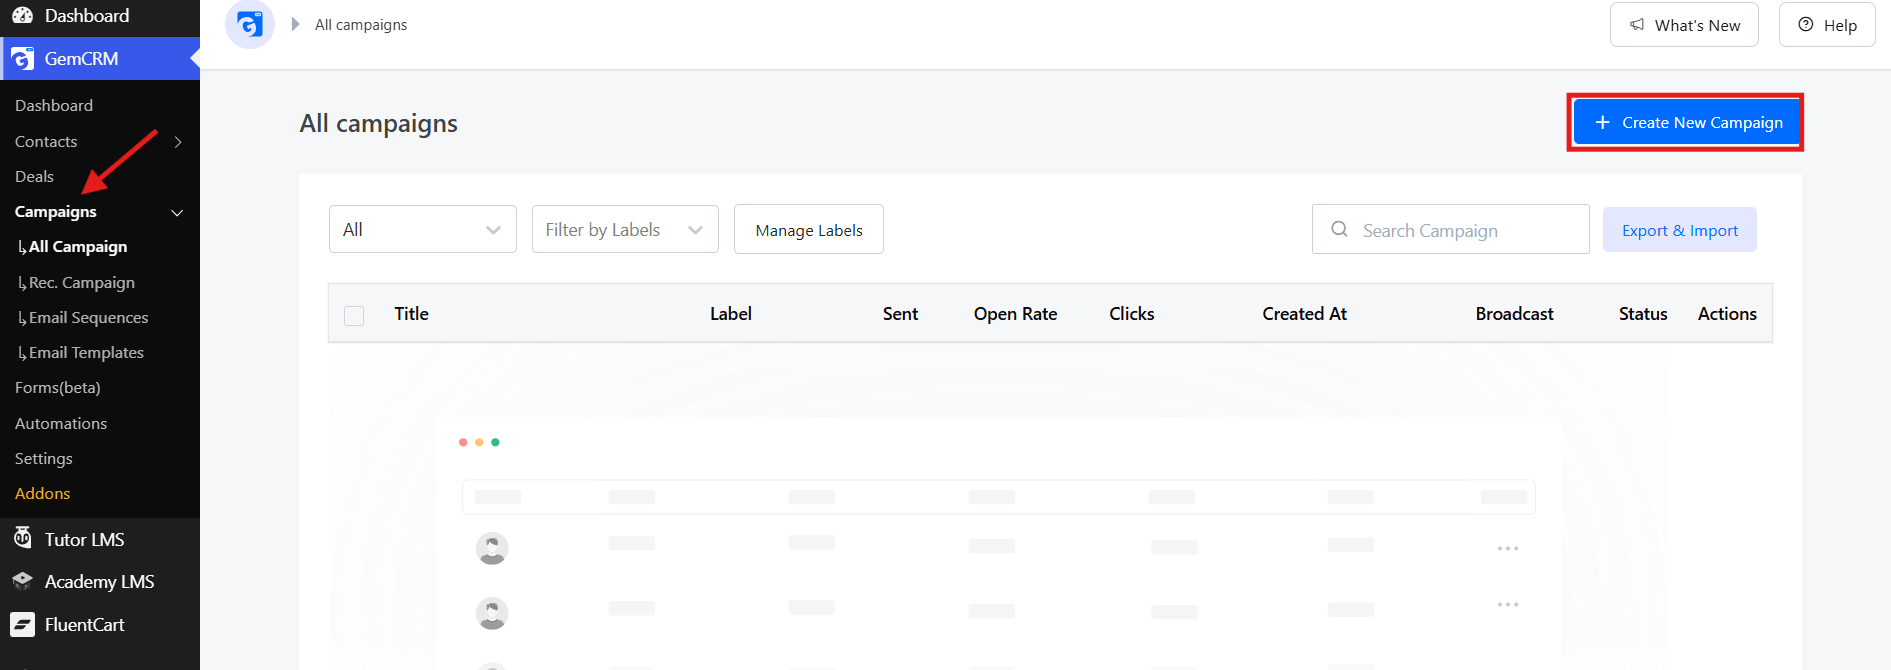
In WordPress, go to GemCRM → Campaigns → All Campaigns, then click + Create New Campaign in the top-right corner.
2. Fill in Subject & Settings
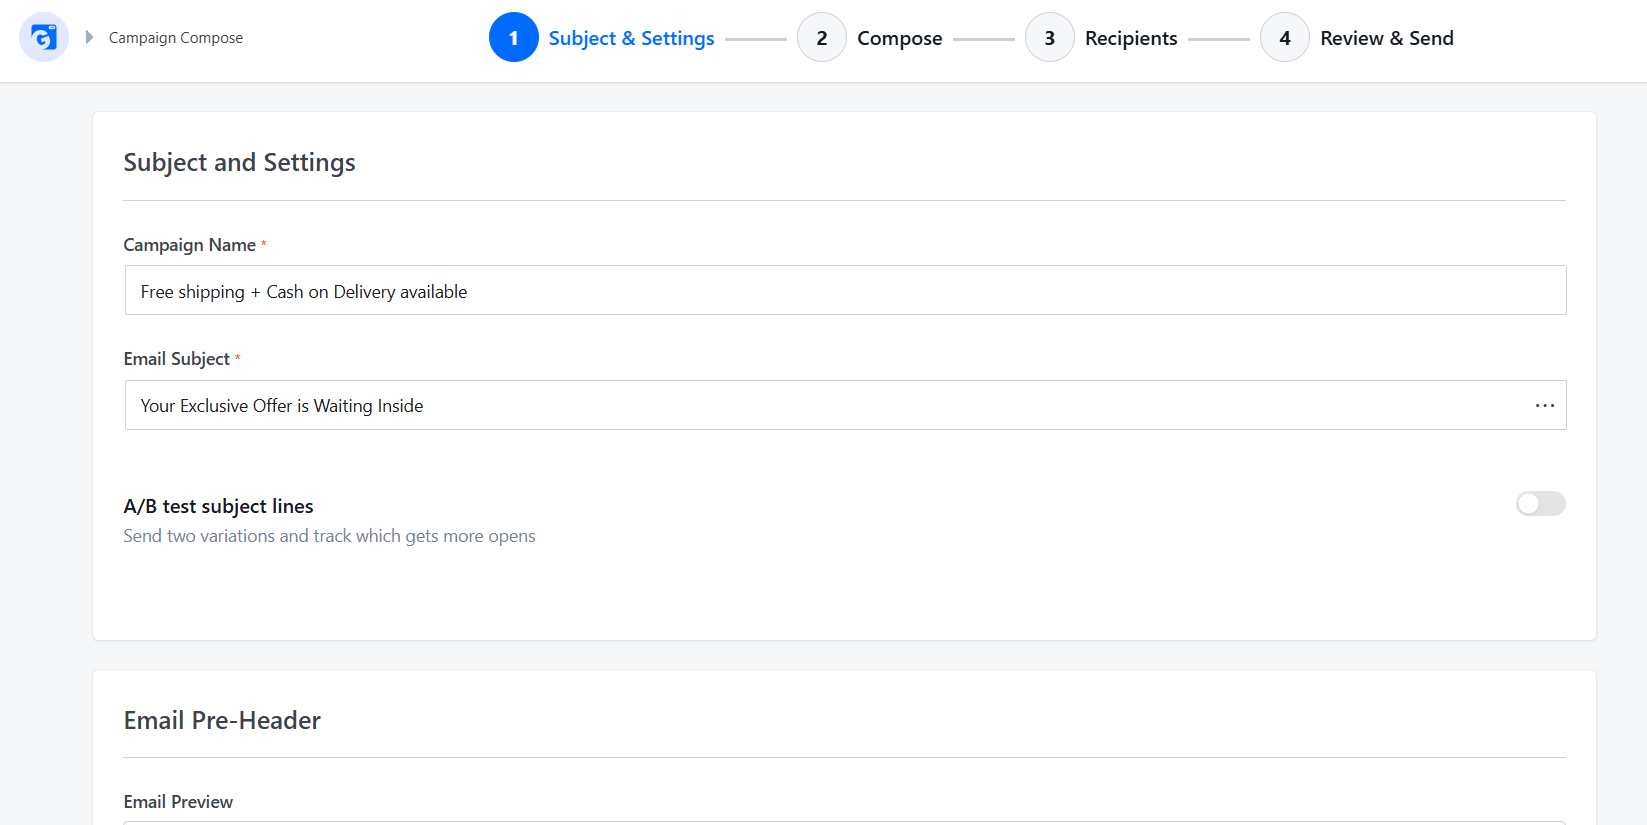
GemCRM first opens the Subject & Settings screen, where you set:
- Campaign Name — internal only, subscribers don’t see it
- Email Subject — what shows in the inbox; keep it specific and under 60 characters (personalized subjects can boost opens by 26% per Litmus)
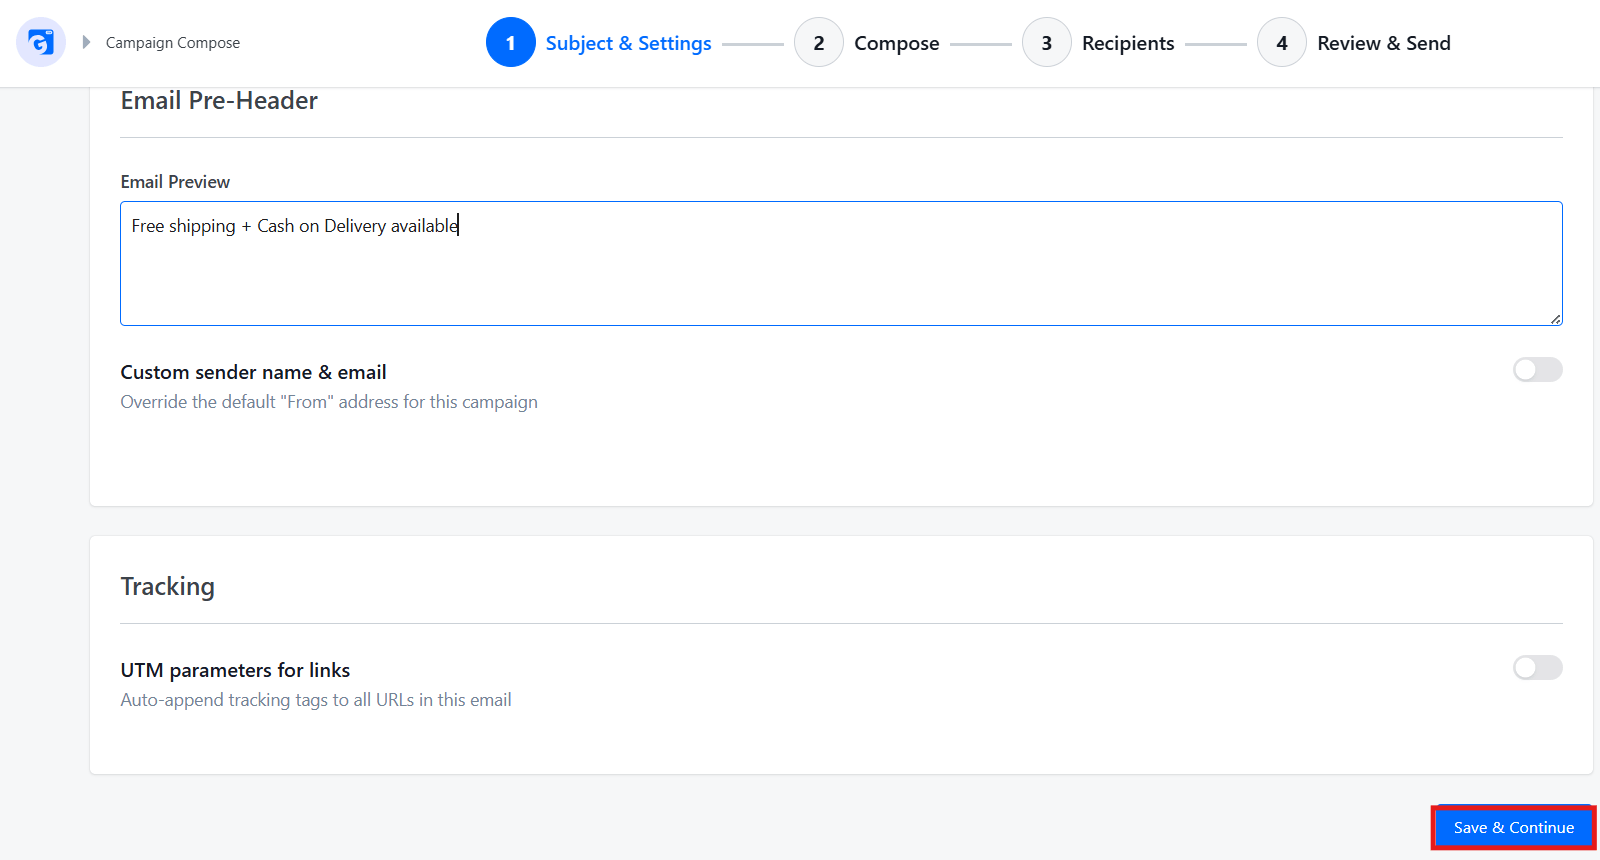
- Email Pre-Header — short preview text that complements (not repeats) the subject
- A/B Test Subject Lines — toggle on to test two subject variations and compare opens
- Custom Sender Name & Email — toggle on to override the default From address
- UTM Parameters — toggle on to auto-add tracking tags to all links
Once done, click Save & Continue.
3. Compose Your Email
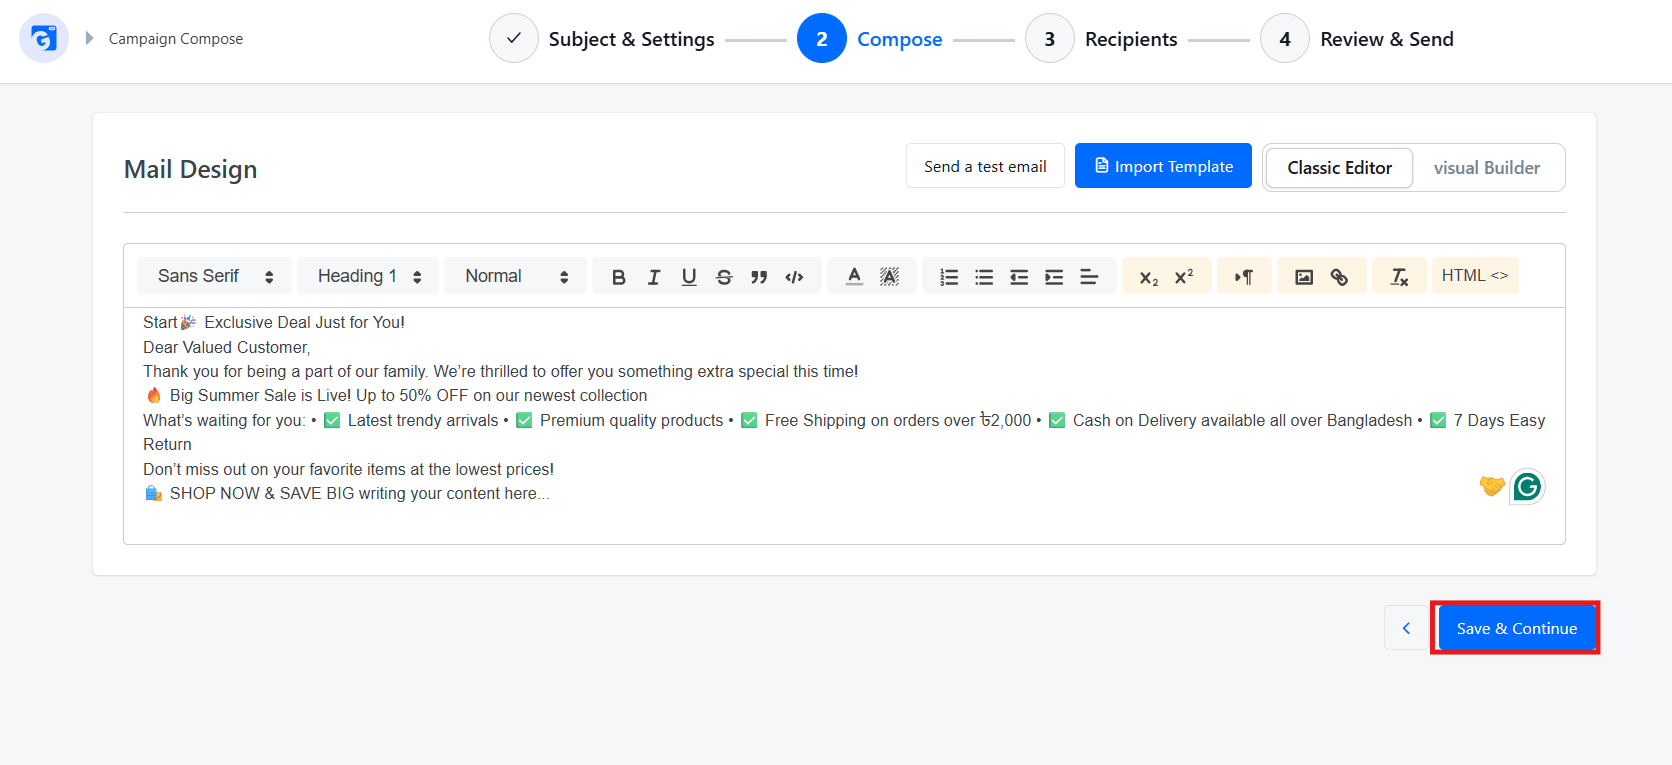
Next is the Mail Design screen. GemCRM gives you three editor options:
- Classic Editor — for simple text emails
- Visual Builder — for drag‑and‑drop layouts
- Import Template — to start from a pre-built design.
Write a focused email (one clear goal) and use Send a test email to preview it before continuing.
Once done, click Save & Continue.
4. Choose Your Recipients
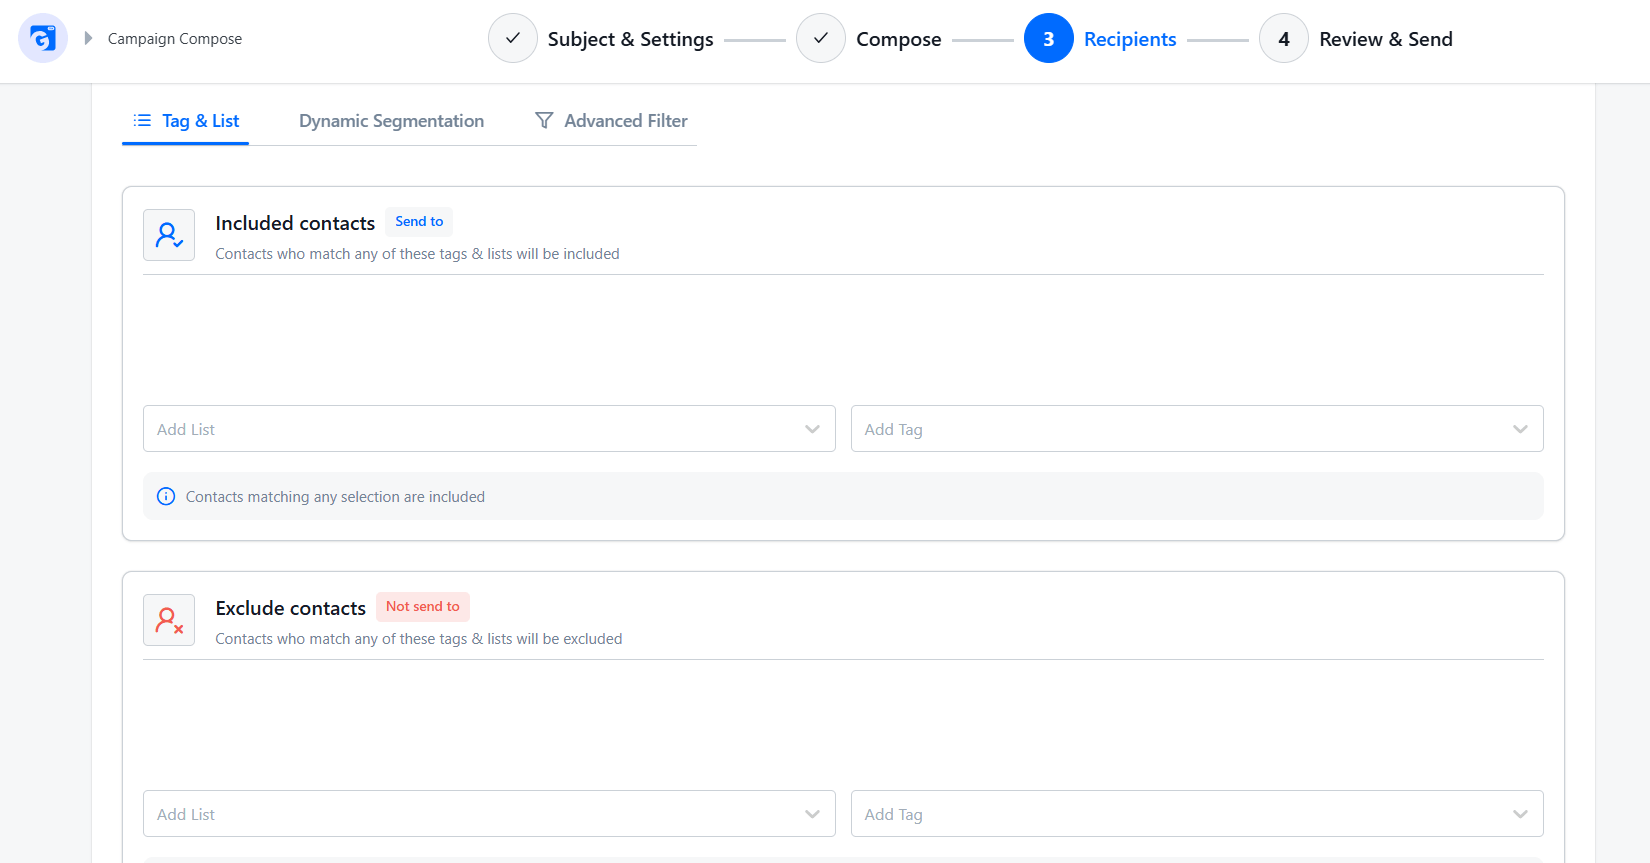
On the Recipients screen, GemCRM gives you three ways to target your audience:
- Tag & List — include or exclude specific lists/tags (fastest option for most campaigns)
- Dynamic Segmentation — build rule-based segments on the fly
- Advanced Filter — apply more granular conditions
For most campaigns, use Tag & List: add your target list under Included contacts and any lists to skip under Exclude contacts.
Once done, click Save & Continue.
5. Review & Send
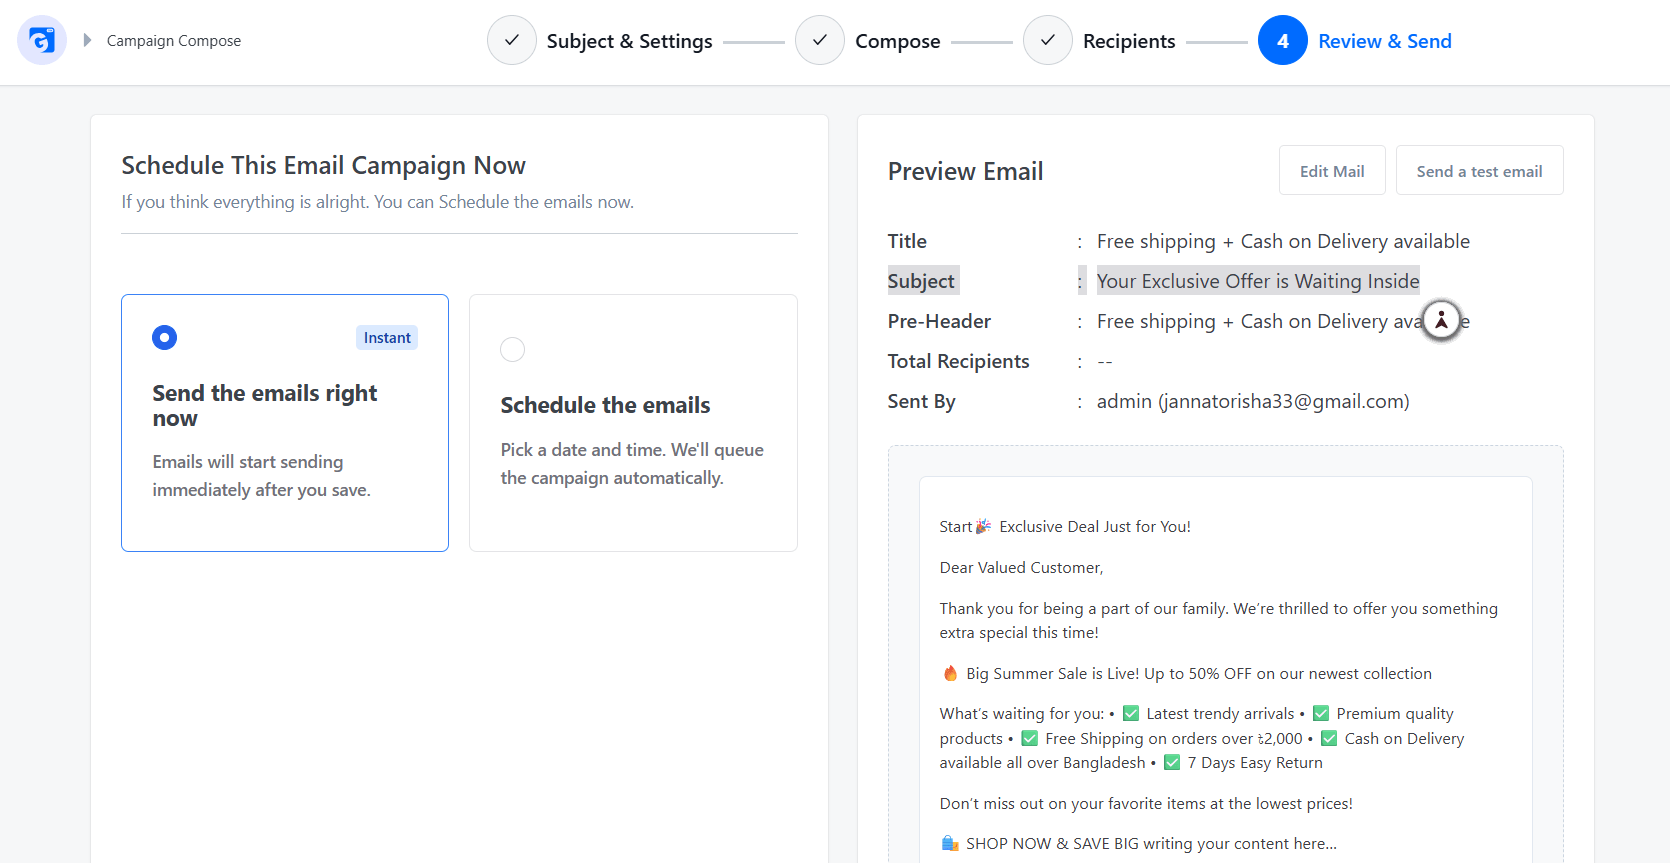
The final screen shows a full Preview Email summary on the right — including Title, Subject, Pre-Header, Total Recipients, Sent By, and a live email preview. Review everything carefully.
On the left, choose how to send:
- Send the emails right now — sends immediately after you save
- Schedule the emails — pick a date and time; GemCRM queues and sends automatically (OptinMonster reports Tuesday at 11 AM often achieves the highest open rates)
Once satisfied, confirm and launch.
After sending, go to GemCRM → Campaigns to track opens, clicks, and unsubscribes — then use those insights to improve your next campaign.
Step 6: Set Up Automated Email Sequences
This is where the real leverage happens: a one-time campaign hits once, but an automated sequence keeps working indefinitely, building relationships with every new subscriber on autopilot.
1. Go to Email Sequences
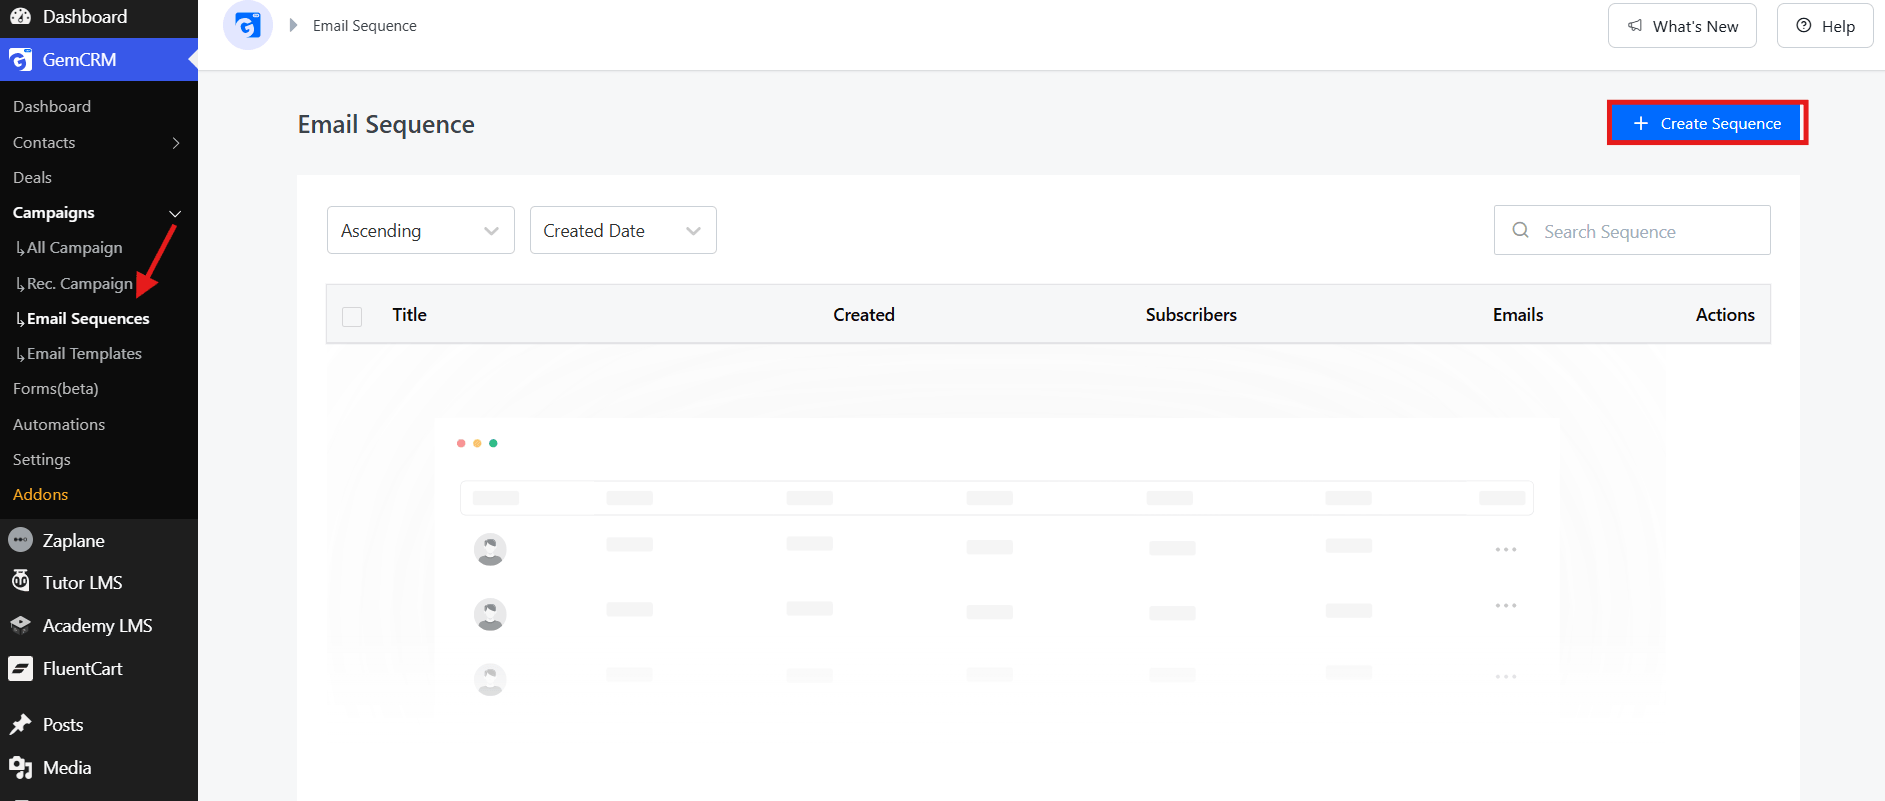
From your WordPress dashboard, go to GemCRM → Campaigns → Email Sequences, then click + Create Sequence in the top-right corner to start a new sequence.
2. Name Your Sequence
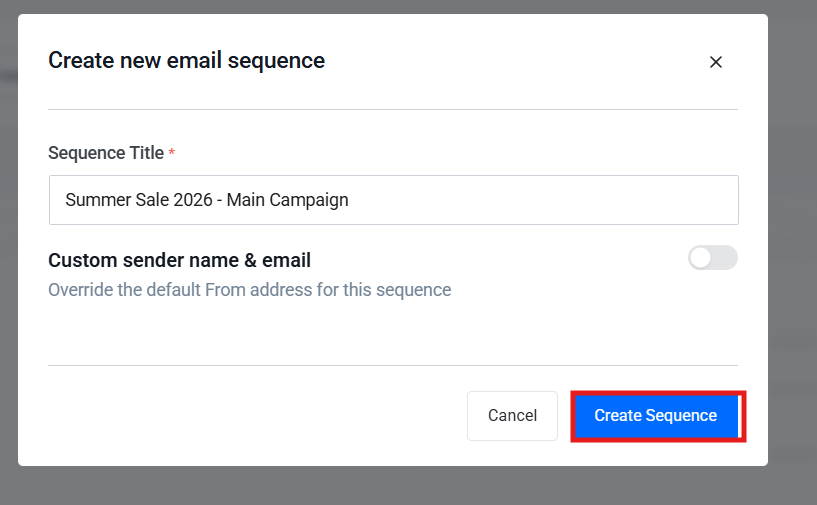
A pop-up will ask for a Sequence Title—use a clear name, such as “Welcome Email Sequence.” Optionally toggle Custom sender name & email to use a different From address, then click Create Sequence.
3. Add Your First Email
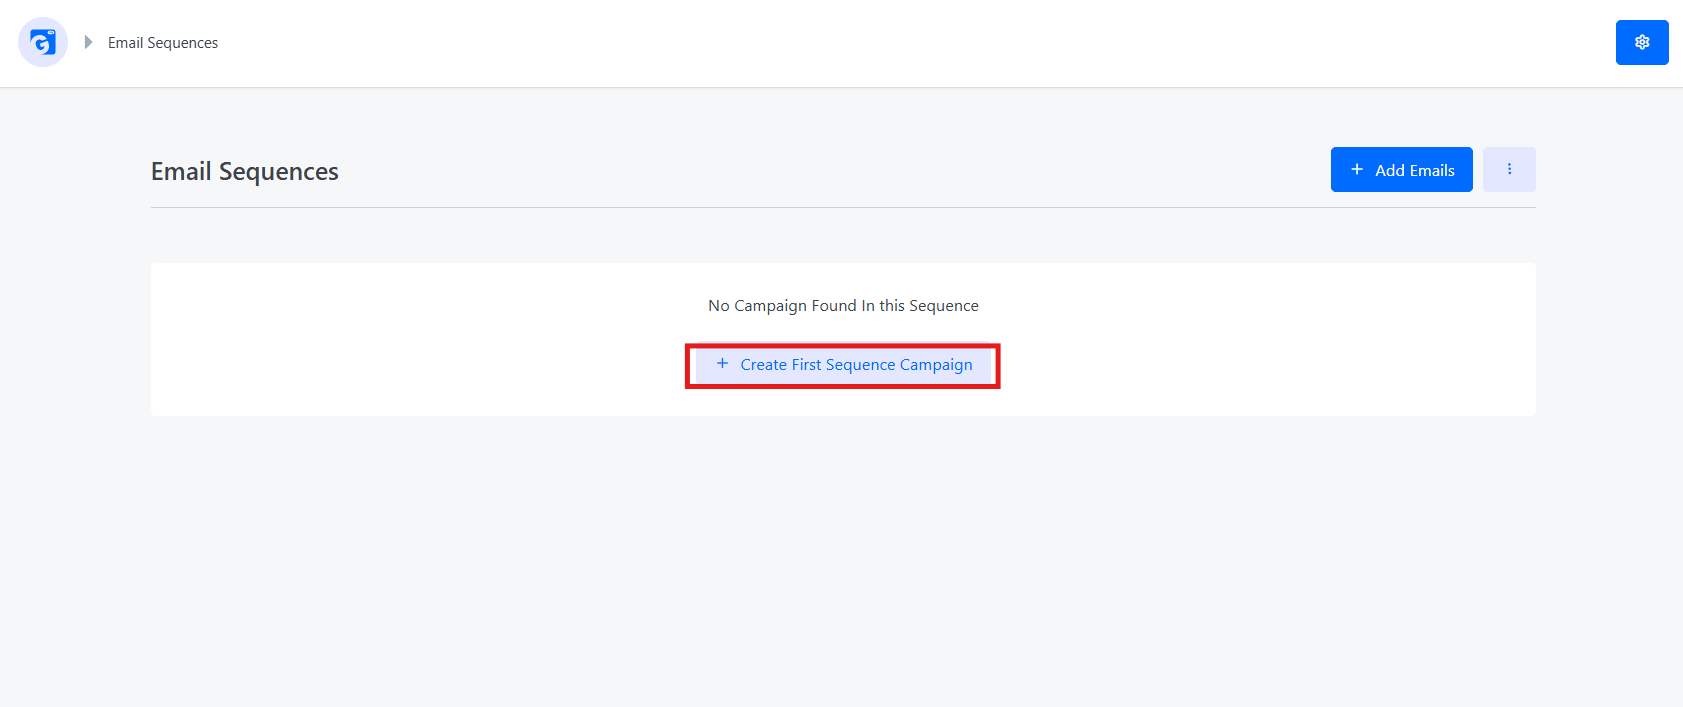
GemCRM opens the Email Sequences screen with “No Campaign Found in this Sequence.” Click + Create First Sequence Campaign to add your first email.
4. Configure Each Email Step
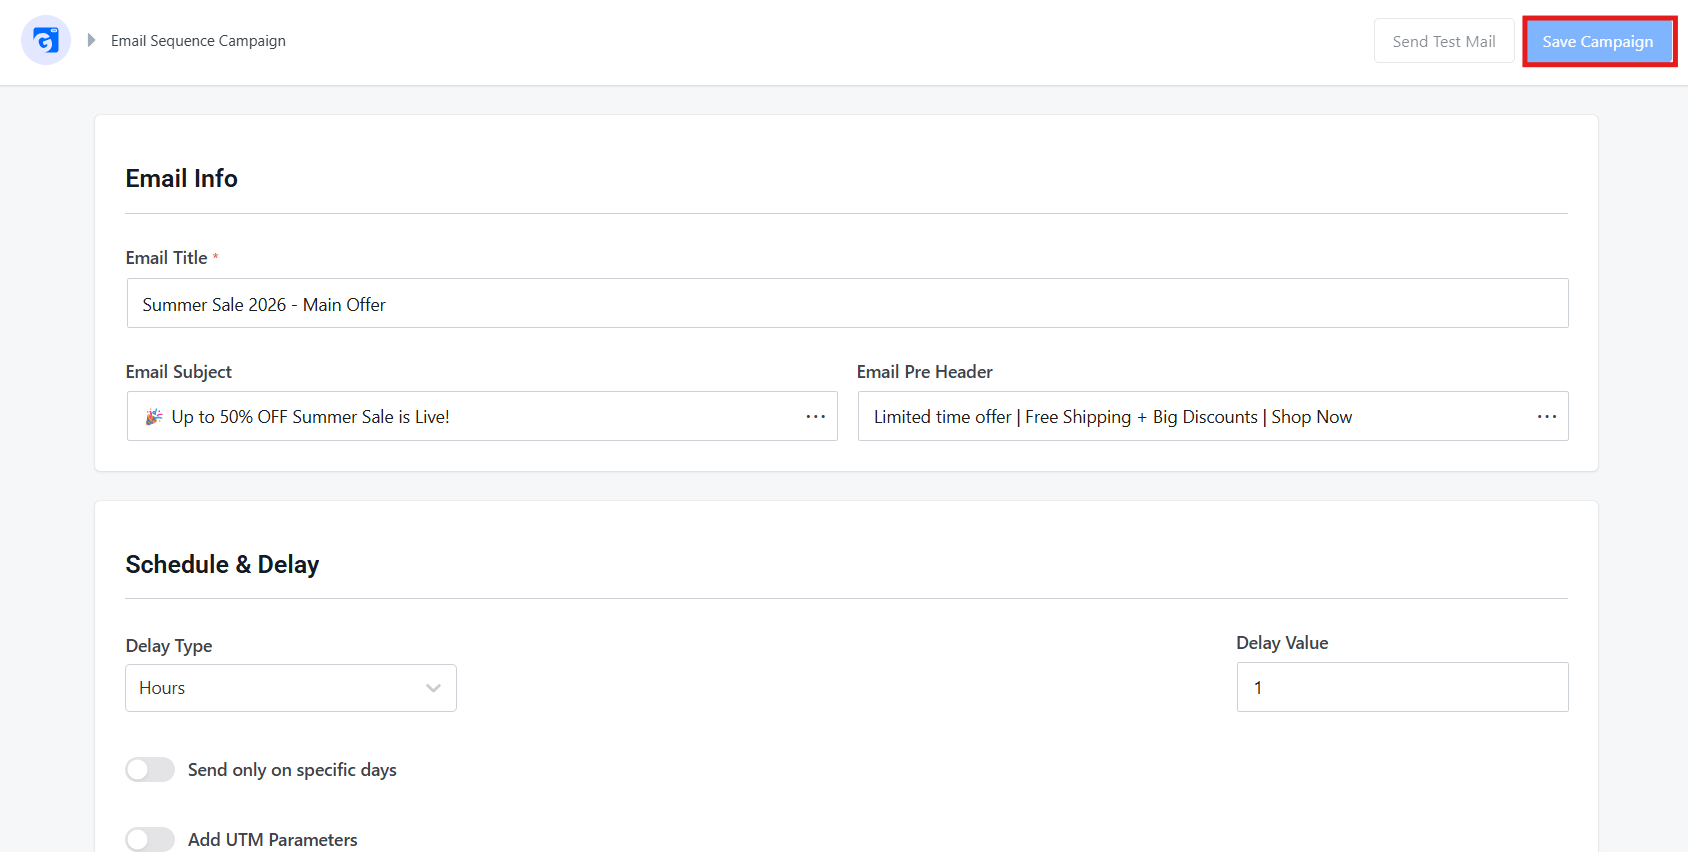
For each email in your sequence, GemCRM provides an Email Sequence Campaign screen with:
Email Info
- Email Title — internal name for this step
- Email Subject — what subscribers see in their inbox
- Email Pre-Header — short preview text below the subject
Schedule & Delay
- Delay Type — Hours, Days, or Weeks
- Delay Value — e.g., 1 hour, 2 days, 5 days
- Send only on specific days — limit sending to selected weekdays
- Add UTM Parameters — auto-track link clicks
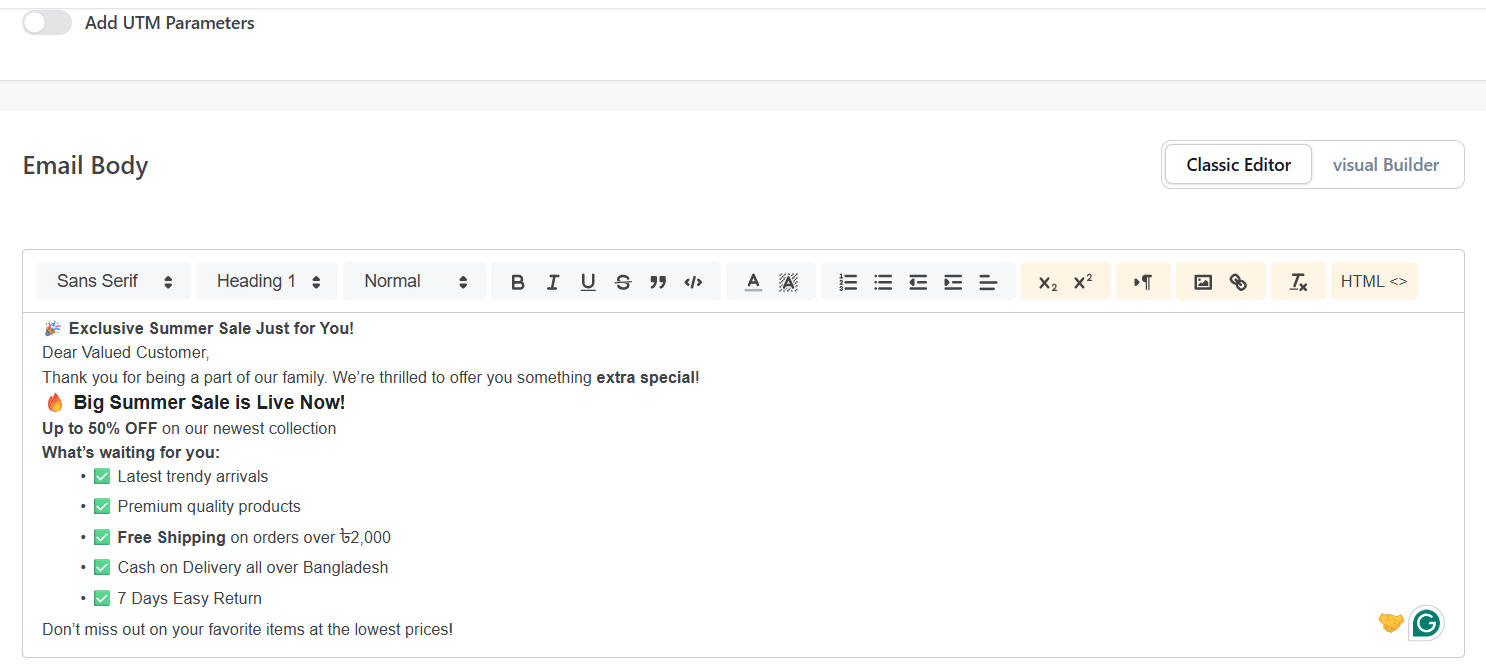
Email Body Write your email with the Classic Editor for simple text, or use the Visual Builder for drag-and-drop layouts.
Once done, click Save Campaign in the top right corner.
5. Build Your Full Welcome Sequence
Repeat this for each email. A simple welcome sequence might look like:
- Email 1 — Delay: 0 hours (immediately): Thank new subscribers, deliver your lead magnet or best content, and set expectations for future emails.
- Email 2 — Delay: 2 days: Share your story or the “why” behind your blog to build trust and connection.
- Email 3 — Delay: 5 days: Send your single most valuable post or resource and let it speak for itself.
- Email 4 — Delay: 10 days: Ask a question like “What are you struggling with?” to spark replies and learn from your audience.
According to GetResponse Email Benchmarks, welcome emails achieve an average open rate of 83.63%, far outperforming any other campaign type. Build this sequence once in GemCRM, and every new subscriber goes through it automatically — no manual work needed.
Step 7: Segment for Better Results
Batch-and-blast email is losing effectiveness. Campaign Monitor finds segmented campaigns can generate up to 760% more revenue than non-segmented ones.
GemCRM makes this easy with built-in Lists, Tags, and Dynamic Segments.
How to Organize and Segment Your Contacts in GemCRM:
1. Go to the Contacts Section
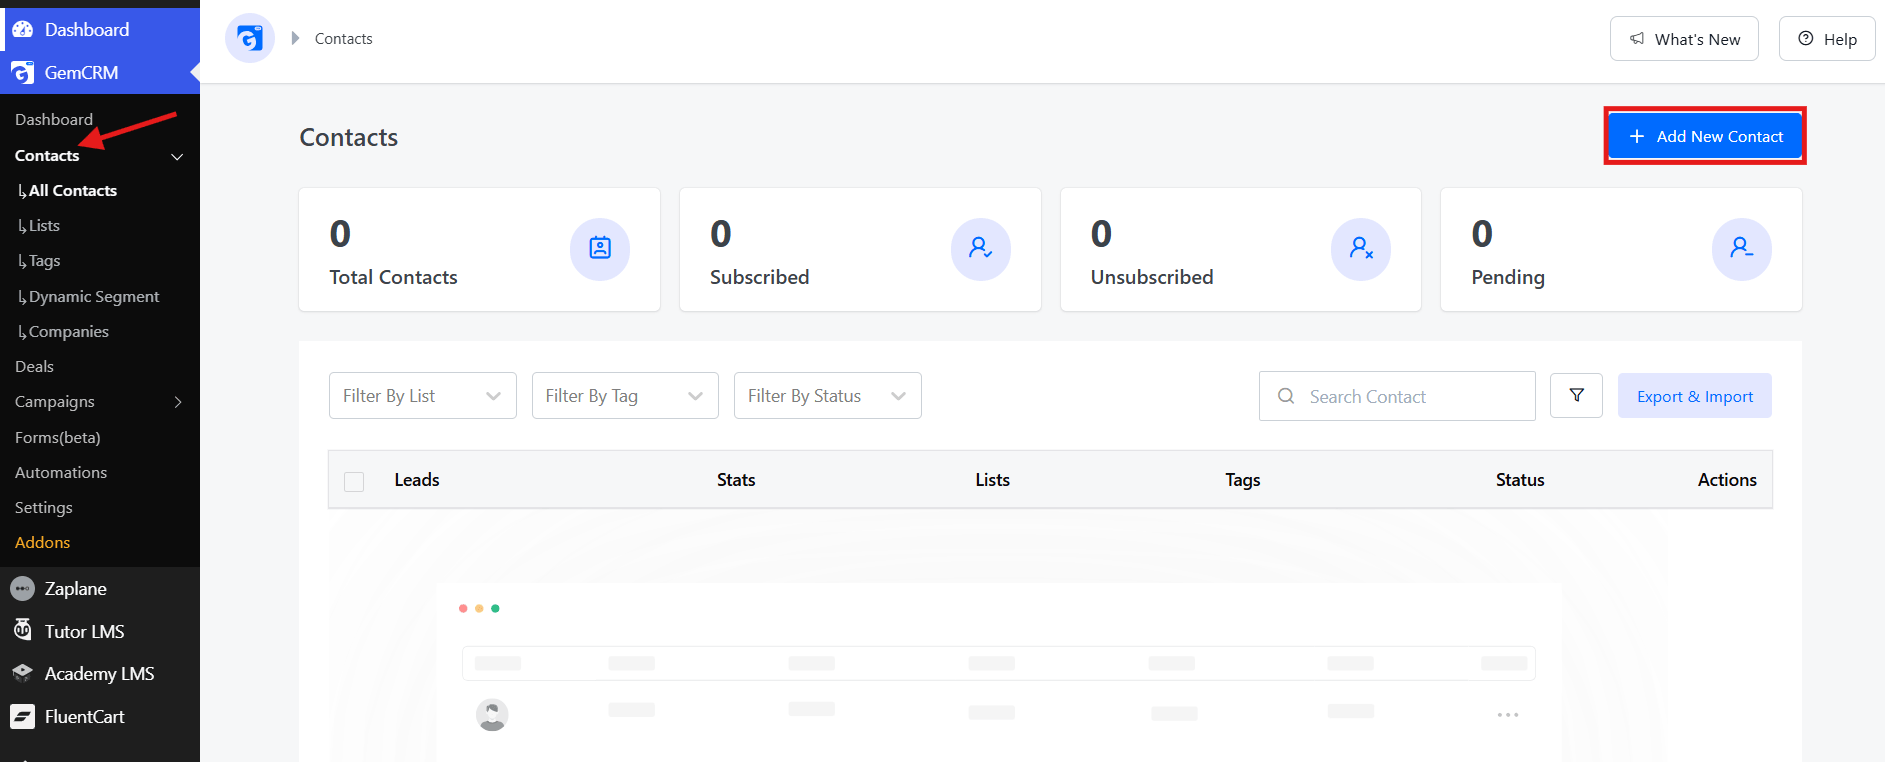
From your WordPress dashboard, go to GemCRM → Contacts → All Contacts to see totals for Subscribed, Unsubscribed, Pending, and more. Use the List, Tag, and Status filters to instantly find any group of contacts.
2. Add Contacts with Lists and Tags
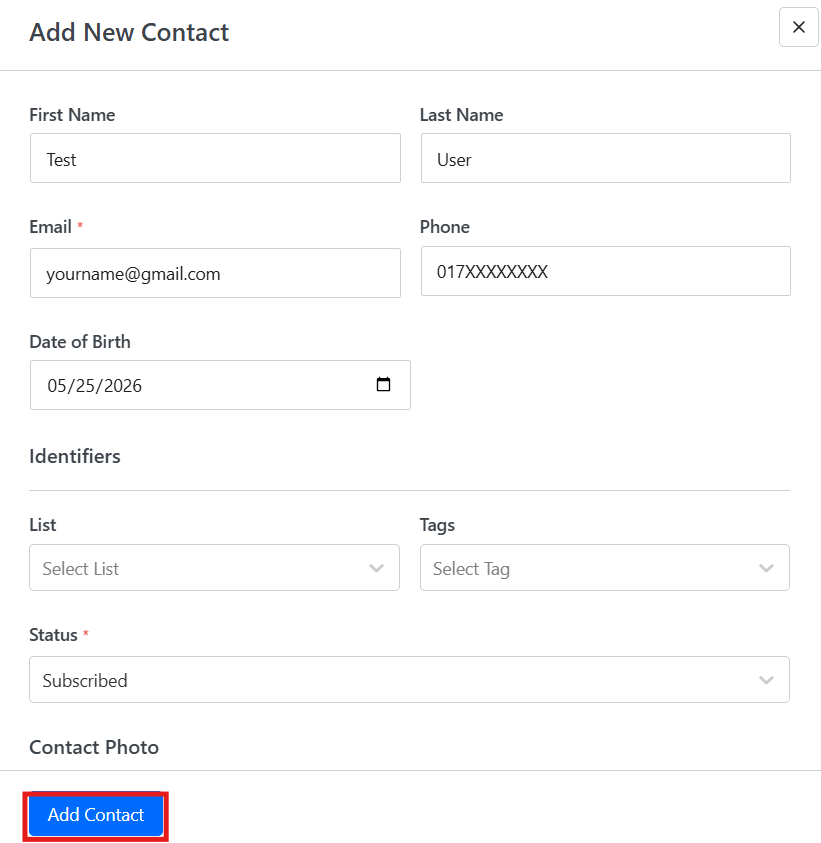
Click + Add New Contact to manually add a subscriber. Enter their basic details, then under Identifiers assign a List and relevant Tags — this is how segmentation starts. Set Status to Subscribed and click Add Contact to save.
Practical Segmentation Examples:
- A personal finance blog separates budgeting vs. investing subscribers and sends each group tailored content.
- A food blog tags subscribers by diet (vegan, keto, gluten-free) and only sends relevant recipes.
- An online educator tags subscribers who downloaded a free guide and follows up with a sequence leading to a paid course.
You do not need dozens of segments. Two or three meaningful audience splits based on actual interest or behavior will consistently outperform a single monolithic list — and GemCRM’s Lists and Tags system makes it easy to build and manage them from day one.
Final Verdict
Sending email campaigns from WordPress is not complicated once the foundation is in place. Install a CRM plugin, connect a reliable SMTP service, authenticate your domain, and build a small, well-organized contact list. From there, a basic welcome sequence and monthly campaign will outperform most of what your competitors are doing.
The tools available inside WordPress today — including self-hosted options like GemCRM and FluentCRM, combined with free SMTP services — mean there is genuinely no reason to pay $50–$100/month to a SaaS platform just to email a list of a few thousand subscribers.
Start simple. Build one sequence. Send one campaign. Look at the data. Then improve.
Frequently Asked Questions
I have a food blog with 800 subscribers. Do I actually need automation, or is a simple monthly newsletter enough?
A monthly newsletter works, but even a simple 3-email welcome sequence will do more for engagement than most ongoing campaigns. New subscribers are most interested in you right after they sign up — that window is worth using. A welcome sequence takes two hours to set up and runs forever.
My WooCommerce store sends order emails, but they often go to spam. Will fixing SMTP help that, too?
Yes. SMTP configuration affects all outgoing emails from WordPress — transactional, order confirmations, password resets, and marketing campaigns. Fixing your SMTP setup improves delivery across the board, not just for campaigns.
I run a membership site. Can I segment emails by membership tier without importing lists manually?
Yes, if your membership plugin and CRM plugin integrate. Most self-hosted WordPress CRM tools can sync WordPress user roles, meaning Gold members, Silver members, and free users can each be tagged and targeted automatically when their role changes.