



SMS marketing has one of the highest open rates of any communication channel — consistently above 90% within the first few minutes of delivery. But most WordPress site owners still treat SMS as something that lives in a separate tool, disconnected from their contacts, segments, and automation workflows.
GemCRM changes that. It is a native WordPress CRM plugin that includes a full SMS campaign system — built directly into your WordPress dashboard. No third-party app switching. No CSV exports. Your contact lists, tags, and audience segments work directly with your SMS campaigns, giving you a tighter and faster messaging workflow than any standalone SMS tool can offer.
This guide walks you through exactly how to set up and send an SMS campaign in GemCRM — from enabling the Messaging module to scheduling your first broadcast.
Before You Begin: Enable Messaging and Configure Your Provider
Before you can send SMS campaigns, two things need to be in place: the Messaging module must be enabled in GemCRM, and you need a configured SMS provider with a valid API key. Here is how to do both.
Step 1 — Enable the Messaging Module
From your WordPress dashboard, go to GemCRM → Addon. Look for the Message addon and make sure the Messaging add-on is toggled on. If it is disabled, the Messaging menu option will not appear in your sidebar. Save your settings after enabling it.
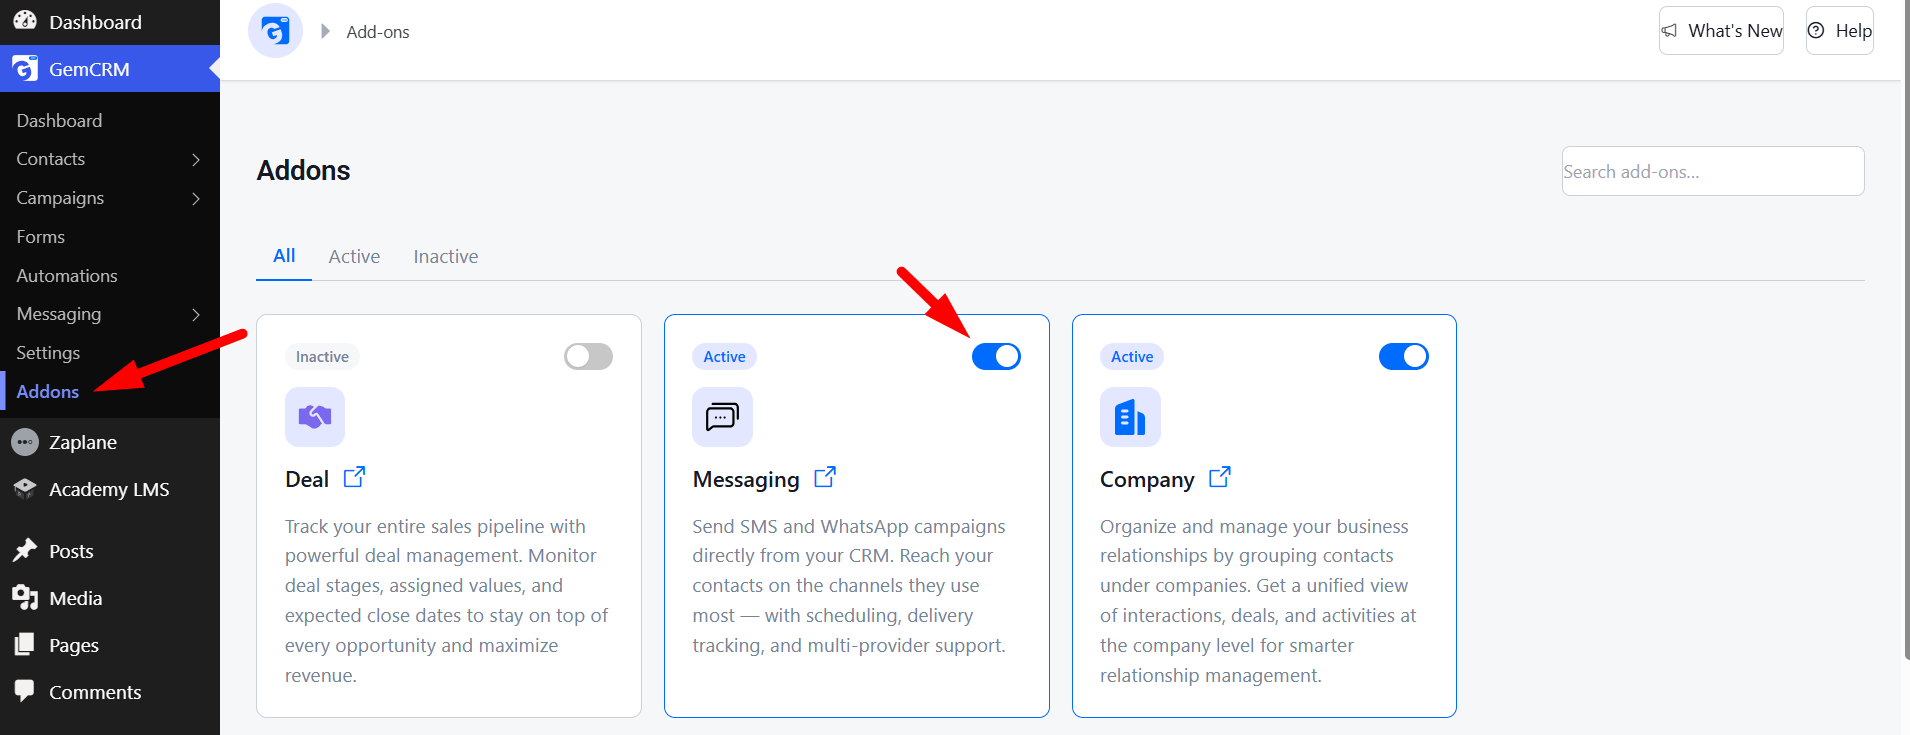
| IMPORTANT The Messaging menu — including the Campaigns option — will only appear in your GemCRM sidebar after you have enabled the Messaging module in Settings. If you do not see it, check your module settings first. |
Step 2 — Set Up Your SMS Provider API
Still in GemCRM → Settings, navigate to the Messaging or Providers settings tab. GemCRM supports popular SMS providers — including Twilio, Vonage, and others — via API. To connect your provider:
1. Select your provider from the dropdown list.
2. Enter your API Key and API Secret (or Account SID and Auth Token, depending on your provider).
3. Enter the sender phone number or sender ID registered with your provider.
4. Click Save to activate the connection.
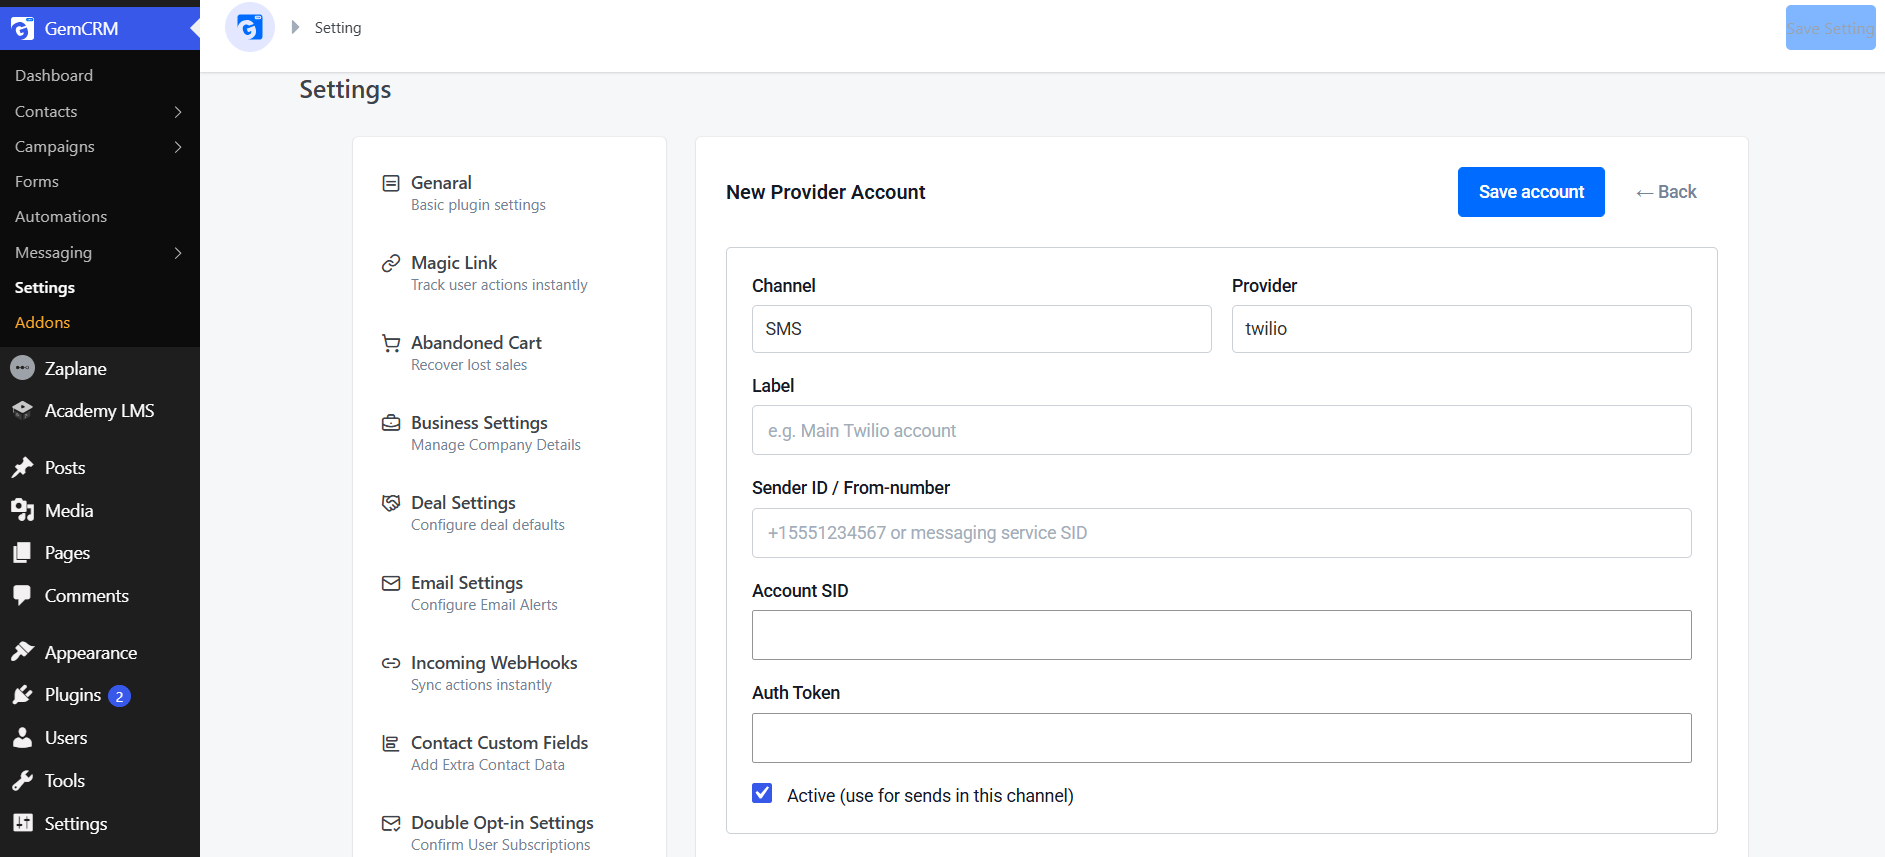
Once saved, GemCRM will list this as your active default provider — which you will see referenced automatically when creating campaigns. You can add multiple provider accounts if needed, and switch between them per campaign.
| TIP Test your provider connection before creating your first campaign. Most SMS providers offer a test API mode or sandbox phone numbers — send a test message first to confirm delivery is working correctly. |
Creating Your SMS Campaign: A 4-Step Walkthrough
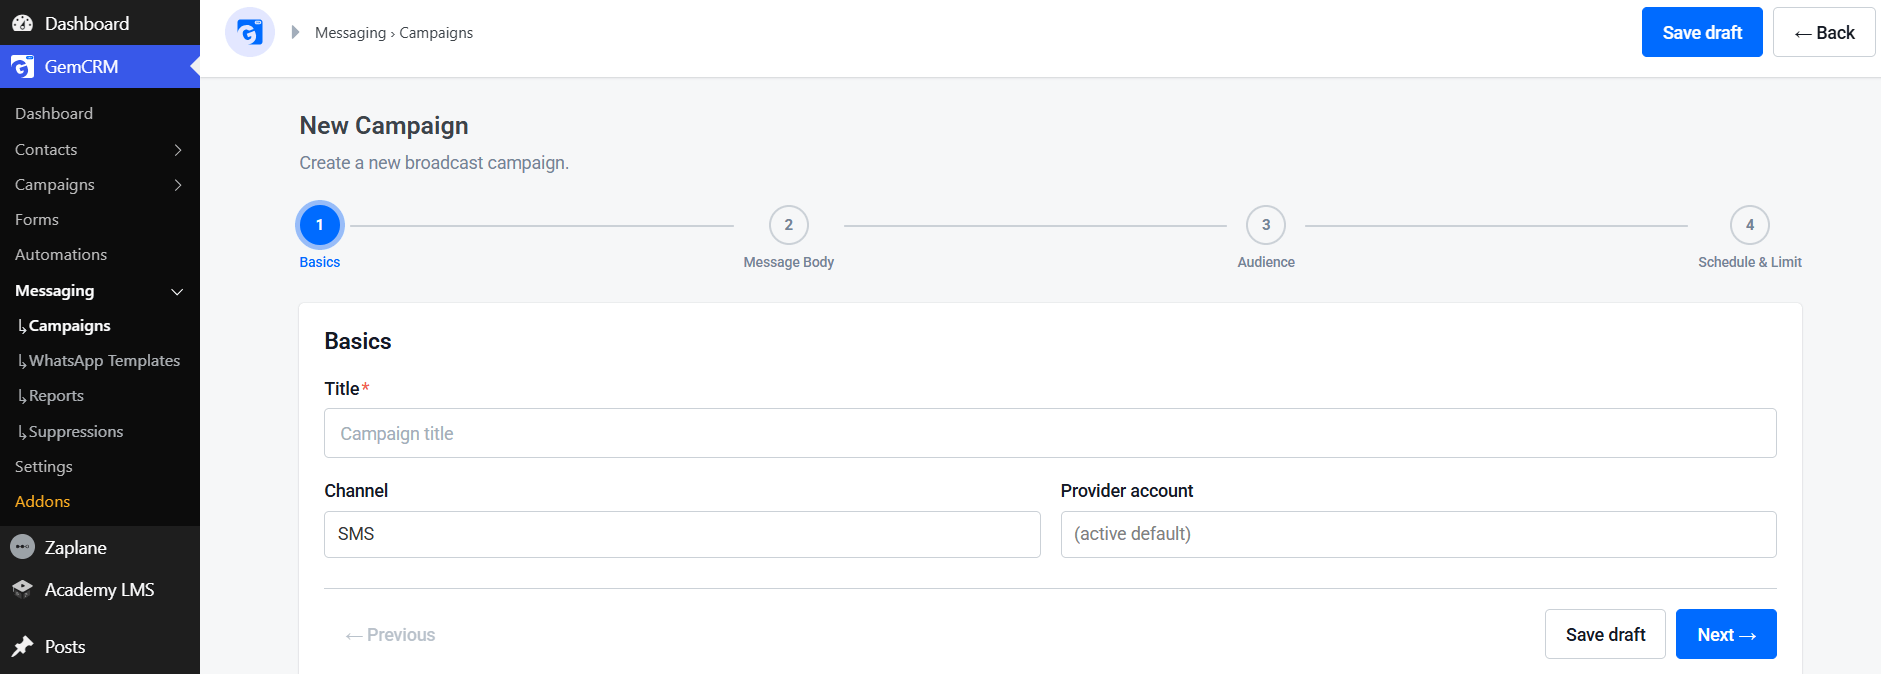
Once Messaging is enabled and your provider is configured, head to GemCRM → Messaging → Campaigns. Click New Campaign to begin. You will be taken through a four-step wizard:
| Step 1: Basics — Name Your Campaign and Select Your Channel This is the starting screen. Fill in: • Title: Give your campaign a clear, descriptive name. This is for your internal reference only — contacts will not see it. • Channel: GemCRM defaults this to SMS. If you have other channels enabled (such as WhatsApp or email), you can select the appropriate one here. • Provider account: GemCRM automatically selects your active default provider — the one you configured in Settings. If you have multiple providers set up, you can choose a specific one from the dropdown. When you are done, click Next to proceed to the Message Body step. |
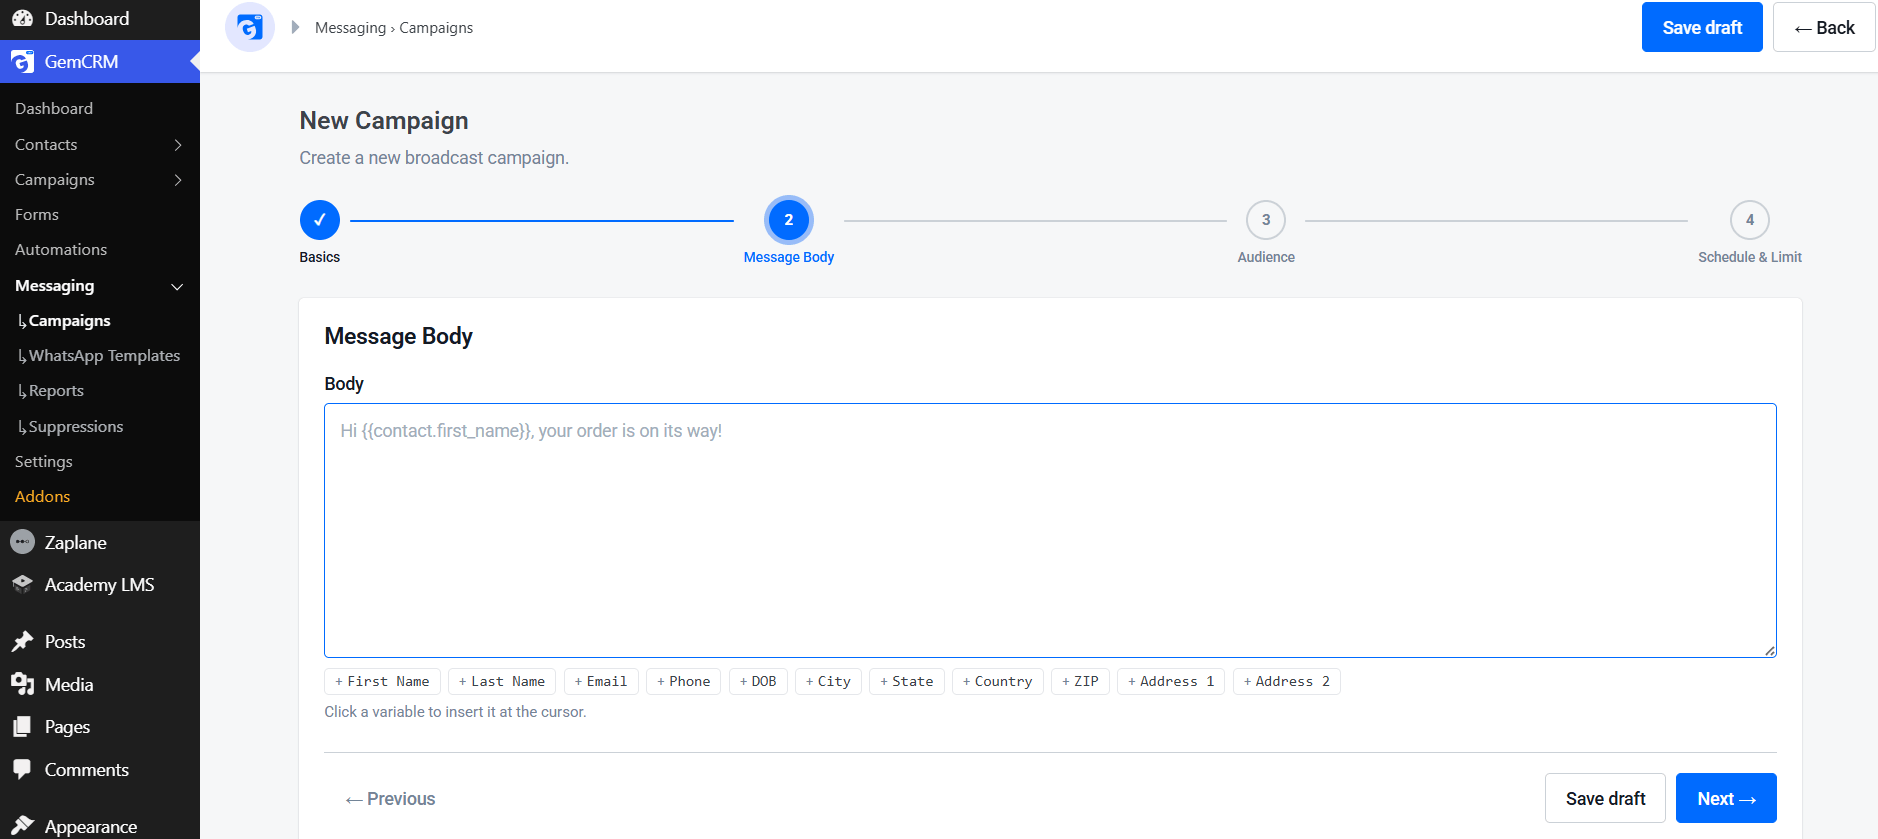
| Step 2: Message Body — Write Your SMS with Personalization Variables This step is where you write the actual message your contacts will receive. The Message Body editor is a simple text field — SMS campaigns are plain text, so there are no formatting options. What makes this powerful is the personalization variable system. Below the text field you will see a row of variable tags: • + First Name • + Last Name • + Phone • + DOB, City, State, Country, ZIP, Address 1, Address 2 Click any variable tag to insert it at your cursor position. For example, clicking + First Name inserts {{contact.first_name}} into your message — which GemCRM automatically replaces with each contact’s actual first name at send time. Example message: Hi {{contact.first_name}}, your order is on its way! Track it here: [link]. Reply STOP to unsubscribe. When your message is ready, click Next to move to the Audience step. |
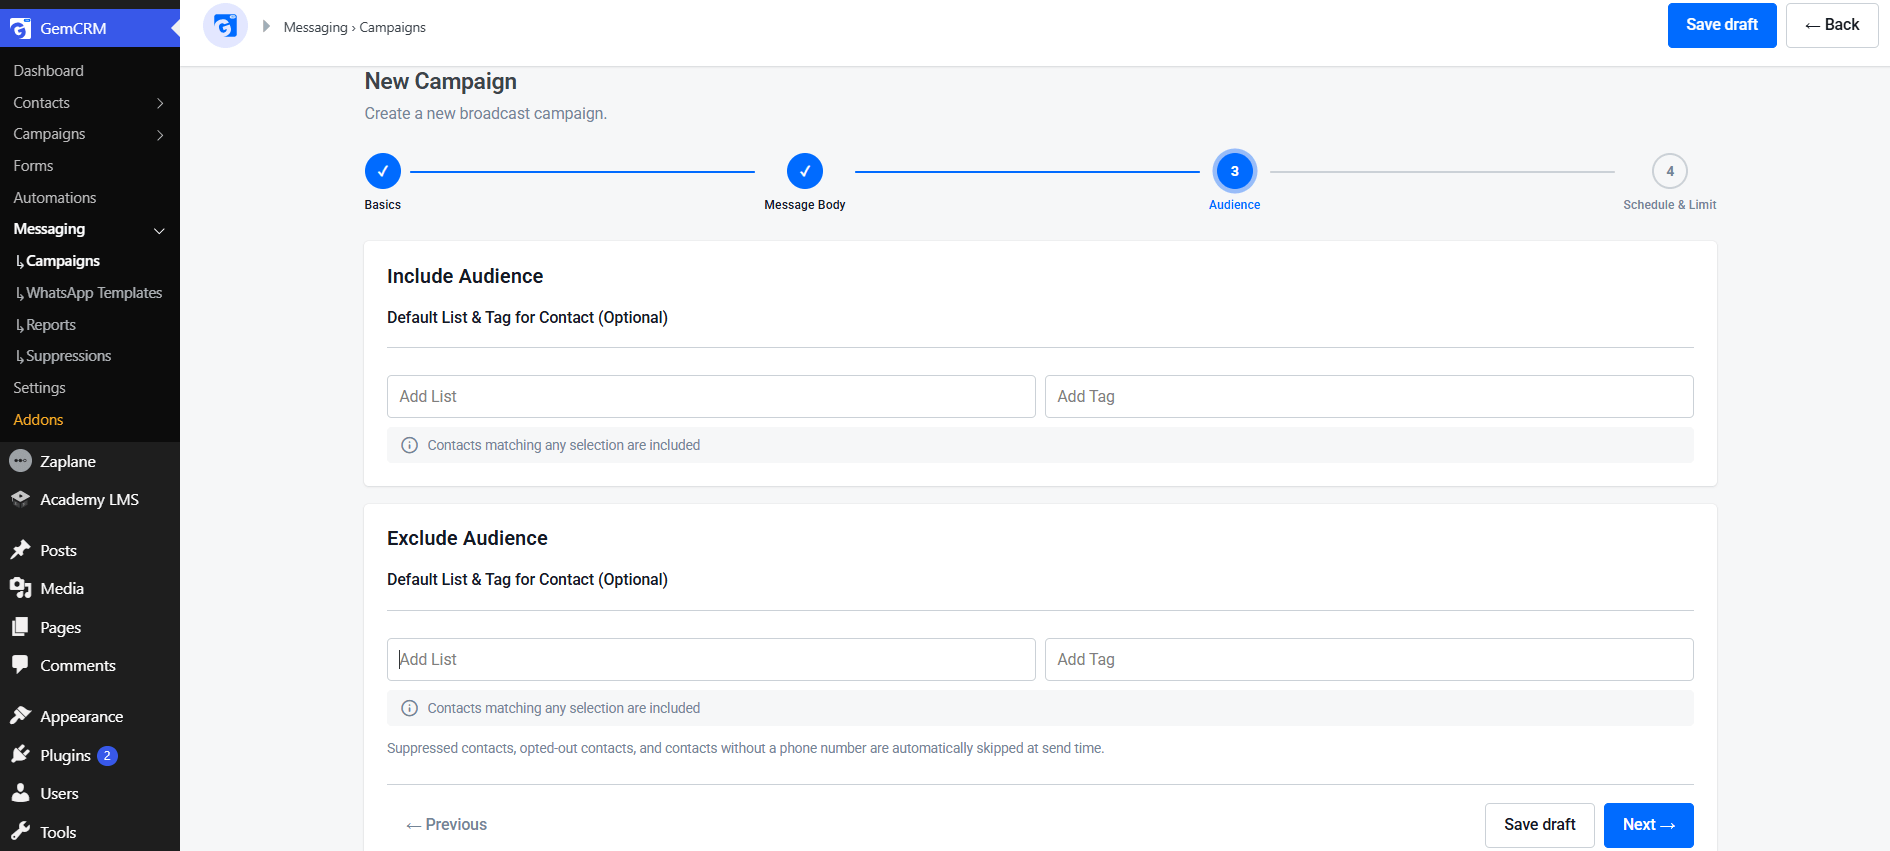
| Step 3: Audience — Choose Who Receives Your SMS Campaign The Audience step gives you precise control over exactly who receives your campaign. It has two sections: Include Audience and Exclude Audience. Include Audience Use the Add List and Add Tag fields to specify which contacts should receive the campaign. You can include contacts by: • List — select one or more contact lists from your GemCRM. • Tag — select one or more tags applied to contacts. Both fields are optional — if you leave them blank, the campaign will be sent to all contacts (subject to the exclusions below). Contacts matching any selection are included. Exclude Audience Use the Exclude section to remove specific segments from your campaign — for example, excluding contacts already tagged as ‘order-complete’ from a cart-recovery campaign. GemCRM also automatically skips the following contacts at send time, regardless of your audience selection: • Suppressed contacts • Opted-out contacts • Contacts without a phone number Once your audience is configured, click Next to proceed to Schedule & Limit. |
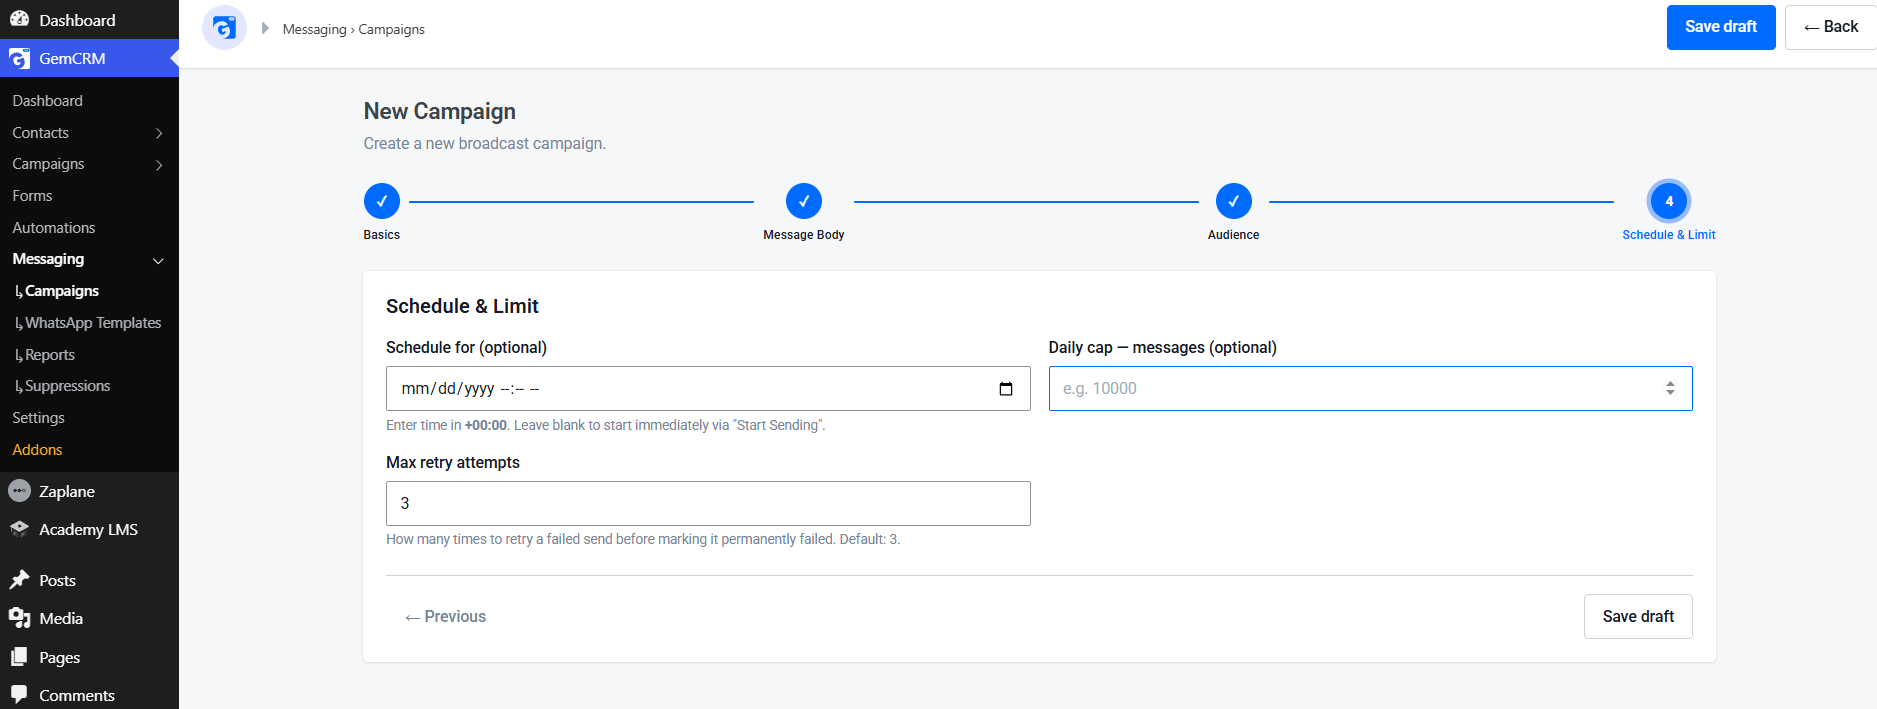
| Step 4: Schedule & Limit — Set When and How Many Messages to Send The final step controls timing and volume. There are three fields: Schedule for (optional) Set a specific date and time for your campaign to send. All times are in +00:00 (UTC). If you leave this field blank, the campaign will not send automatically — you will need to click Start Sending manually from the campaign dashboard. Daily cap — messages (optional) Set a maximum number of messages to send per day. This is useful for large audiences where you want to spread delivery across multiple days to stay within provider rate limits or manage costs. For example, entering 10,000 means GemCRM will send a maximum of 10,000 messages per day until the full audience is reached. Max retry attempts This controls how many times GemCRM will attempt to resend a message if the first attempt fails. The default is 3 — meaning GemCRM will try up to three times before marking a failed send as permanently failed. You can adjust this depending on your provider’s reliability or your use case urgency. When you are satisfied with your scheduling settings, click Save draft to store the campaign for later — or, if you left the schedule blank, go to the campaign dashboard and click Start Sending to launch immediately. |
Sending or Saving Your Campaign
At every step in the campaign wizard, you have two options at the bottom of the screen:
Save draft
Saves your progress without sending or scheduling. You can return to the campaign at any time from GemCRM → Messaging → Campaigns to edit, finalize, or launch it.
Next →
Proceeds to the next step in the wizard. All your changes are preserved as you move through the steps.
Start Sending (from campaign dashboard)
If you did not set a scheduled send time, your campaign will have a Ready status in the campaign list. Click Start Sending from the campaign row to begin delivery immediately.
| PRO TIP Always save a draft first and review it before launching. From the campaign list view, you can preview the full campaign details — message, audience, and schedule — before clicking Start Sending. This extra review step prevents costly sends to the wrong audience or with incorrect personalization variables. |
SMS Campaign Best Practices for WordPress Site Owners
Getting the technical setup right is only half the picture. Here are the practices that separate high-performing SMS campaigns from ones that get ignored — or worse, reported as spam:
• Always include an opt-out instruction in every message. ‘Reply STOP to unsubscribe’ is the standard — and in many countries, legally required. GemCRM automatically skips opted-out contacts, but you still need to give people a clear path to opt out.
• Keep messages under 160 characters when possible. Standard SMS messages are 160 characters. Going over splits your message into multiple segments, which increases delivery cost with most providers.
• Use the First Name variable for every campaign. Personalized messages get significantly higher response rates than generic broadcasts. The {{contact.first_name}} variable takes two seconds to add and measurably improves results.
• Use the Daily cap field for large audiences. If you are sending to more than a few thousand contacts, spreading delivery over multiple days reduces the risk of provider rate-limit errors and keeps costs predictable.
• Test with a small segment first. Before sending to your full audience, use the Include Audience filters to target a small test list — 10 to 50 contacts — and verify delivery, personalization, and link tracking are working correctly.
• Check your Suppressions list regularly. Go to GemCRM → Messaging → Suppressions to see contacts who have opted out or been suppressed. Keeping this list clean protects your sender reputation with your SMS provider.
Start Sending SMS Campaigns From WordPress Today
Sending targeted, personalized SMS campaigns directly from your WordPress dashboard is one of the most practical ways to reach your audience in real time — and with GemCRM, the entire process lives where the rest of your contact management already happens. No tab switching. No data exports. No separate tool subscriptions.
The four-step campaign wizard — Basics, Message Body, Audience, and Schedule & Limit — keeps the process straightforward whether you are sending a quick order notification to 50 contacts or a segmented promotional campaign to thousands.
Once you have enabled the Messaging module and connected your provider, your first campaign takes less than five minutes to build. That is a setup cost worth paying once for a channel that continues delivering results every time you use it.
Frequently Asked Questions
Where do I enable SMS campaigns in GemCRM?
Go to GemCRM → Settings and enable the Messaging module. Once enabled, the Messaging menu will appear in your sidebar with Campaigns, WhatsApp Templates, Reports, and Suppressions sub-options.
Which SMS providers does GemCRM support?
GemCRM connects to popular SMS providers via API — including Twilio, Vonage, and others. Go to GemCRM → Settings → Messaging/Providers to configure your provider’s API key and sender number. You can set one as the active default, which is automatically selected when creating new campaigns.
Can I personalize SMS messages with contact data?
Yes. The Message Body step provides a row of personalization variables — First Name, Last Name, Email, Phone, DOB, City, State, Country, ZIP, Address 1, and Address 2. Click any variable to insert it at your cursor. GemCRM replaces each variable with the contact’s actual data at send time.
What happens to contacts without a phone number?
GemCRM automatically skips any contact without a phone number at send time, regardless of your audience selection. Similarly, suppressed contacts and opted-out contacts are also automatically excluded — no manual filtering required.
Can I schedule SMS campaigns for a future time?
Yes. In the Schedule & Limit step (Step 4), use the ‘Schedule for’ date and time picker to set a future send time. All times are in UTC (+00:00). If you leave this blank, the campaign stays in a ‘Ready’ status and you can launch it manually by clicking Start Sending from the campaign list.
What is the Daily cap setting for?
The Daily cap field limits how many messages GemCRM sends per day for that campaign. This is useful for large audiences where you want to spread sends over multiple days to stay within your SMS provider’s rate limits or manage daily costs. For example, setting a cap of 5,000 will send 5,000 messages per day until your full audience has been reached.
Can I send to specific contact lists or tags only?
Yes. In the Audience step, use the Include Audience section to select specific contact lists or tags. Only contacts matching your selection will receive the campaign. You can also use the Exclude Audience section to remove specific lists or tags from your send — useful for suppressing recent buyers from a promotional campaign.