




Creating an online course is only the first step. As your student base grows, managing enrollments, communication, and follow-ups manually becomes difficult.
A CRM helps solve this problem by organizing student information and automating communication. For Academy LMS users, GemCRM provides contact management, email marketing, and automation directly inside WordPress. When connected through Zaplane, student activities in Academy LMS can automatically trigger actions inside GemCRM.
This guide shows how to connect Academy LMS with GemCRM, automate student enrollment, and manage student communication using a simple workflow.
Why Course Creators Need a CRM
After students enroll, course creators usually need to send welcome emails, organize learners into groups, share course updates, and follow up with inactive students. Doing this manually becomes difficult as enrollments increase.
A CRM helps by:
- Storing student information in one place.
- Organizing learners with lists and tags.
- Automating email communication.
- Sending targeted messages to specific student groups.
- Reducing repetitive administrative work.
Instead of switching between multiple tools, course creators can manage both learning and communication from the same WordPress website.
What Makes a Great CRM for Course Creators?
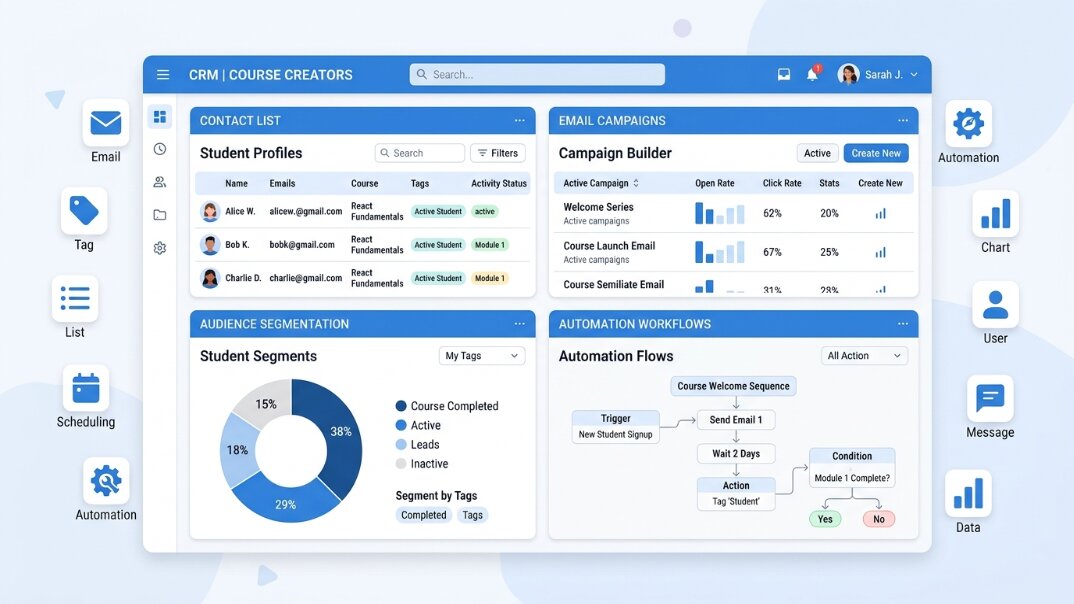
Not every CRM is designed for education businesses. Online course creators need a solution that combines contact management, email marketing, automation, and audience segmentation in one place. A WordPress-native CRM like GemCRM makes it easier to manage student relationships without relying on multiple disconnected tools.
Key capabilities to look for:
- Contact management with detailed student profiles
- Audience segmentation by course, stage, or behavior
- Email campaigns with customizable templates
- Automated multi-step email sequences
- Onboarding workflows triggered by enrollment
- Campaign scheduling and delivery management
- Personalized communication based on learner data
- A centralized dashboard for managing everything
For WordPress users, having all these features built into your existing site is especially valuable — it removes the need to jump between disconnected tools.
Connect Academy LMS with GemCRM
GemCRM connects with Academy LMS through Zaplane, a WordPress automation plugin that allows events from one plugin to trigger actions in another.
Before creating an automation, make sure the following plugins are installed and activated:
- Academy LMS
- GemCRM
- Zaplane
After activating all three plugins, connect Academy LMS and GemCRM inside Zaplane. Once connected, Zaplane can listen for student activities in Academy LMS and perform actions in GemCRM automatically.
Before You Start
Before creating your first automation, make sure your WordPress website is properly configured.
You should have:
- Academy LMS installed and activated.
- GemCRM installed and activated.
- Zaplane installed and activated.
- At least one published Academy LMS course.
- A configured GemCRM contact list for enrolled students.
- A welcome email automation created in GemCRM (optional but recommended).
Once everything is ready, you can build your automation workflow.
Create Your First Automation
Create a new workflow in Zaplane using the following configuration.
Trigger
User enrolled in a course (Academy LMS)
Actions
- Create Contact (GemCRM)
- Apply List (GemCRM)
- Apply Tag (GemCRM)
- Send Email (GemCRM)
After publishing the workflow, every new learner who enrolls in an Academy LMS course will automatically be processed by GemCRM.
Workflow 1 — Automatically Sync Student Enrollments
Workflow Overview
User enrolled in a course → Create Contact → Apply List → Apply Tag → Send Email
Step 1 — Set Up the Enrollment Trigger
The workflow kicks off the moment a learner enrolls in an Academy LMS course. Here’s exactly how to set that trigger up inside Zaplane:
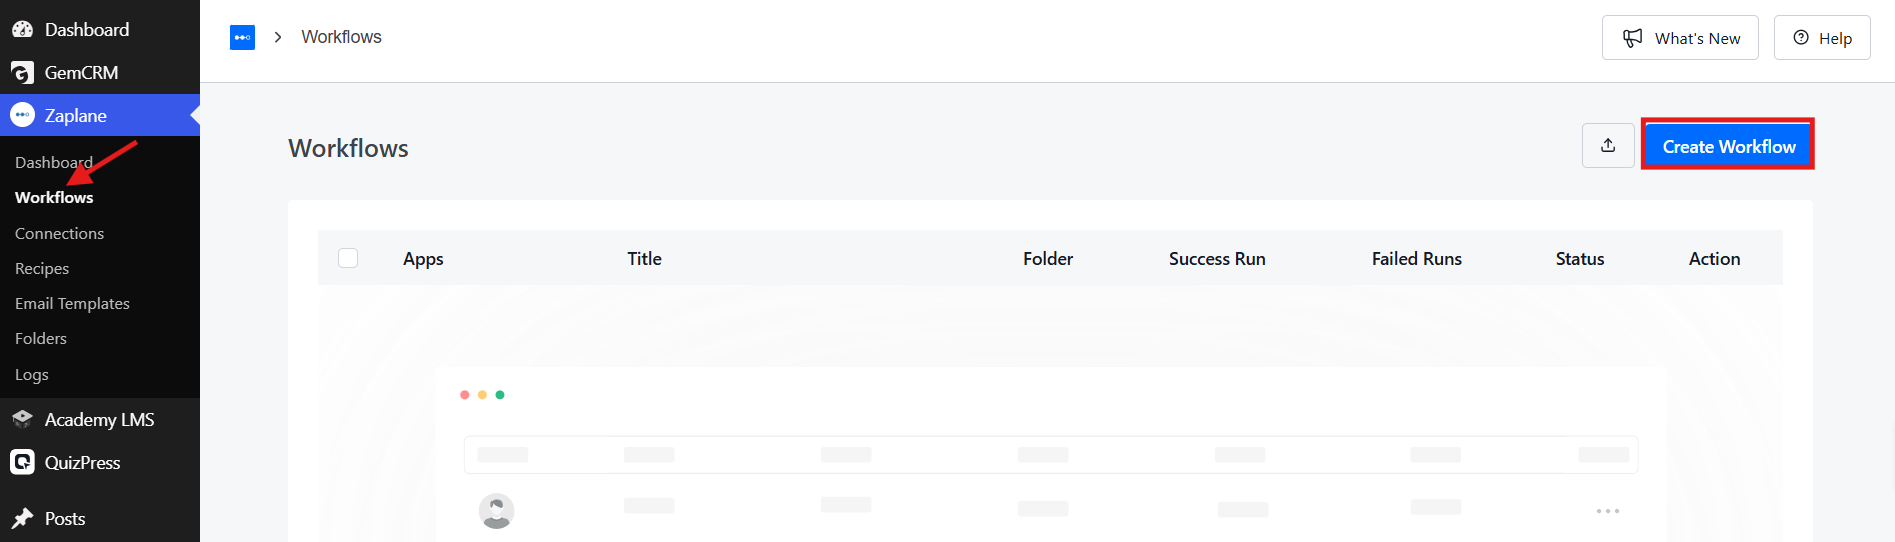
- Go to Zaplane → Workflows in your WordPress dashboard, then click the “Create Workflow” button in the top right corner.
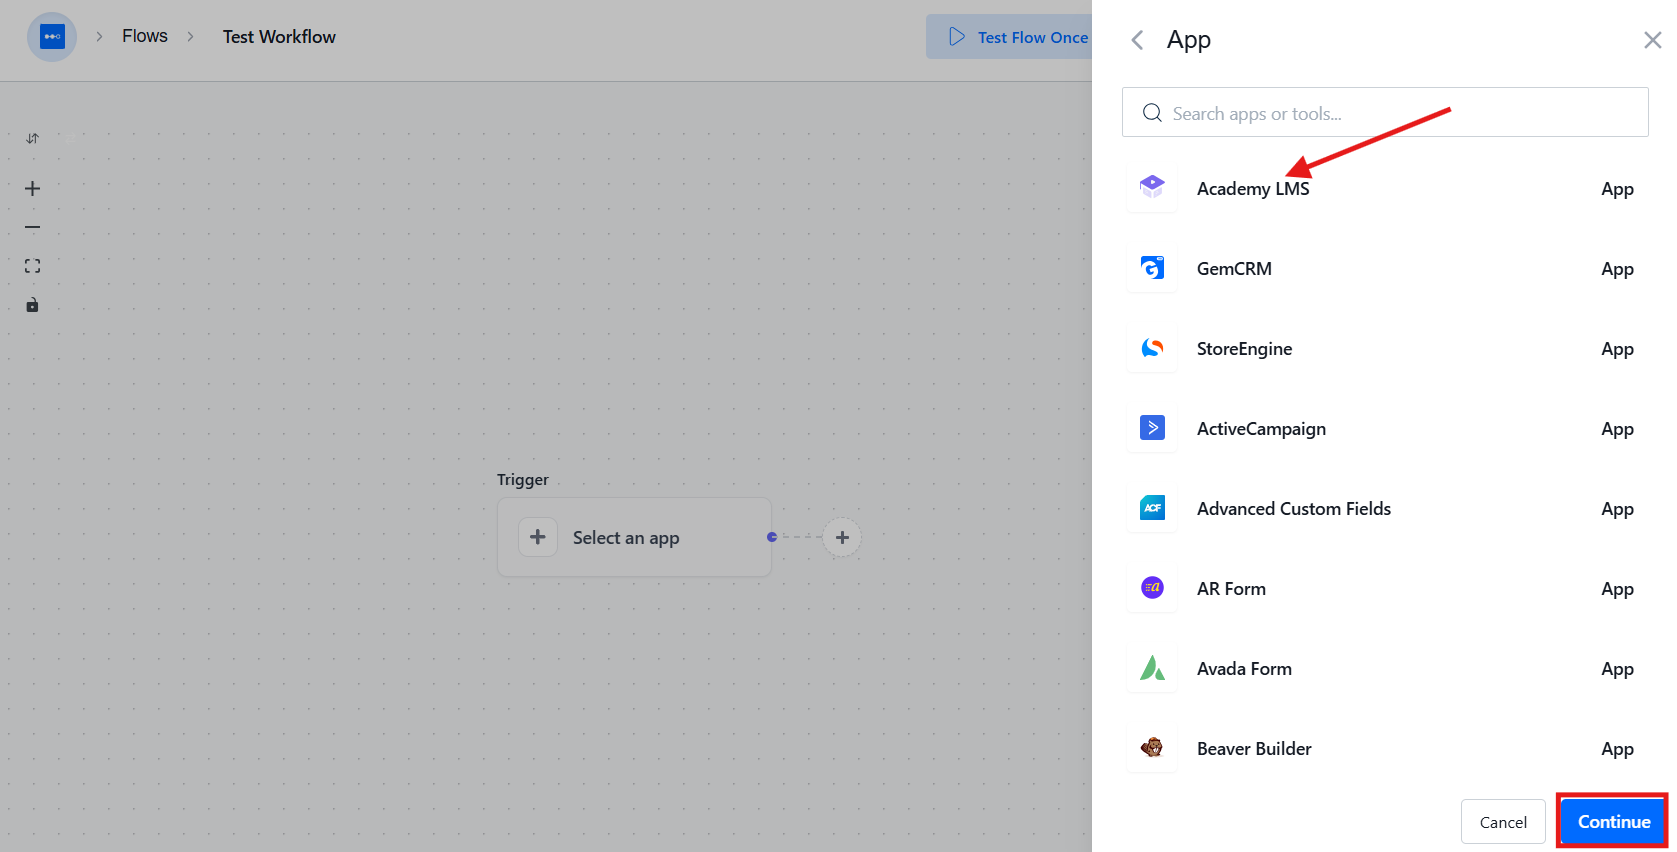
- On the blank workflow canvas, click the Trigger box (“Select an app”) and choose Academy LMS from the list of available apps.
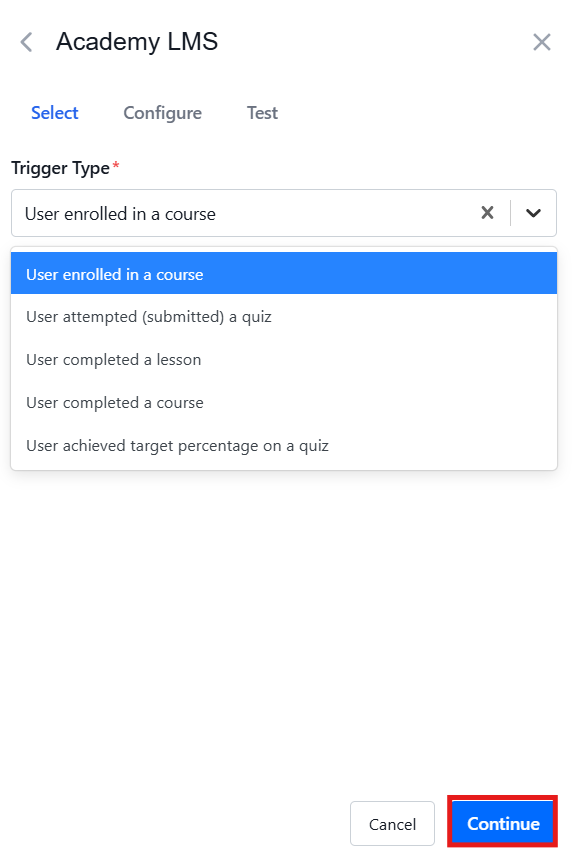
- Under the Select tab, set Trigger Type to “User enrolled in a course,” then click Continue.
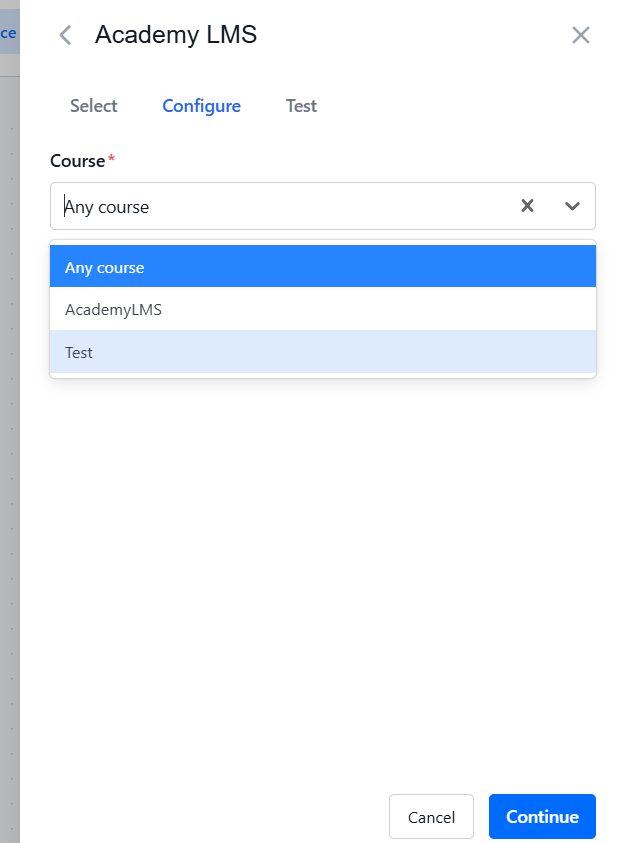
- Switch to the Configure tab and choose which course this trigger should apply to — pick “Any course” if you want the automation to run for every course, or select a specific one. Click Continue.
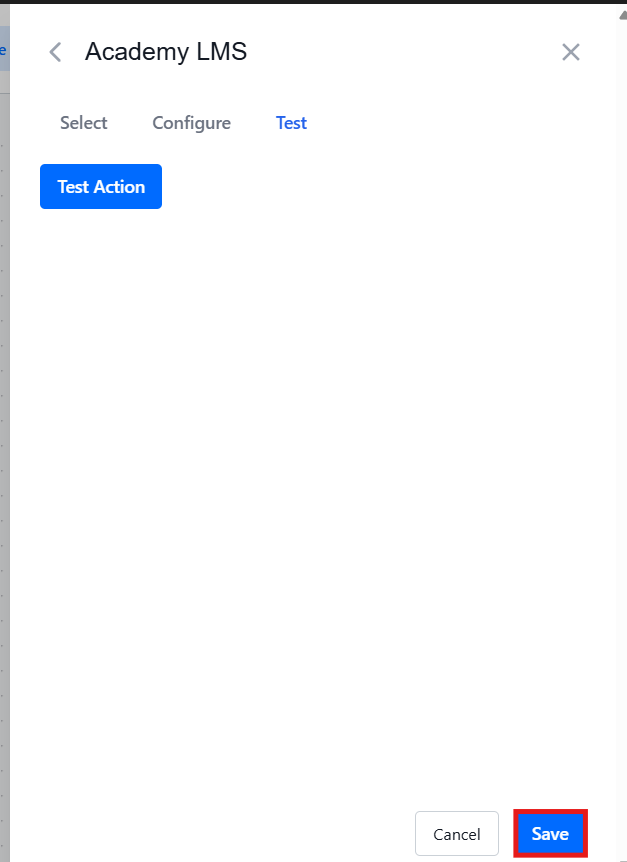
- Go to the Test tab and click “Test Action” to confirm Zaplane can correctly detect an enrollment, then click Save.
- Back on the workflow canvas, you’ll now see the trigger block labeled “User Enroll Course” (academy), and the workflow status will show as Active.
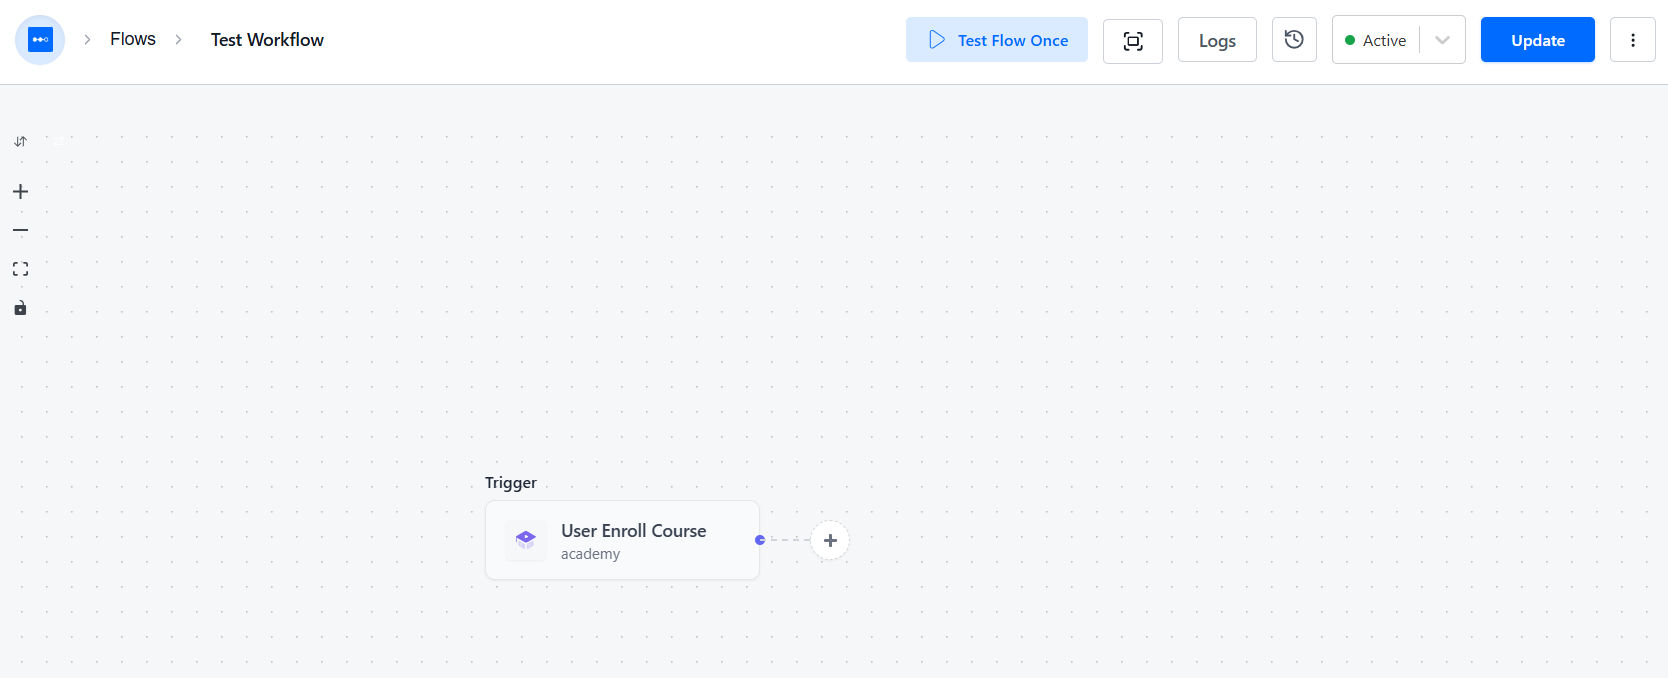
Once this trigger is in place, Zaplane will automatically pick up every new enrollment and kick off the rest of the automation you build.
Step 2 — Create Contact
Once the trigger is in place, add an action that creates the student as a contact in GemCRM. Here’s how:
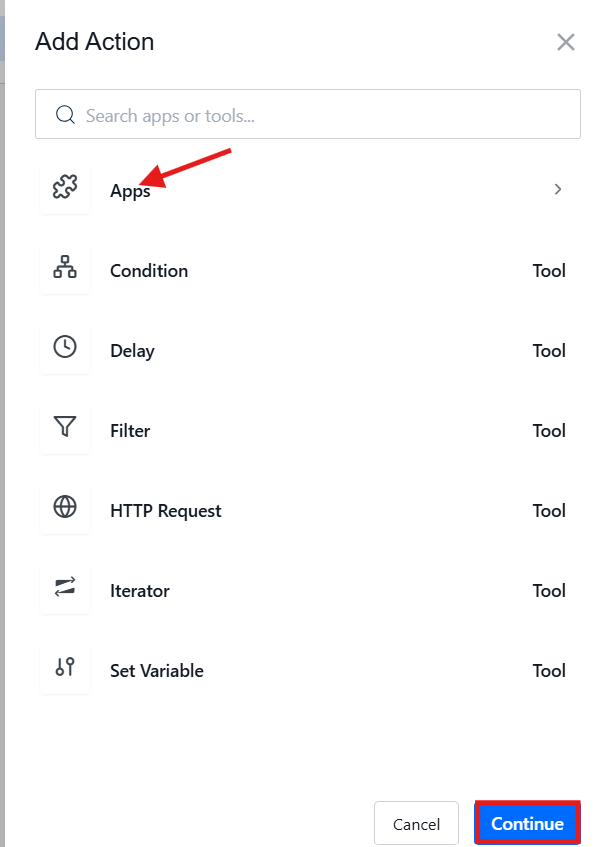
- Add a new action. Click the “+” icon after the trigger to open the Add Action panel, then select Apps.
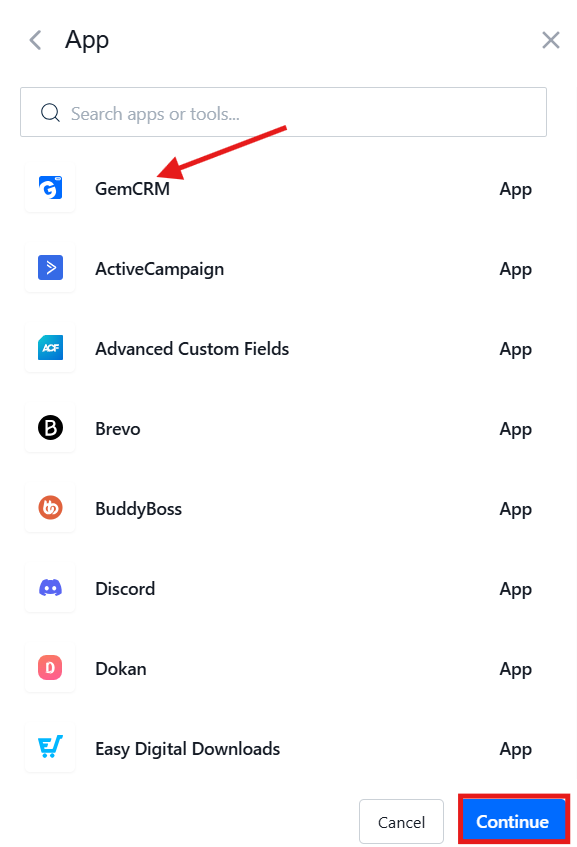
- Select the action app. From the app list, choose GemCRM, then click Continue.
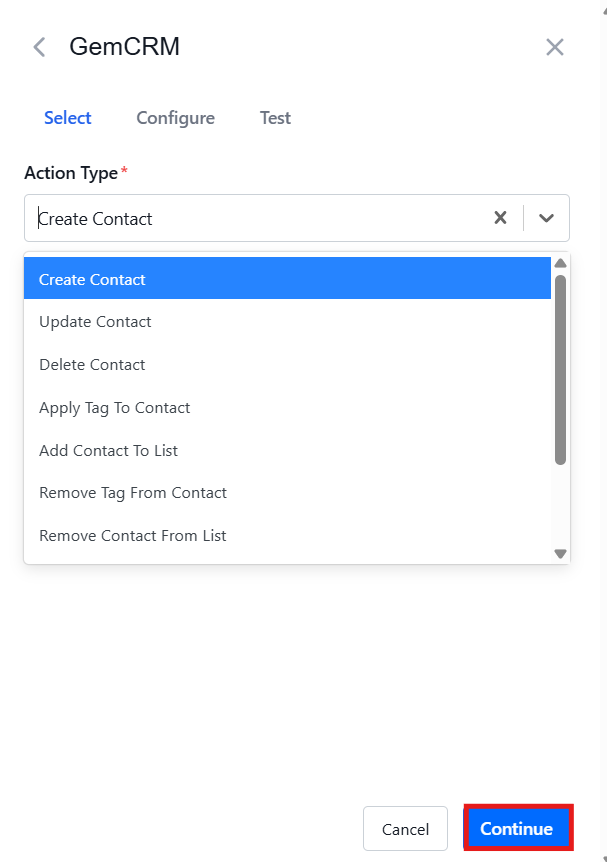
- Choose the action type. Under the Select tab, set Action Type to “Create Contact,” then click Continue.
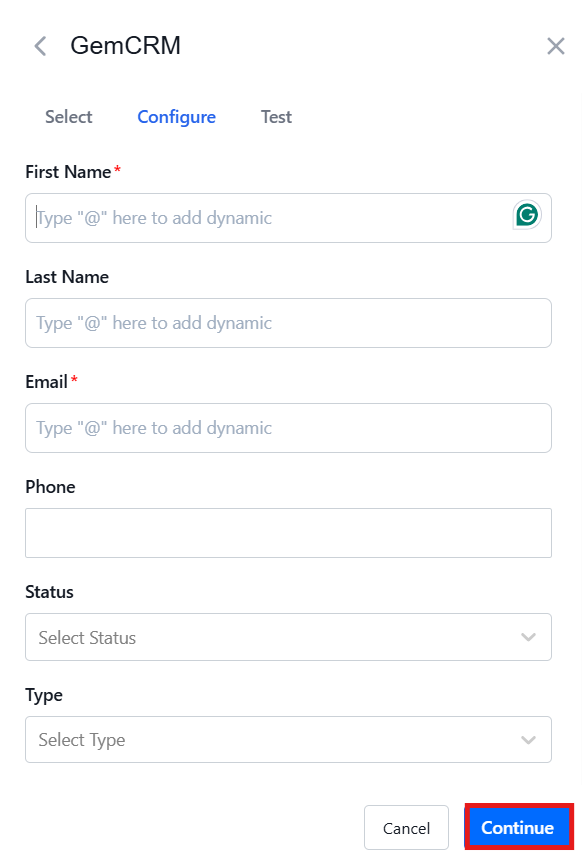
- Configure the contact fields. Switch to the Configure tab and map the student’s enrollment data into GemCRM’s contact fields — First Name, Last Name, and Email (Email is required, along with First Name). You can also set Phone, Status, and Type if needed. Use the dynamic data option (type “@”) to pull these values directly from the Academy LMS trigger. Click Continue.
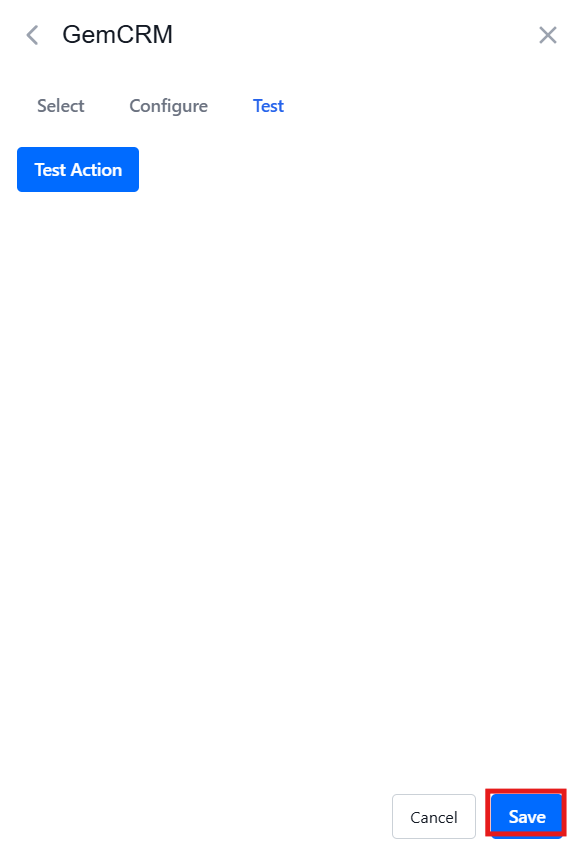
- Test the action. Go to the Test tab and click “Test Action” to confirm a contact is created correctly in GemCRM, then click Save.
- Confirm the action is added. Back on the workflow canvas, you’ll now see “Create Contact” (GemCRM) connected right after the “User Enroll Course” trigger.
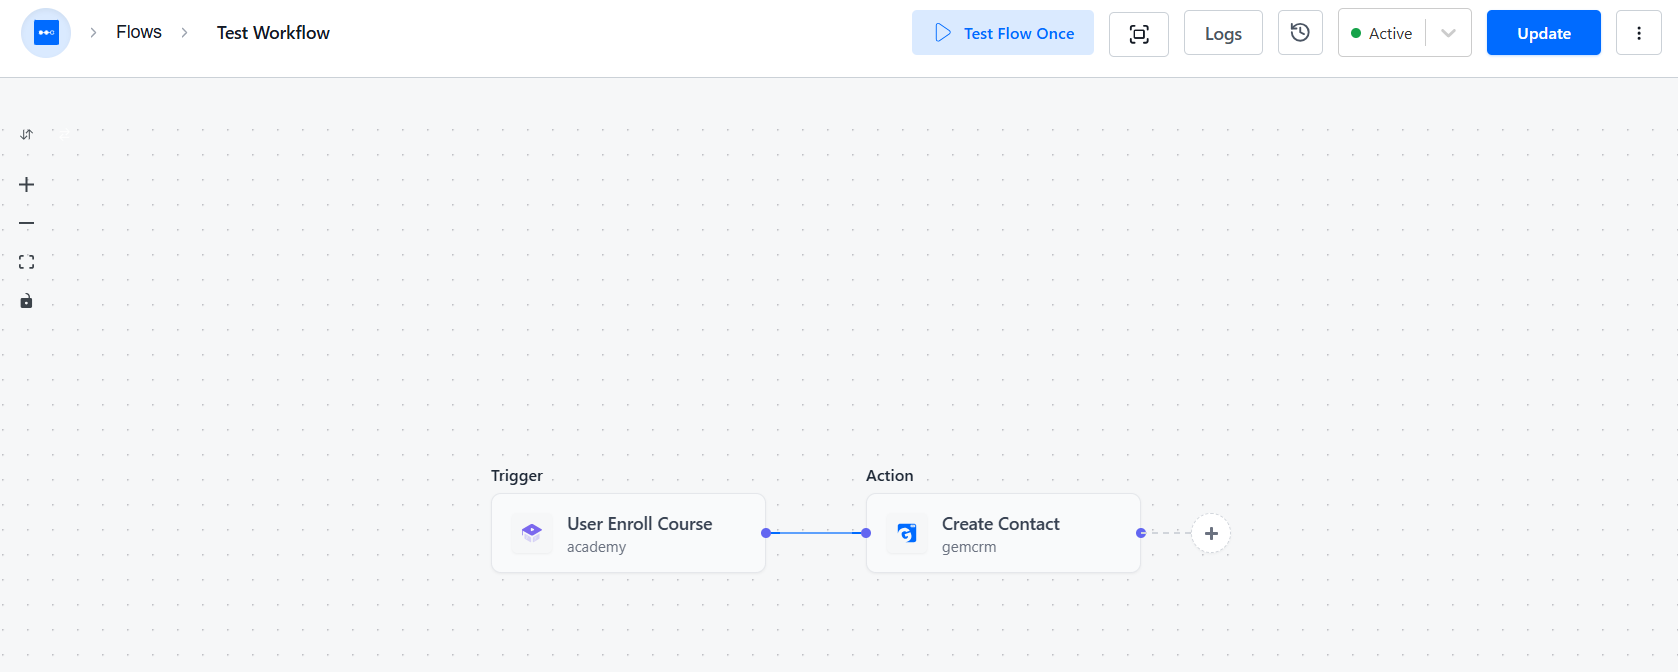
With this step configured, every new enrollment automatically creates a matching contact record in GemCRM, ready for the next steps in the workflow.
Step 3 — Apply List
With the contact now being created, add a next action that adds the student to a chosen contact list in GemCRM. Here’s how:
- Add another GemCRM action. Just like before, click the “+” icon after “Create Contact,” select Apps, and choose GemCRM again, then click Continue.
- Choose the action type. Under the Select tab, set Action Type to “Add Contact To List,” then click Continue.
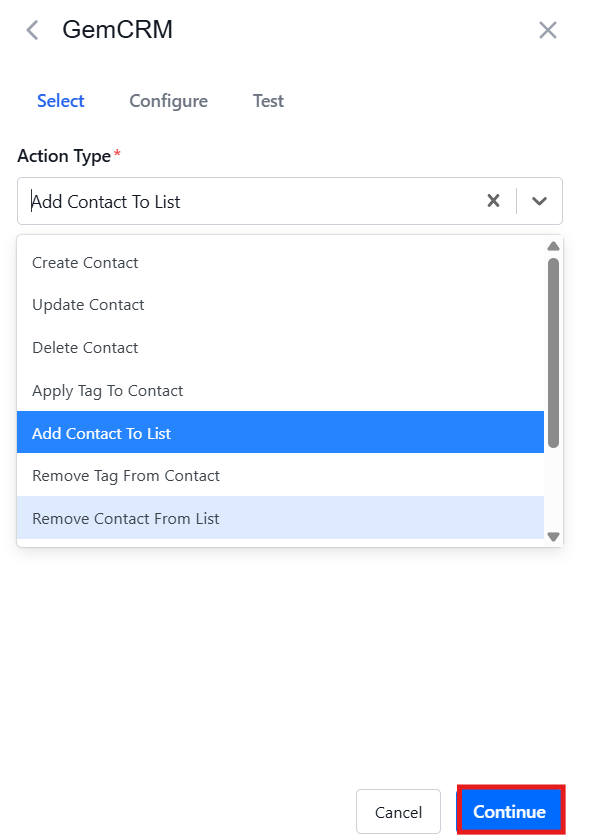
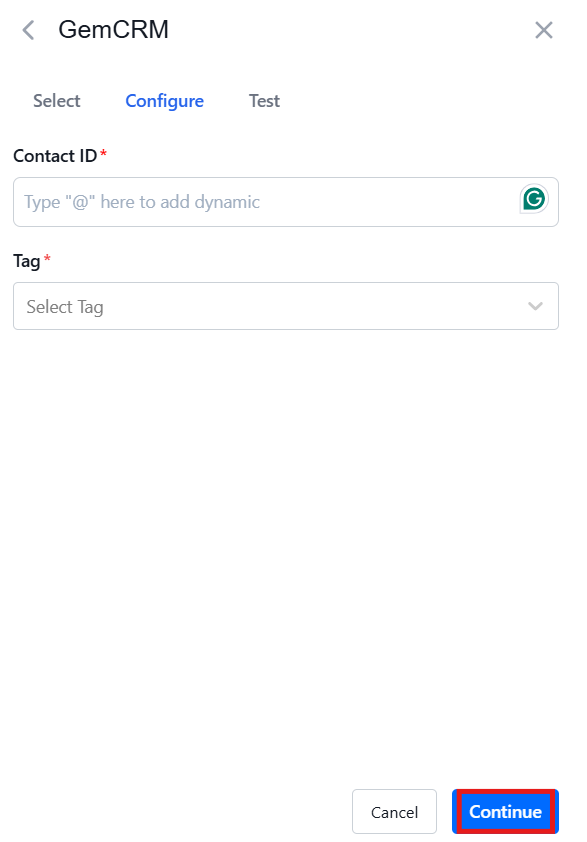
- Configure the list. Switch to the Configure tab. Set Contact ID using dynamic data (type “@”) to pull in the contact created in the previous step, then choose the List you want the student added to from the dropdown. Click Continue, then test and save the action.
- Confirm the action is added. Back on the workflow canvas, you’ll now see all three blocks connected in order: User Enroll Course → Create Contact → Apply List.
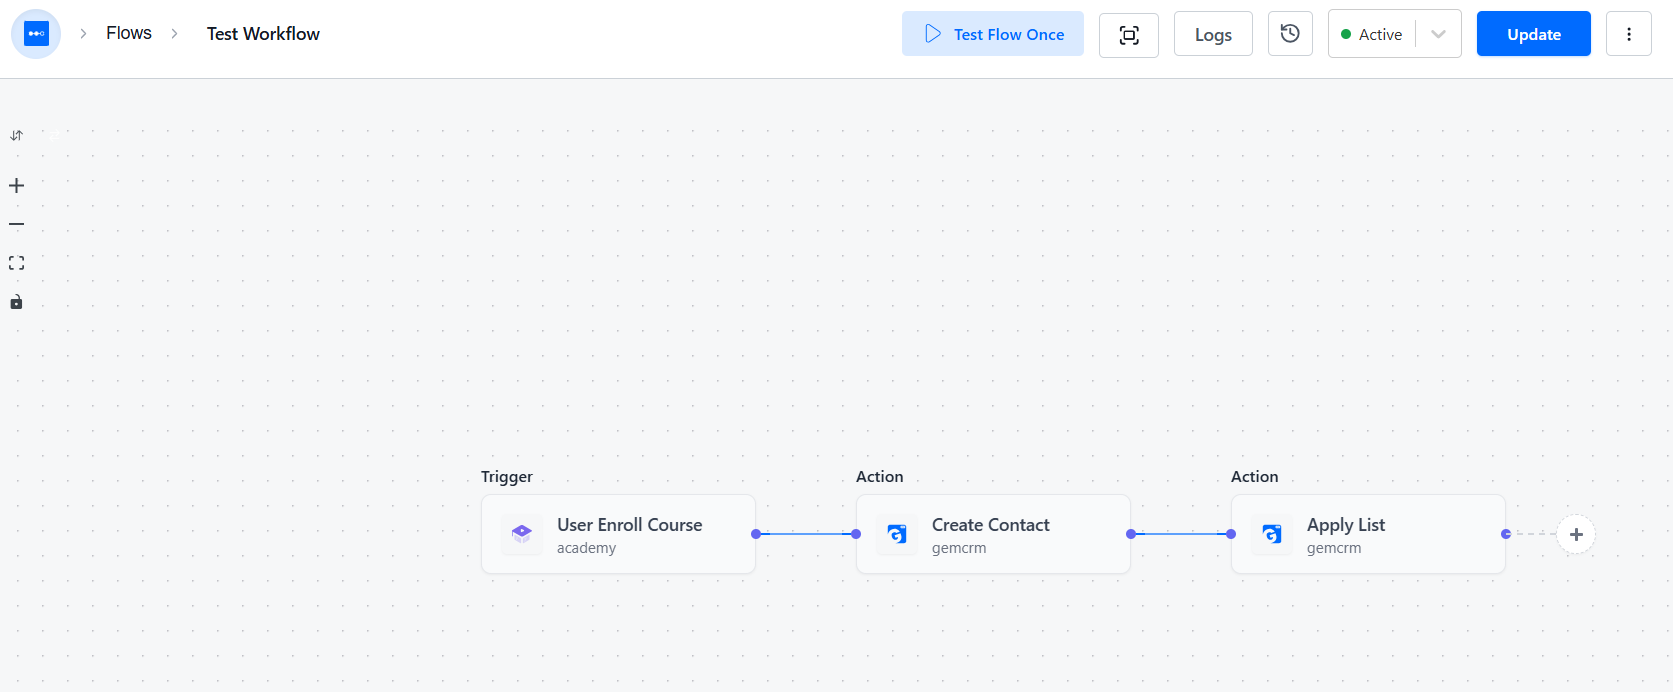
With this step in place, every new student is automatically added to the right contact list in GemCRM — ready to be organized, tagged, and reached with future campaigns.
Step 4 — Apply Tag
Next, add one more action that tags the contact so learners can be categorized and targeted more precisely later on.
- Add another GemCRM action. Just like before, click the “+” icon after “Apply List,” select Apps, and choose GemCRM again, then click Continue.
- Choose the action type. Under the Select tab, set Action Type to “Apply Tag To Contact,” then click Continue.
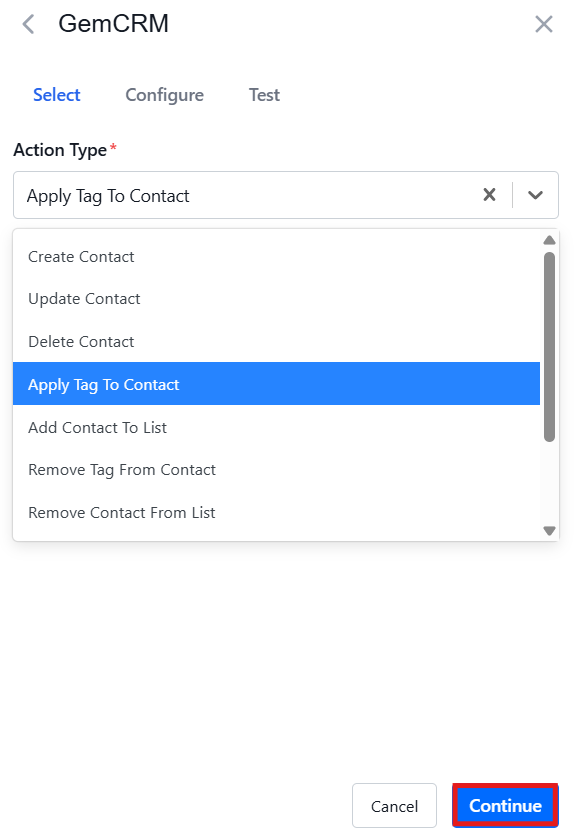
- Configure the tag. Switch to the Configure tab. Set Contact ID using dynamic data (type “@”) to pull in the contact from the earlier steps, then choose the Tag you want applied from the dropdown. Click Continue.
- Test the action. Go to the Test tab and click “Test Action” to confirm the tag is applied correctly, then click Save.
- Confirm the action is added. Back on the workflow canvas, you’ll now see all four blocks connected in order: User Enroll Course → Create Contact → Apply List → Apply Tag.
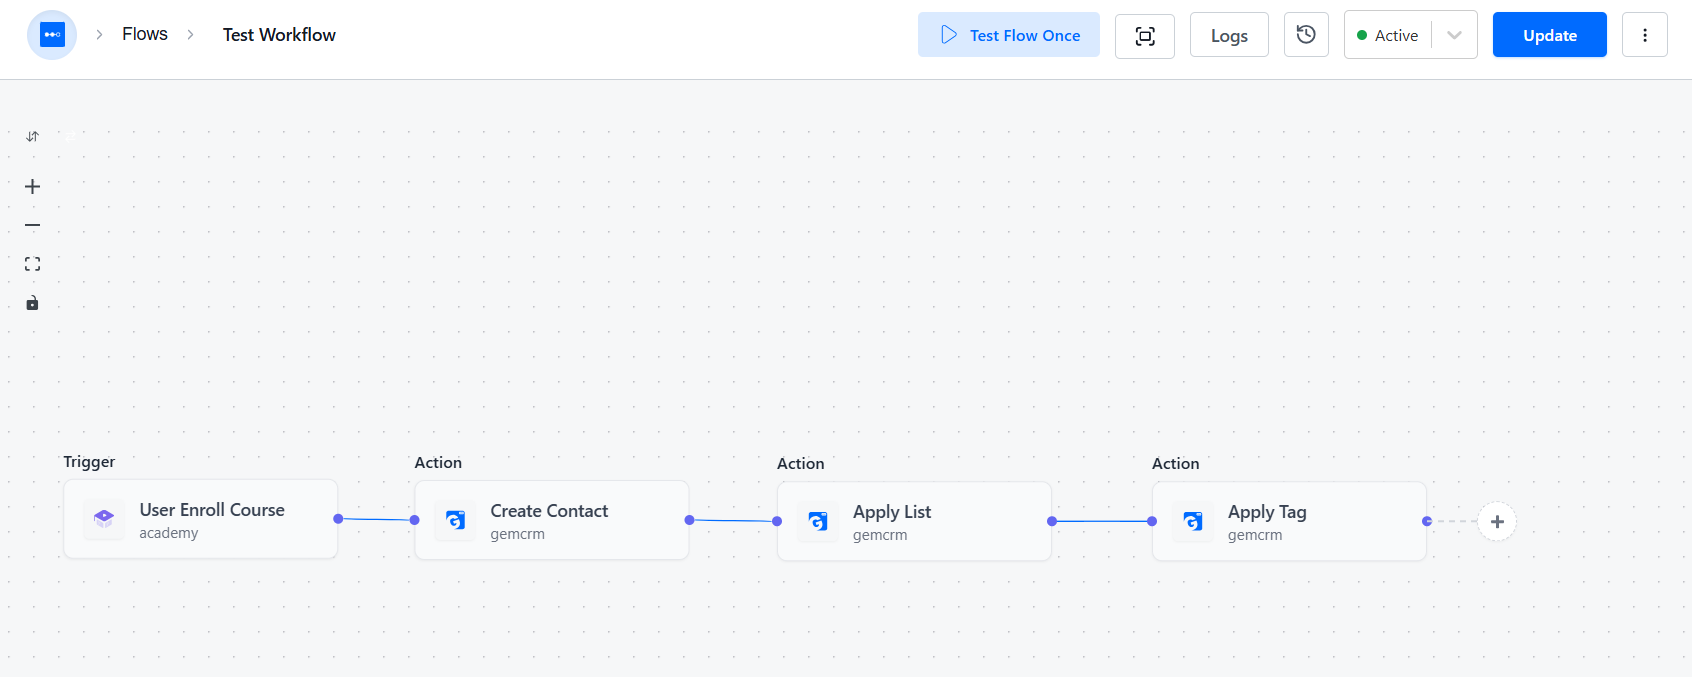
With tagging in place, every enrolled student is neatly labeled — making it easy to filter, segment, and target them in future campaigns.
Step 5 — Send Welcome Email
Finally, add one last action that sends the student a welcome email automatically.
- Add another GemCRM action. Just like before, click the “+” icon after “Apply Tag,” select Apps, and choose GemCRM again, then click Continue.
- Choose the action type. Under the Select tab, set Action Type to “Send Email,” then click Continue.
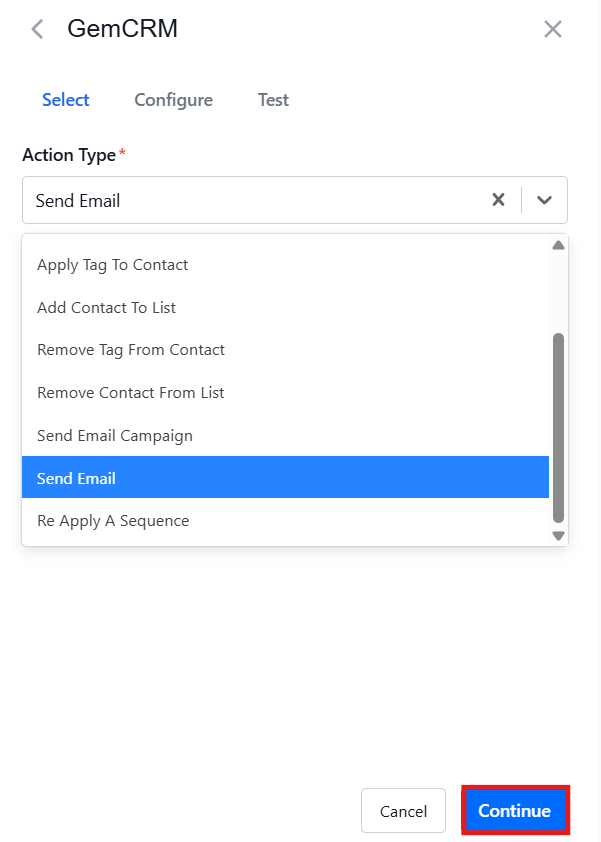
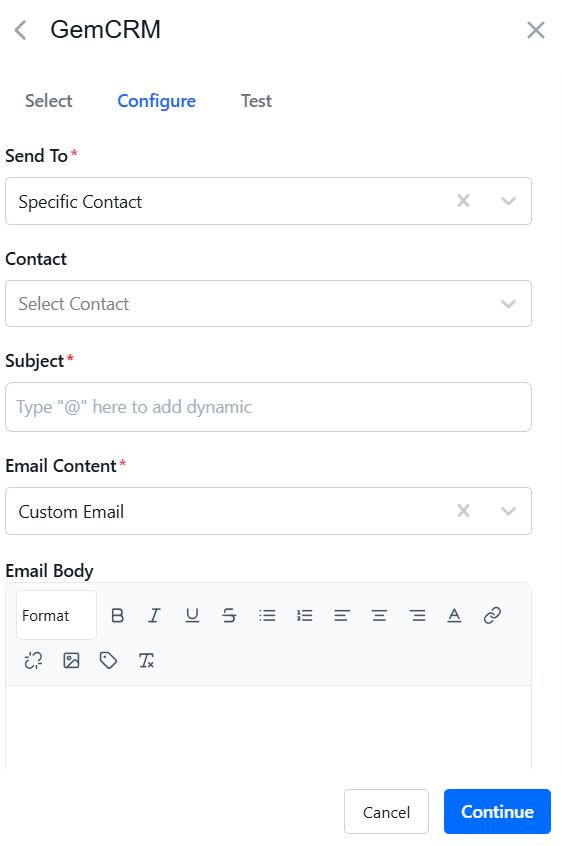
- Configure the email. Switch to the Configure tab. Set Send To to “Specific Contact” and select the Contact, then fill in the Subject (using dynamic data if you want to personalize it) and choose Email Content — for example, “Custom Email” — and write your welcome message in the Email Body editor. Click Continue.
- Test the action. Go to the Test tab and click “Test Action” to confirm the email sends correctly, then click Save.
- Confirm the full workflow. Back on the workflow canvas, you’ll now see all five blocks connected end-to-end: User Enroll Course → Create Contact → Apply List → Apply Tag → Send Email.
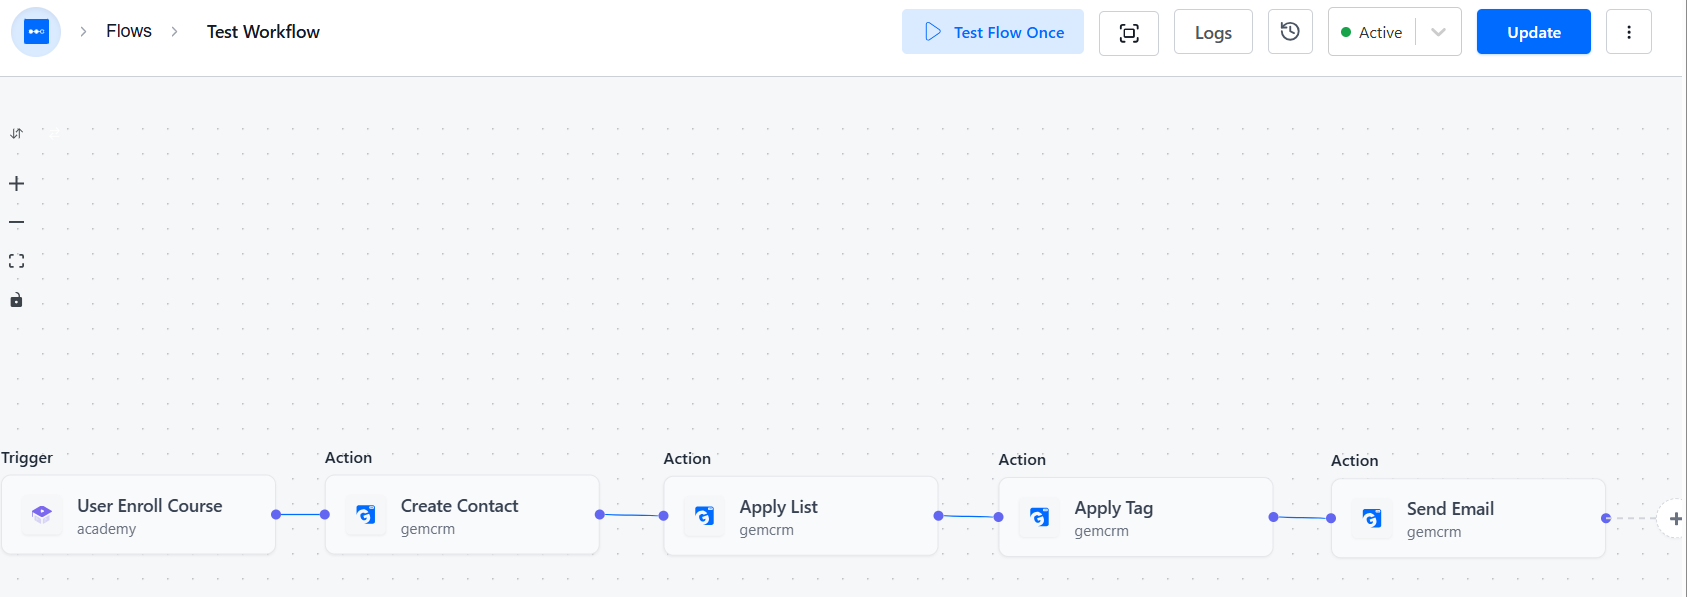
And that’s it — your enrollment automation is complete. From here on, every student who enrolls in an Academy LMS course will be automatically added to GemCRM, sorted into the right list, tagged, and welcomed with an onboarding email — all without you touching a thing.
What Happens After Enrollment?
After a learner enrolls in an Academy LMS course, Zaplane automatically handles the workflow based on the actions you configure.
A typical enrollment workflow includes:
- Detect the enrollment event.
- Create a contact in GemCRM.
- Add the contact to a contact list.
- Apply one or more tags.
- Send a welcome email.
- Continue additional email automation if configured.
This eliminates repetitive manual work and ensures every learner follows the same onboarding process.
Customize Your Workflow
Every online course business is different, so your automation workflow can be customized based on your requirements.
For example, you can:
- Add different contact lists for different courses.
- Apply unique tags for each course category.
- Send different welcome emails for different audiences.
- Create separate automation workflows for premium and free students.
This flexibility allows you to build workflows that match your own teaching and marketing strategy.
Benefits of Using GemCRM with Academy LMS
After the integration is configured, course creators can manage student communication more efficiently.
- Automatically capture new enrollments
- Organize learners using lists and tags
- Send onboarding emails automatically
- Reduce repetitive manual tasks
- Keep communication inside WordPress
Final Thoughts
Academy LMS makes it easy to create and deliver online courses, while GemCRM helps you manage student communication through automation. By connecting both plugins with Zaplane, you can automatically create contacts, organize learners, apply tags, and send onboarding emails whenever a student enrolls.
For course creators who want a WordPress-native CRM that works smoothly with Academy LMS, GemCRM provides a practical way to automate student engagement without relying on external marketing platforms.
FAQ
Can GemCRM work with Academy LMS?
Yes. GemCRM integrates with Academy LMS through Zaplane, allowing student enrollment events to trigger actions inside GemCRM automatically.
Do I need Zaplane to connect GemCRM with Academy LMS?
Yes. Zaplane acts as the automation bridge between Academy LMS and GemCRM.
Can I automatically send welcome emails after enrollment?
Yes. After a learner is added to a contact list, GemCRM can automatically send a welcome email through an automation workflow.
Can I organize students into different groups?
Yes. GemCRM supports contact lists, tags, and dynamic segments for student organization and targeted communication.