



Are you sending the same email to every single subscriber on your list? If yes, you’re leaving serious money on the table. Email list segmentation is one of the most powerful strategies to increase open rates, click-through rates, and ultimately, conversions — and when you combine it with WordPress and a smart CRM tool like GemCRM, the results can be transformative.
In this guide, we’ll walk you through exactly how to segment your email list in WordPress for better conversions, using GemCRM as your go-to tool throughout the process.
What Is Email List Segmentation?
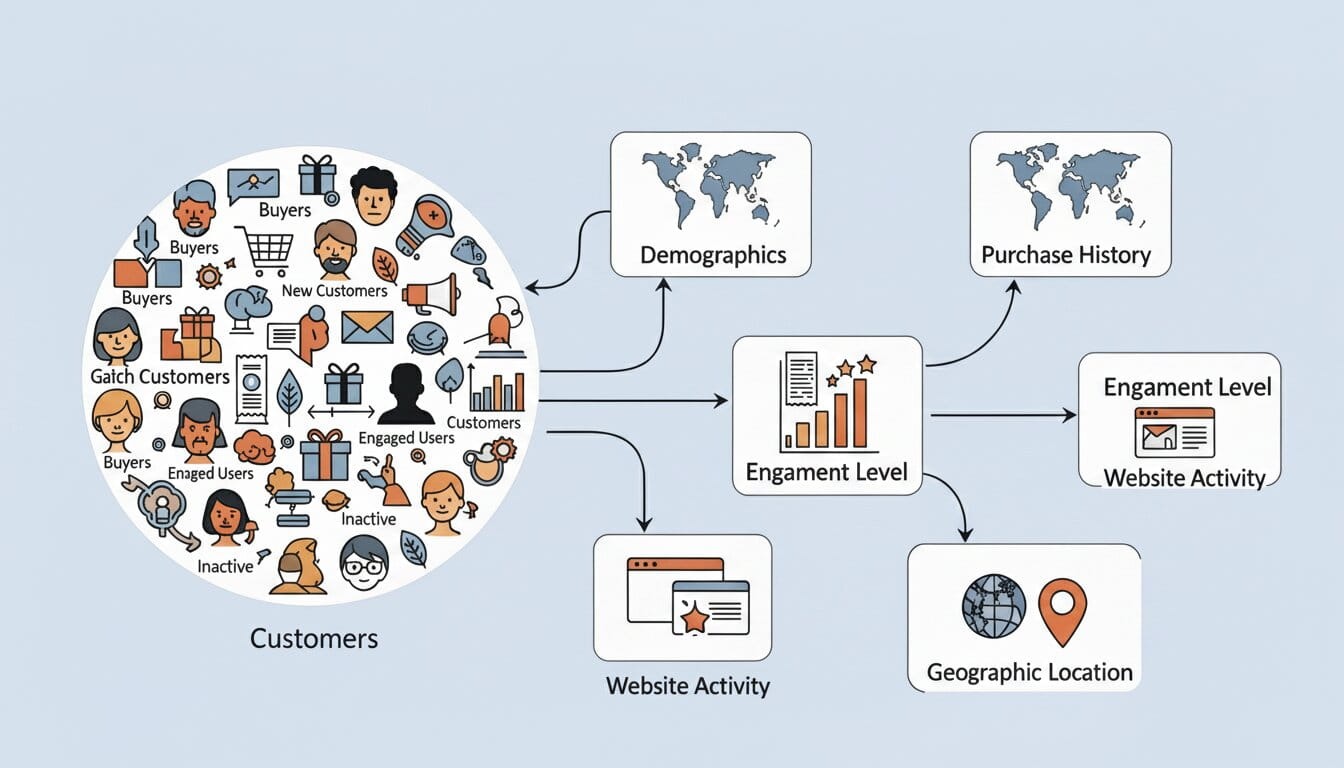
Email list segmentation is the process of dividing your subscribers into smaller, more targeted groups based on specific criteria — such as behavior, demographics, interests, purchase history, or engagement level. Instead of blasting one generic message to thousands of people, you send highly relevant emails to the right person at the right time.
The result? Higher open rates. More clicks. Better conversions.
According to Mailchimp’s email marketing research, segmented email campaigns can drive up to 760% more revenue compared to non-segmented campaigns. That’s not a number to ignore.
Why Segmentation Matters for WordPress Sites

WordPress powers over 40% of all websites globally. Whether you’re running an eCommerce store with StoreEngine, a membership site, a blog, or a SaaS landing page, your email list is one of your most valuable assets.
Without segmentation:
- New subscribers get the same emails as long-time customers
- Cold leads receive sales pitches they’re not ready for
- Loyal buyers get re-engagement campaigns that feel tone-deaf
With segmentation:
- Every subscriber gets content that matches where they are in the customer journey
- You nurture leads more effectively
- You boost lifetime customer value
This is exactly where GemCRM steps in.
What Is GemCRM and Why Use It for Email Segmentation?
GemCRM is a powerful CRM and email marketing tool that integrates seamlessly with WordPress. It allows you to collect subscriber data, track user behavior, create detailed contact segments, and automate personalized email campaigns — all from within your WordPress dashboard or its connected interface.
Key features of GemCRM relevant to segmentation:
- Smart tagging system — Automatically tag subscribers based on form submissions, purchases, or page visits
- Behavioral tracking — Monitor which emails subscribers open, which links they click, and which pages they visit on your site
- Custom field support — Capture demographic and preference data directly from opt-in forms
- Dynamic segments — Create rules-based segments that update automatically as subscriber behavior changes
- StoreEngine integration — Pull purchase data directly to segment buyers, repeat customers, and cart abandoners
- Visual automation builder — Set up drip sequences that trigger based on segment membership
Now let’s get into the actual steps.
Step 1: Define Your Segmentation Goals
Before opening GemCRM, take a moment to think about what you actually want to achieve. Common goals include boosting sales from existing customers, re-engaging inactive subscribers, nurturing new leads into buyers, and reducing unsubscribes by sending more relevant emails. Having a clear goal upfront will make every step inside GemCRM more focused and purposeful.
Step 2: Connect GemCRM to Your WordPress Site
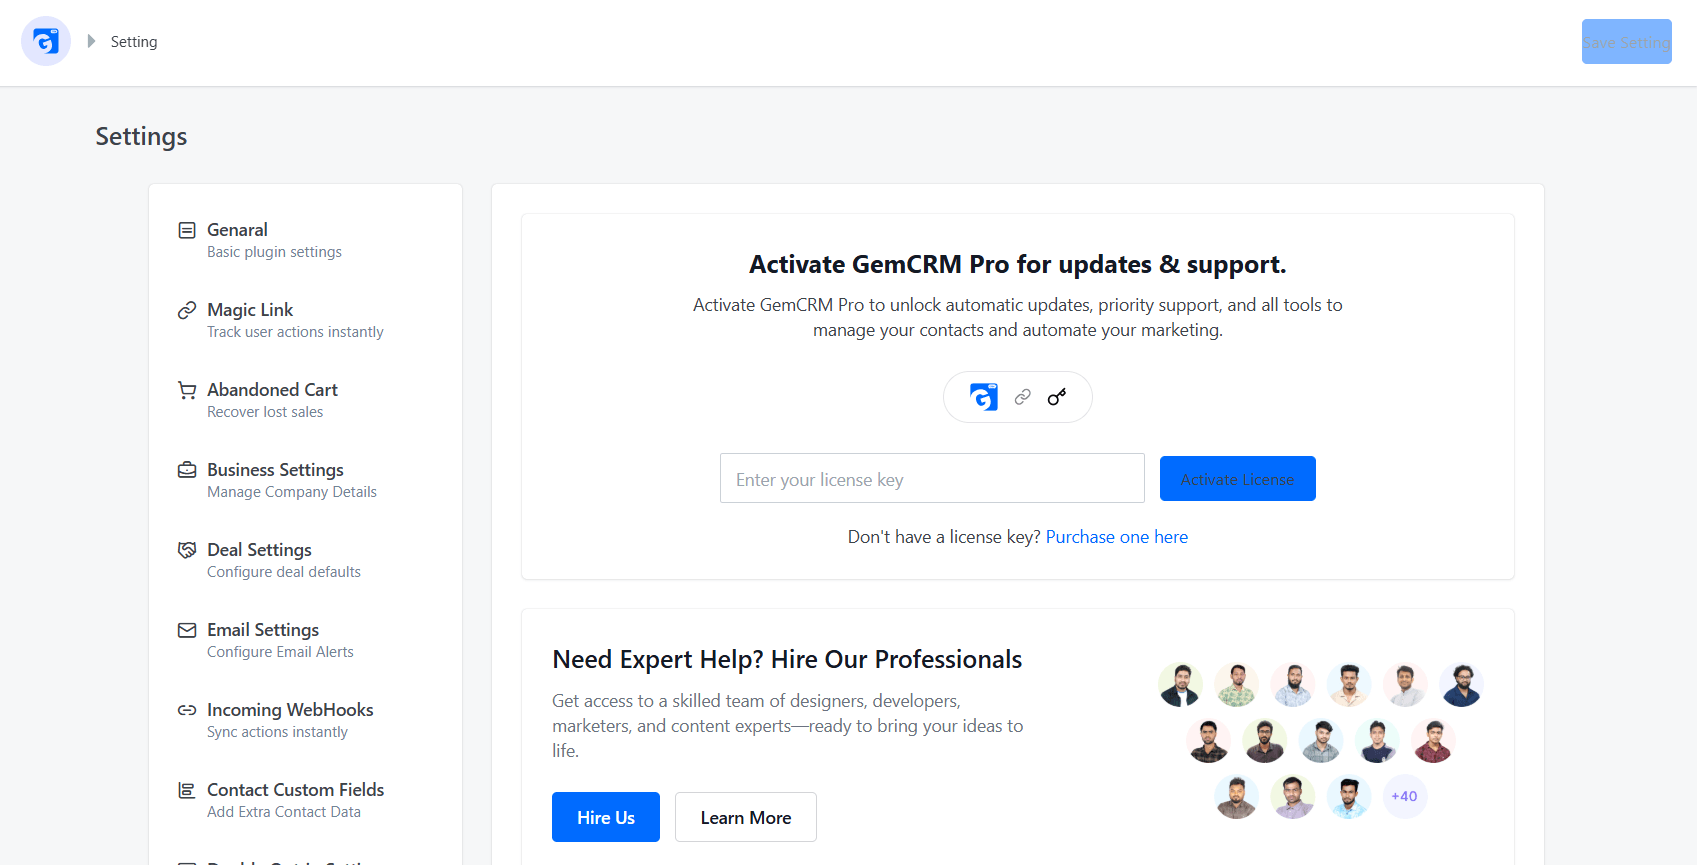
Install and activate the GemCRM plugin, then go to WordPress Dashboard → GemCRM → Settings → License and enter your license key to activate the plugin.
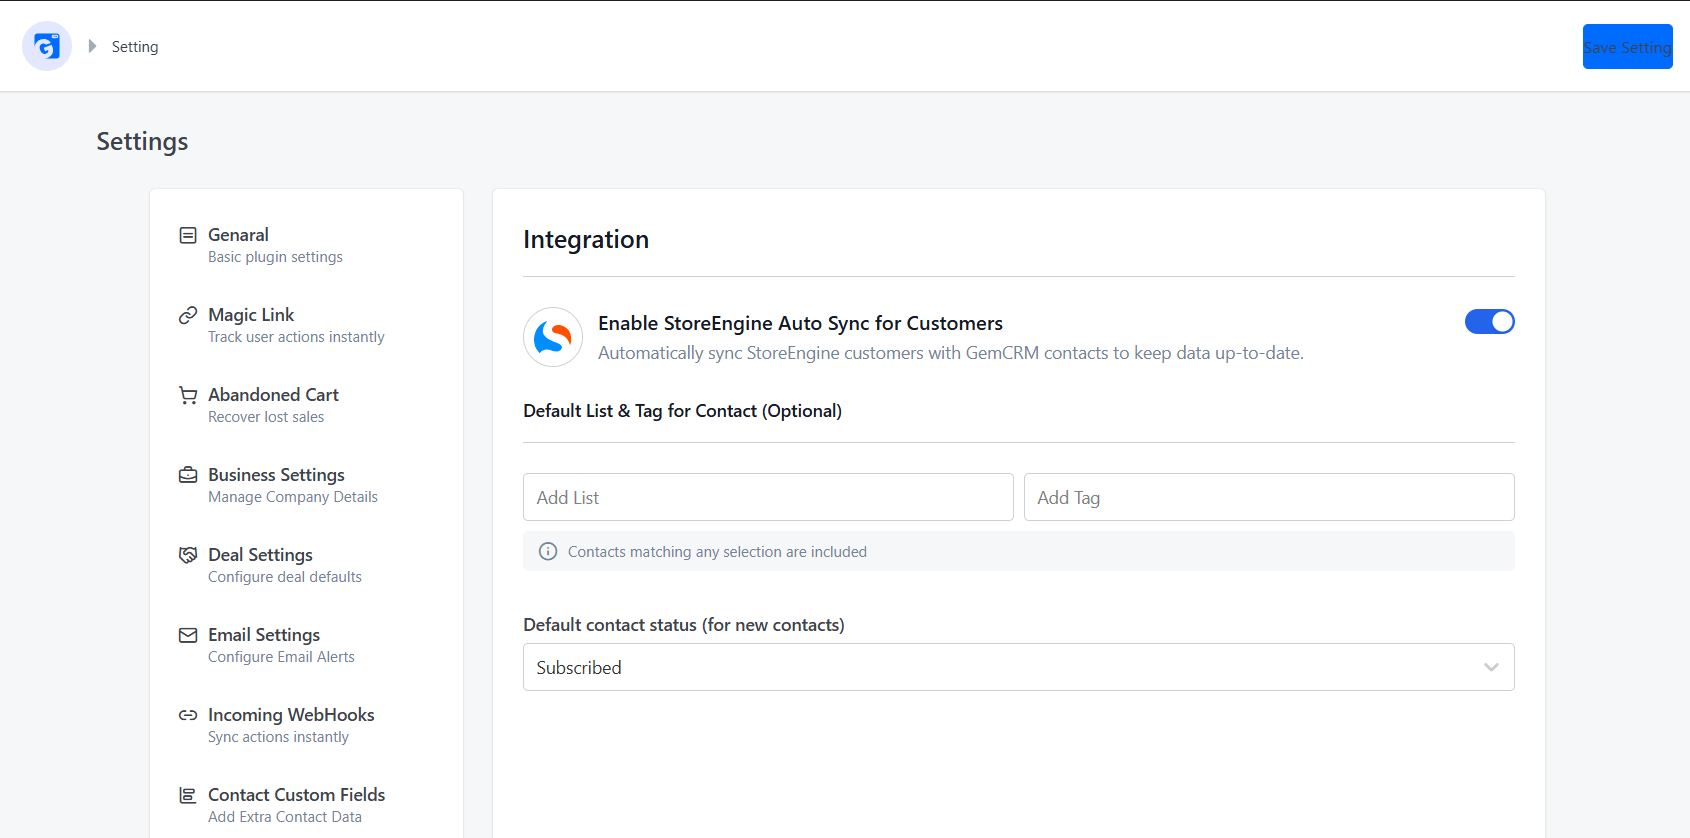
Next, go to Settings → Integration → StoreEngine and enable StoreEngine Auto Sync to automatically keep your customer data in sync with GemCRM. From here, you can also set a default list, tag, and contact status for all new contacts coming in from StoreEngine.
Once everything is connected, GemCRM will start pulling in subscriber data and tracking behavior automatically.
Step 3: Capture the Right Data at the Point of Sign-Up
Your segmentation is only as good as the data behind it. Go to Settings → Contact Custom Fields and click Add Field to start collecting extra information from your subscribers.
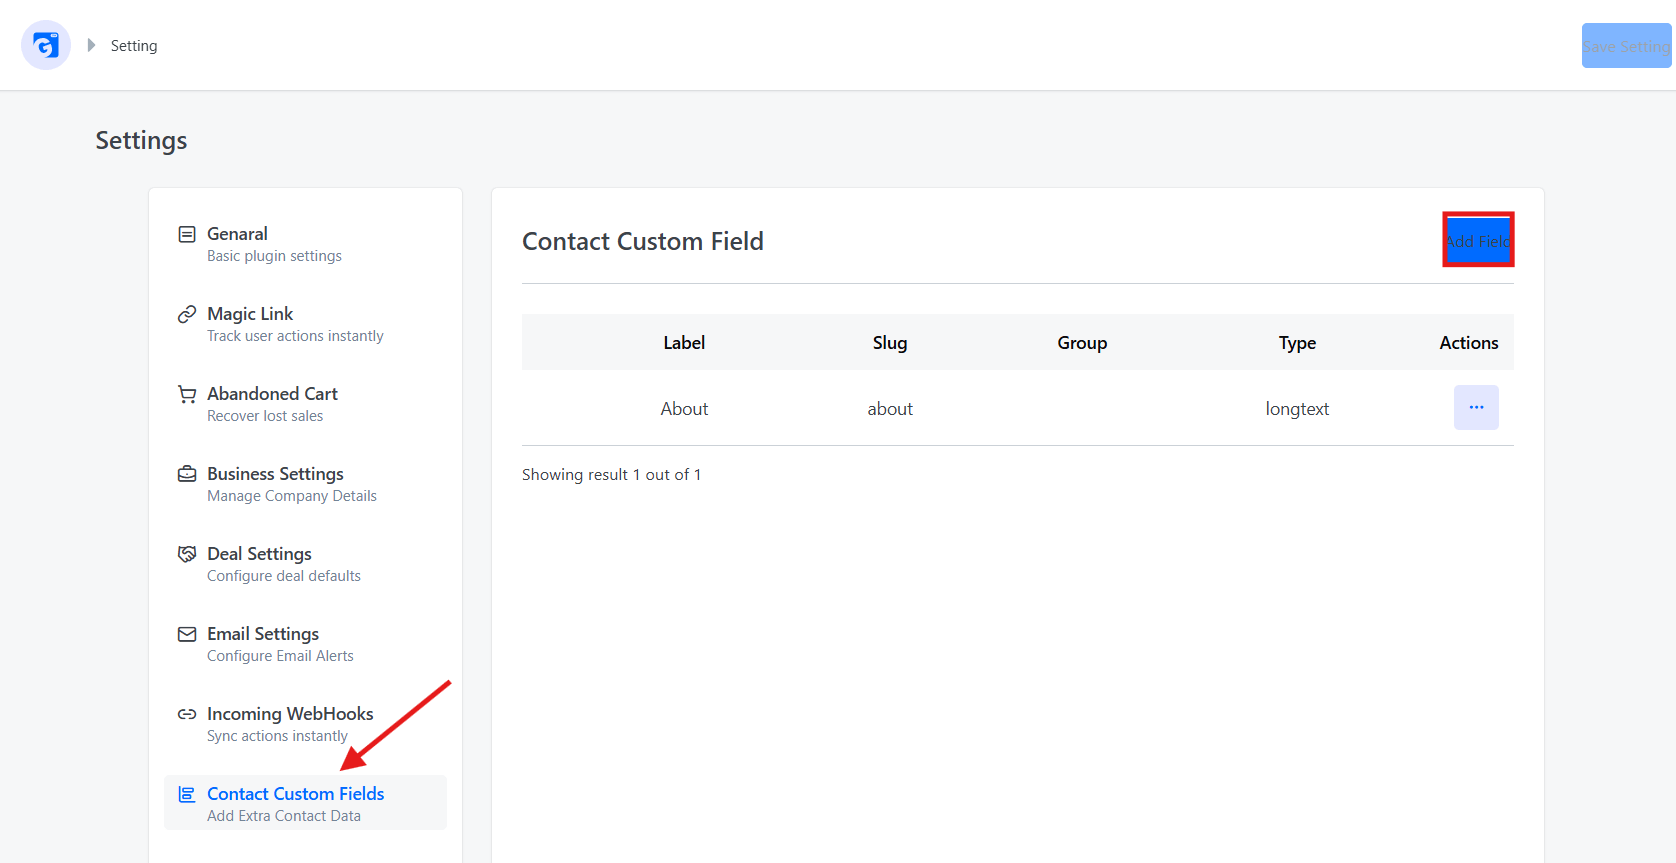
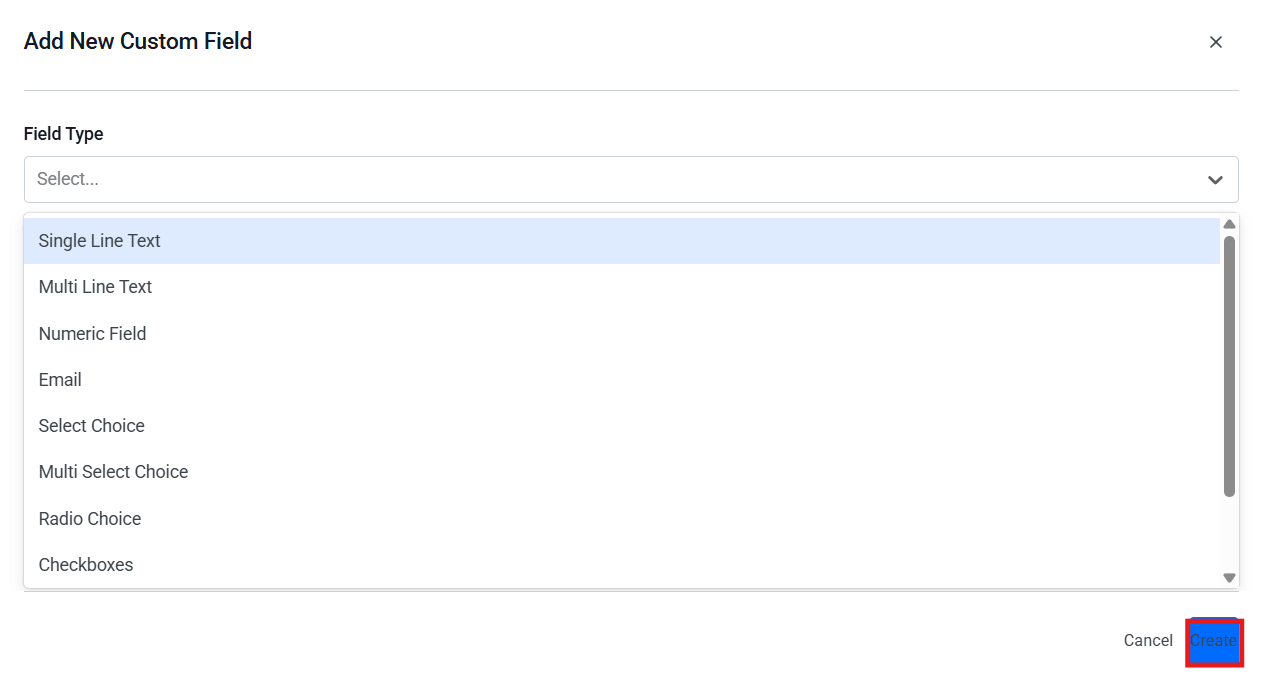
GemCRM supports multiple field types to match what you want to collect:
- Single Line Text — for short answers like name or company
- Multi-Line Text — for longer responses
- Numeric Field — for age, revenue, or any number-based data
- Select Choice — for single-option dropdowns like industry or location
- Multi-Select Choice — for multiple selections, like interest areas
Pro tip: Start with just one or two extra fields. Adding too many fields at sign-up reduces conversions. Collect more data gradually as subscribers engage over time.
Step 4: Set Up Behavioral Segments in GemCRM
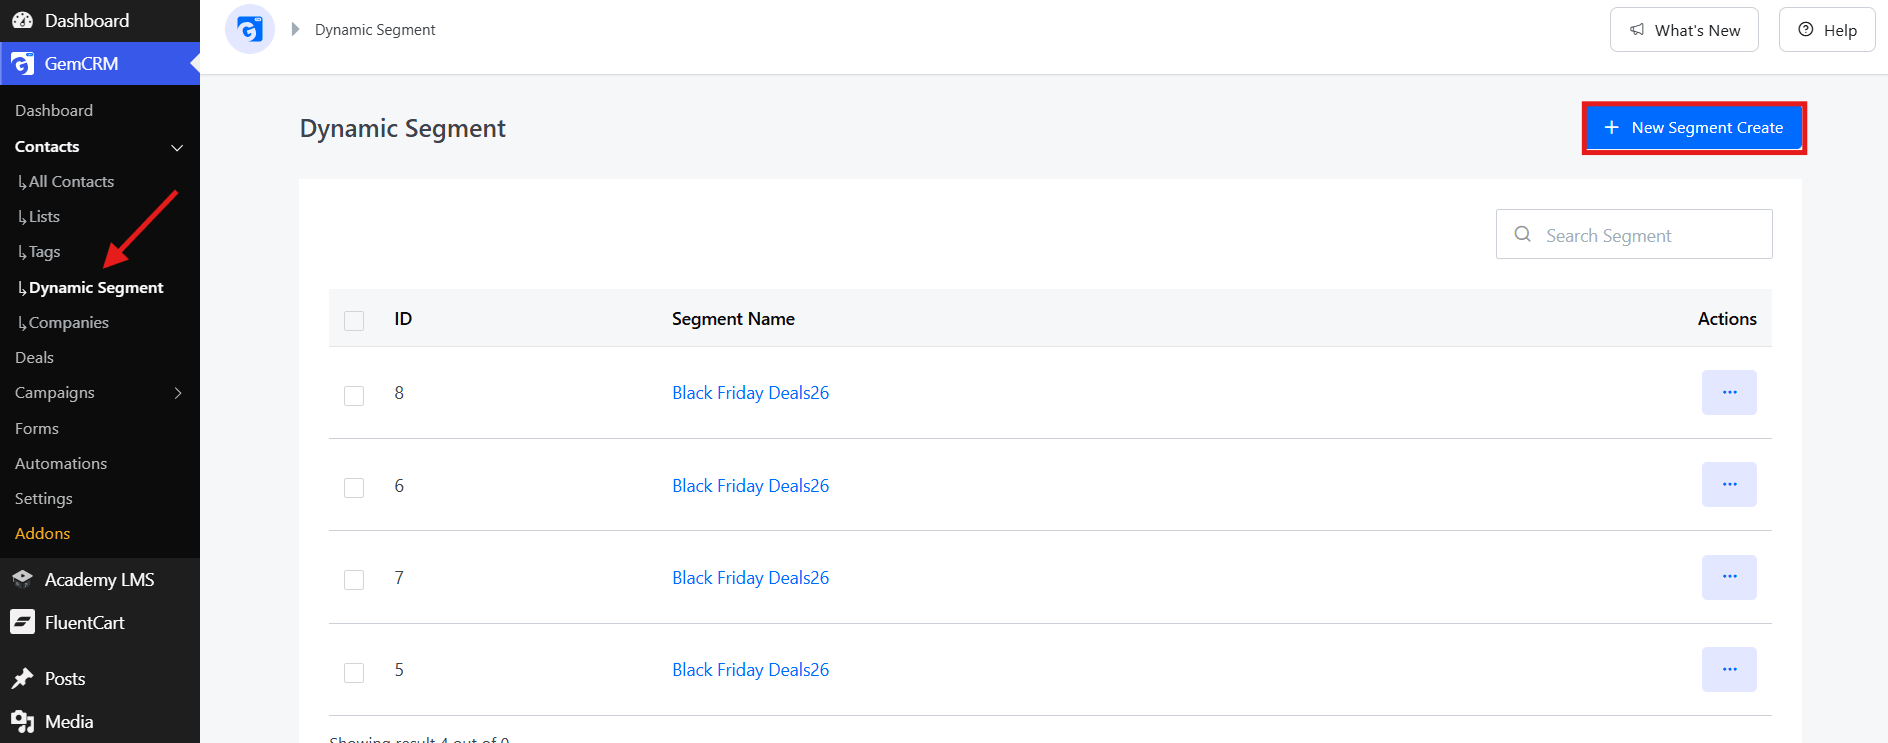
Go to Contacts → Dynamic Segment and click New Segment Create to start building your first segment.
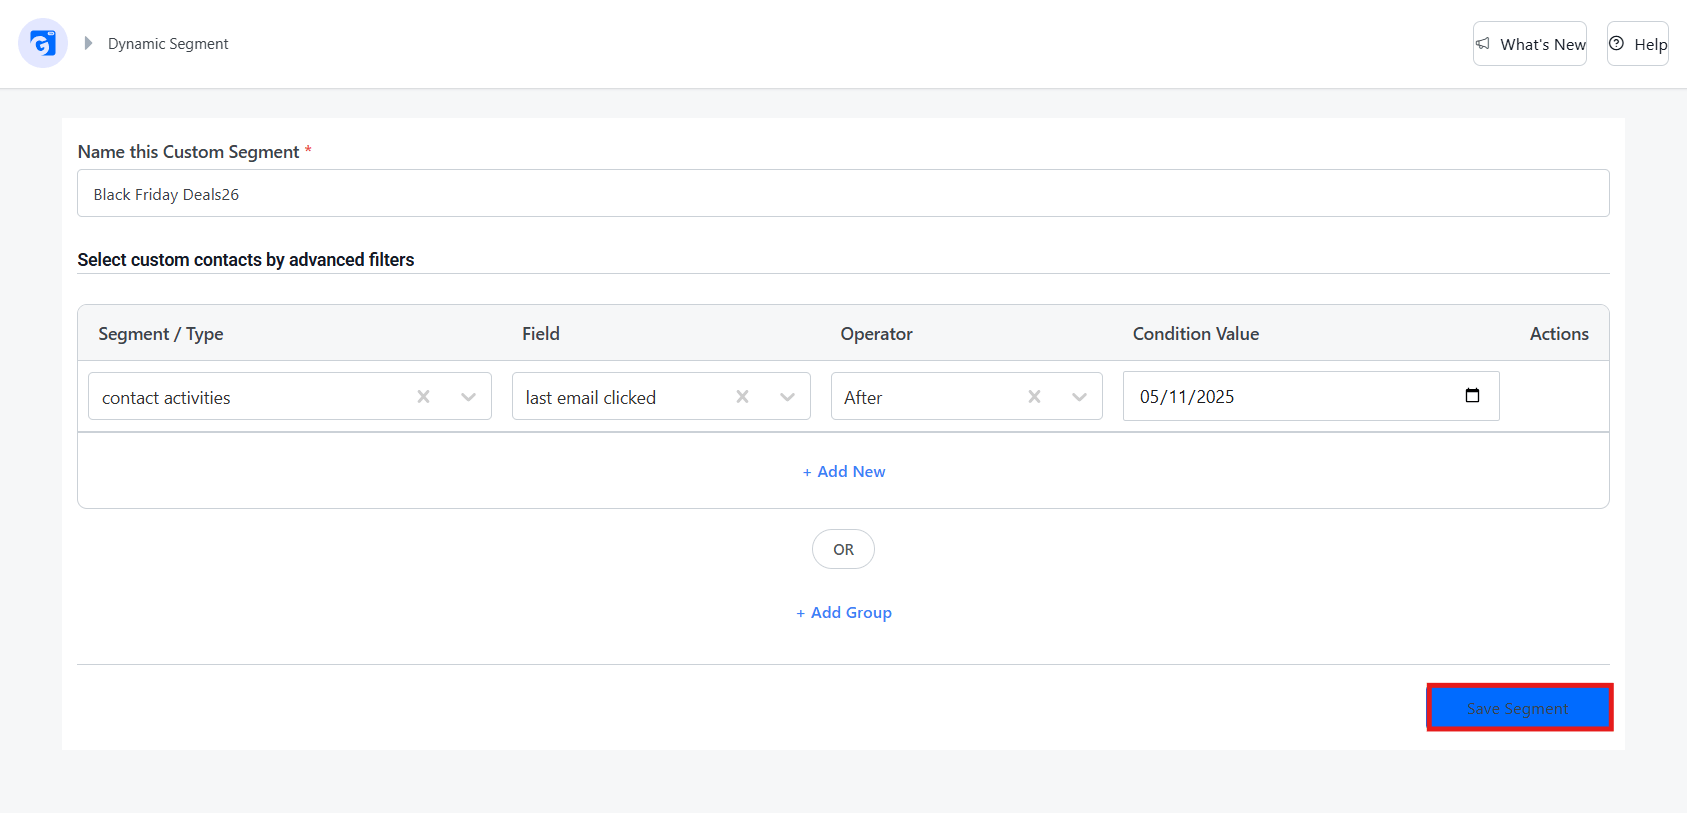
Give your segment a name, then use the advanced filter builder to set your conditions. Each rule has four parts — Segment/Type, Field, Operator, and Condition Value.
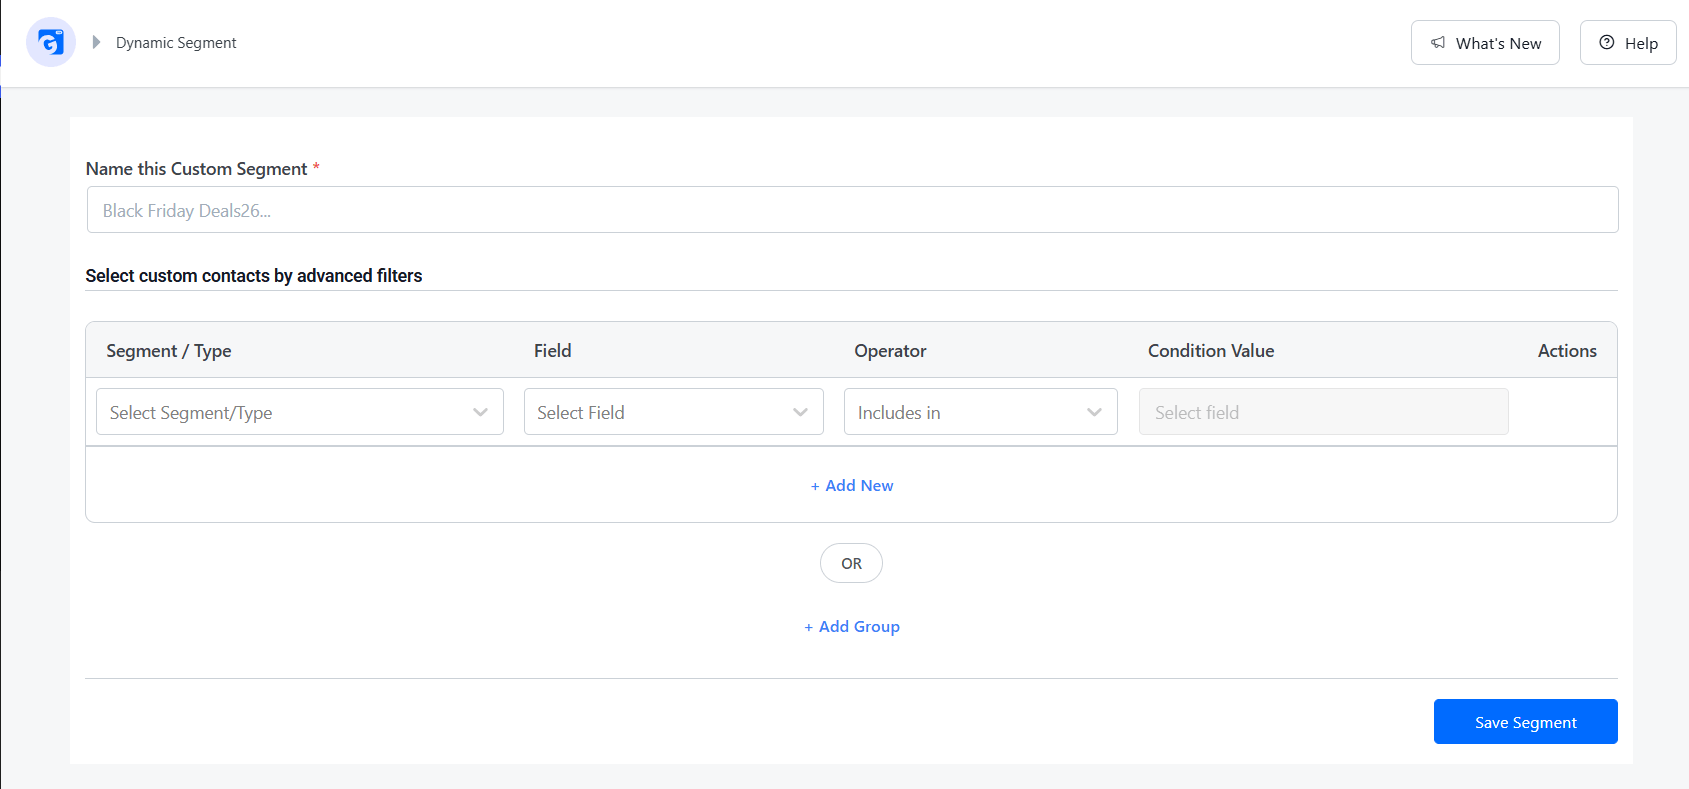
For Segment/Type, you can choose from:
- Contact — filter by name, email, created date, etc.
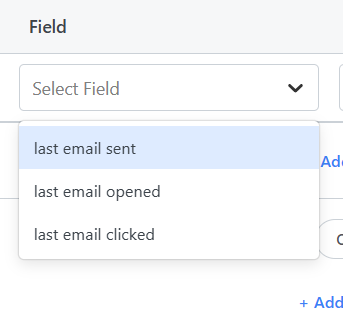
- Contact activities — filter by last email sent, last email opened, or last email clicked
- Contact segment — filter by which segment a contact already belongs to
- Custom fields — filter by any custom field you’ve created
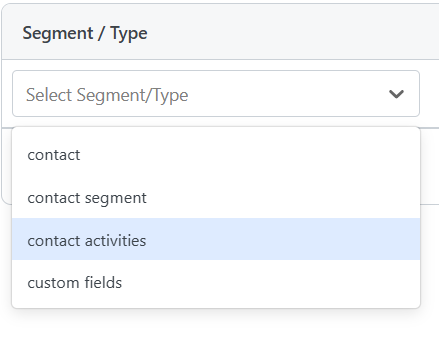
For behavioral segments, select contact activities as the type, then choose your field from the dropdown — last email sent, last email opened, or last email clicked.
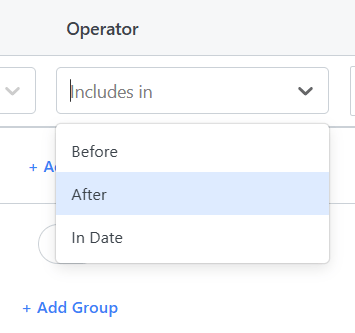
Then set your operator — Before, After, or In Date — and enter a date as your condition value.
Once your rules are set, click Save Segment.
Step 5: Use Tags for Micro-Segmentation
GemCRM’s tag system takes segmentation a step further, letting you zero in on subscribers based on specific actions they’ve taken — automatically or through manual tagging.
Here are a few examples of tags in action:
- clicked-pricing-page — Subscriber visited your pricing page
- downloaded-lead-magnet-ebook — Subscriber grabbed a specific free resource
- abandoned-cart — Subscriber added items to cart but didn’t complete the purchase
- webinar-attendee — Subscriber registered for or attended a webinar
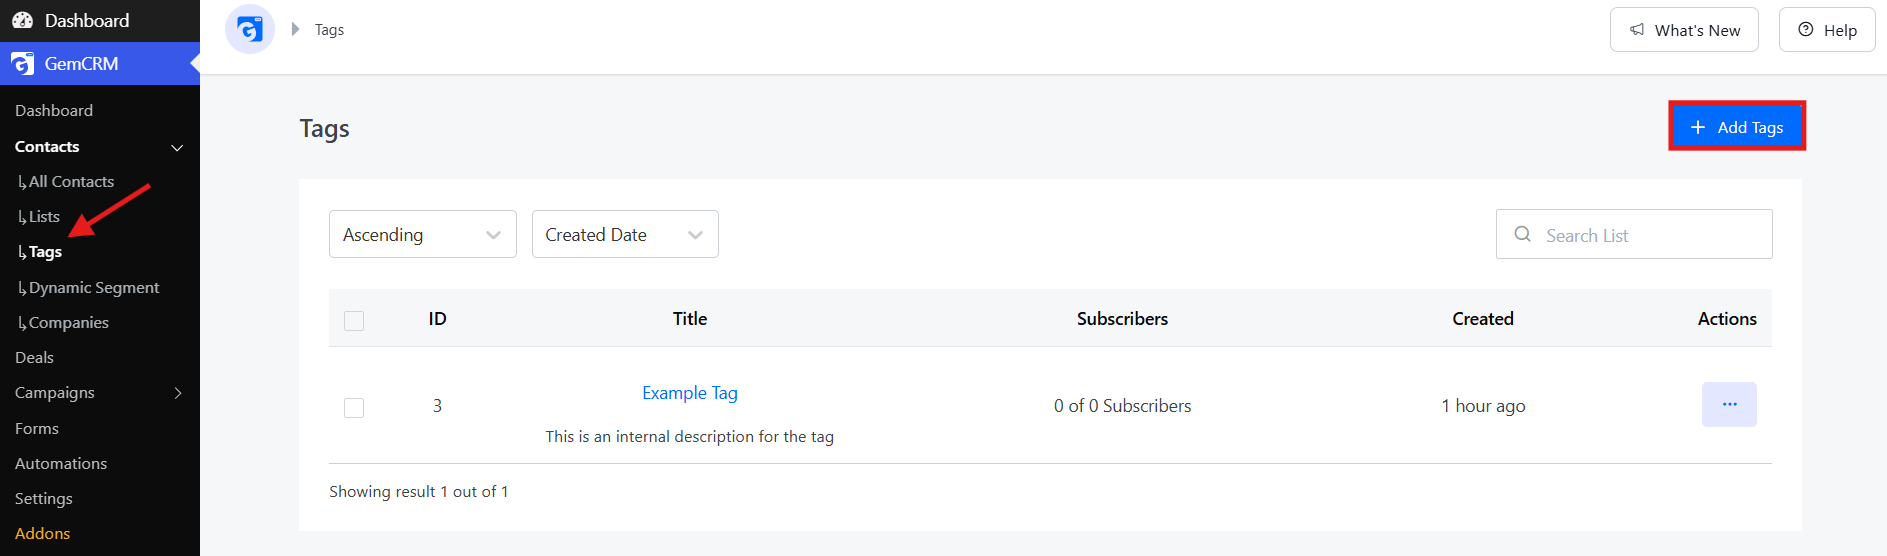
To create a new tag, go to Contacts → Tags from the left sidebar, then click the + Add Tags button in the top right corner.
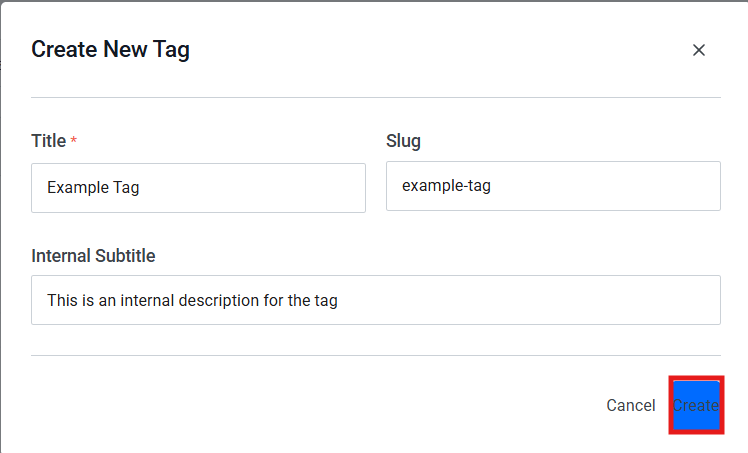
A dialog box will appear. Fill in the following fields:
- Title (required) — The name of your tag (e.g., clicked-pricing-page)
- Slug — Auto-generated from the title
- Internal Subtitle — An optional note for internal reference
Then click the Create button to save.
The real power comes when you combine tags to build hyper-targeted groups. For example, you could segment subscribers who downloaded your eBook and visited your sales page but haven’t bought yet — and drop them into a focused email sequence designed to close the deal.
Step 6: Build Automated Email Sequences for Each Segment
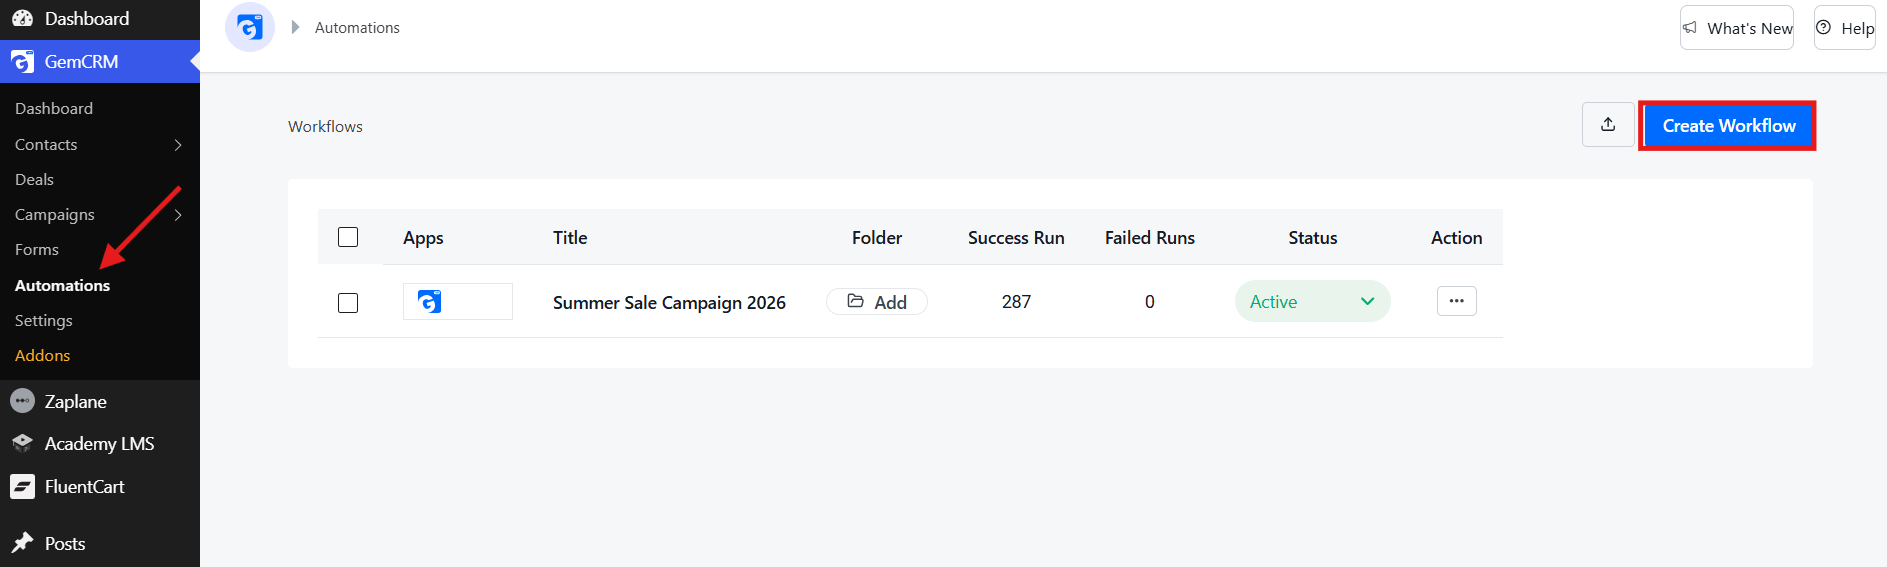
Go to GemCRM → Automations from the left sidebar, then click Create Workflow in the top right corner.
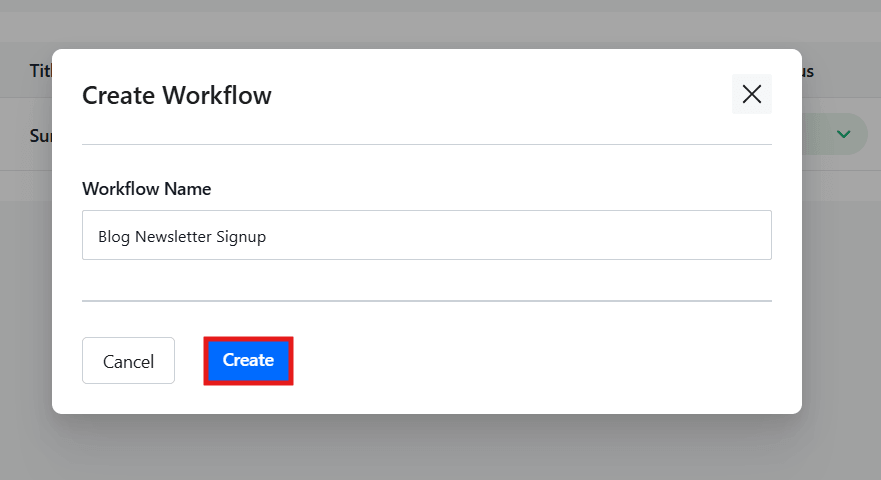
Enter your Workflow Name and click Create.
On the workflow canvas, click the Action Type dropdown and select Send Email.
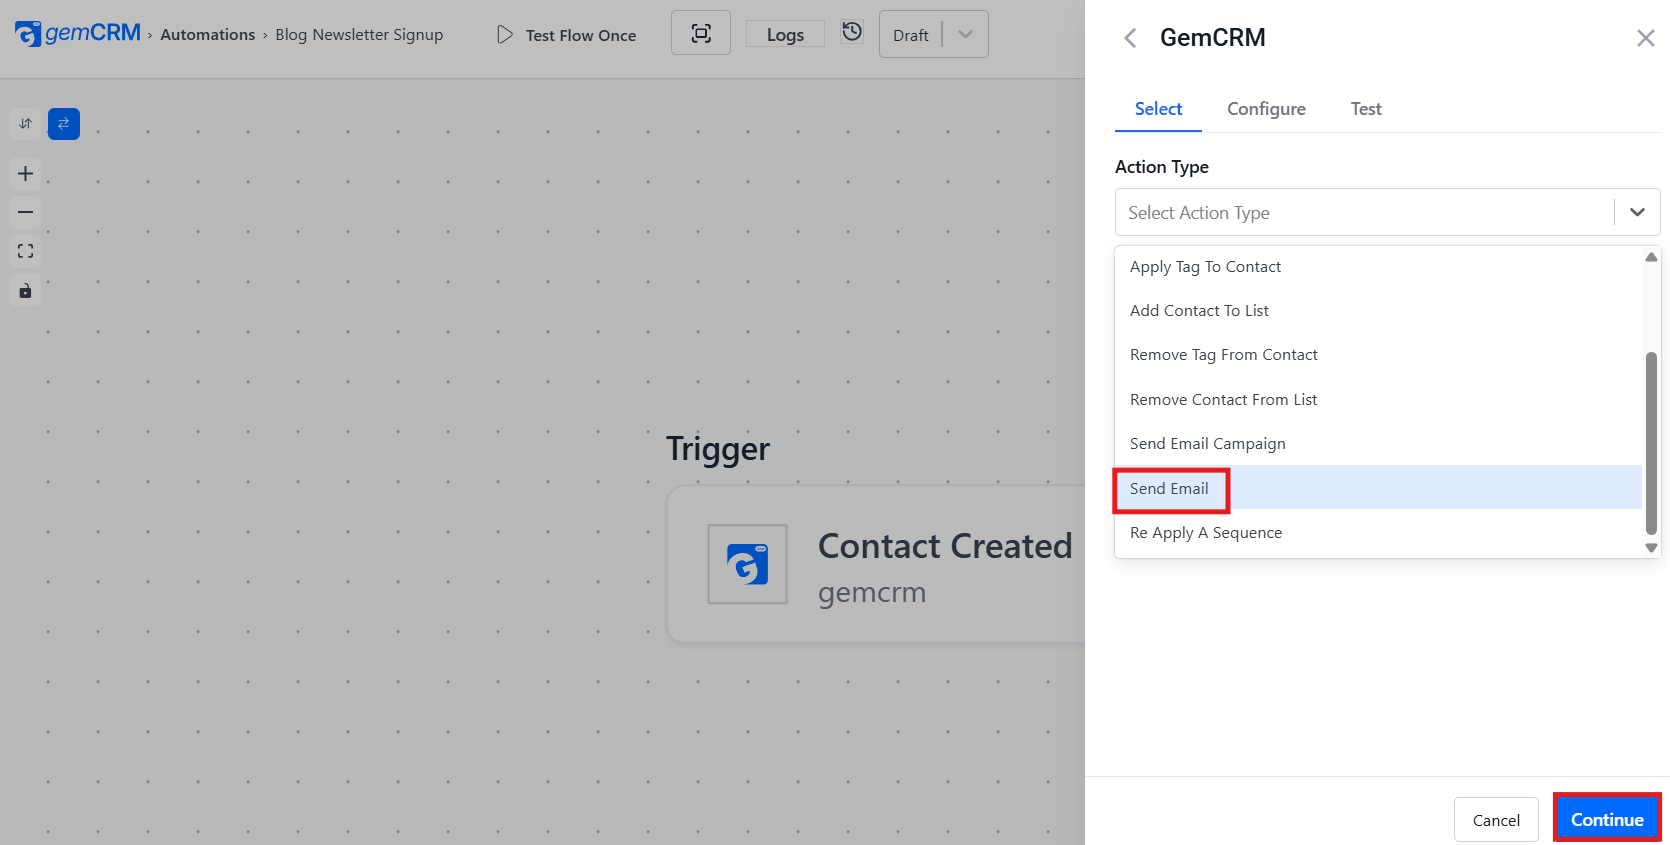
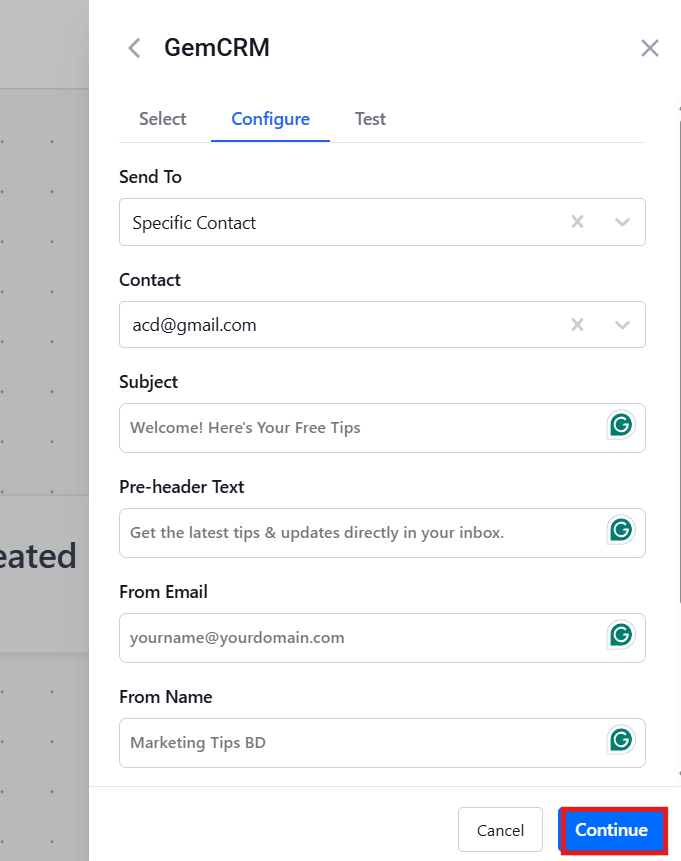
Fill in your email details — Subject, Pre-header Text, From Email, and From Name — then click Continue.
Here are a few high-performing sequences to get you started:
Welcome Sequence (New Subscribers)
- Email 1 (Day 0): Welcome + your best free resource
- Email 2 (Day 2): Your story and brand values
- Email 3 (Day 4): Social proof + case study
- Email 4 (Day 7): First soft offer or CTA
Re-Engagement Sequence (Cold Subscribers)
- Email 1: “We’ve missed you — here’s what’s new.”
- Email 2 (Day 3): Exclusive discount or content upgrade
- Email 3 (Day 5): Last chance — preference update link
Post-Purchase Sequence (Buyers)
- Email 1: Order confirmation + thank you
- Email 2 (Day 2): How to get the most from your purchase
- Email 3 (Day 7): Related product recommendation
- Email 4 (Day 14): Review request + loyalty reward
Step 7: Test, Analyze, and Refine Your Segments
Segmentation isn’t a set-it-and-forget-it strategy. To track your results, go to Campaigns → All Campaigns from the left sidebar.
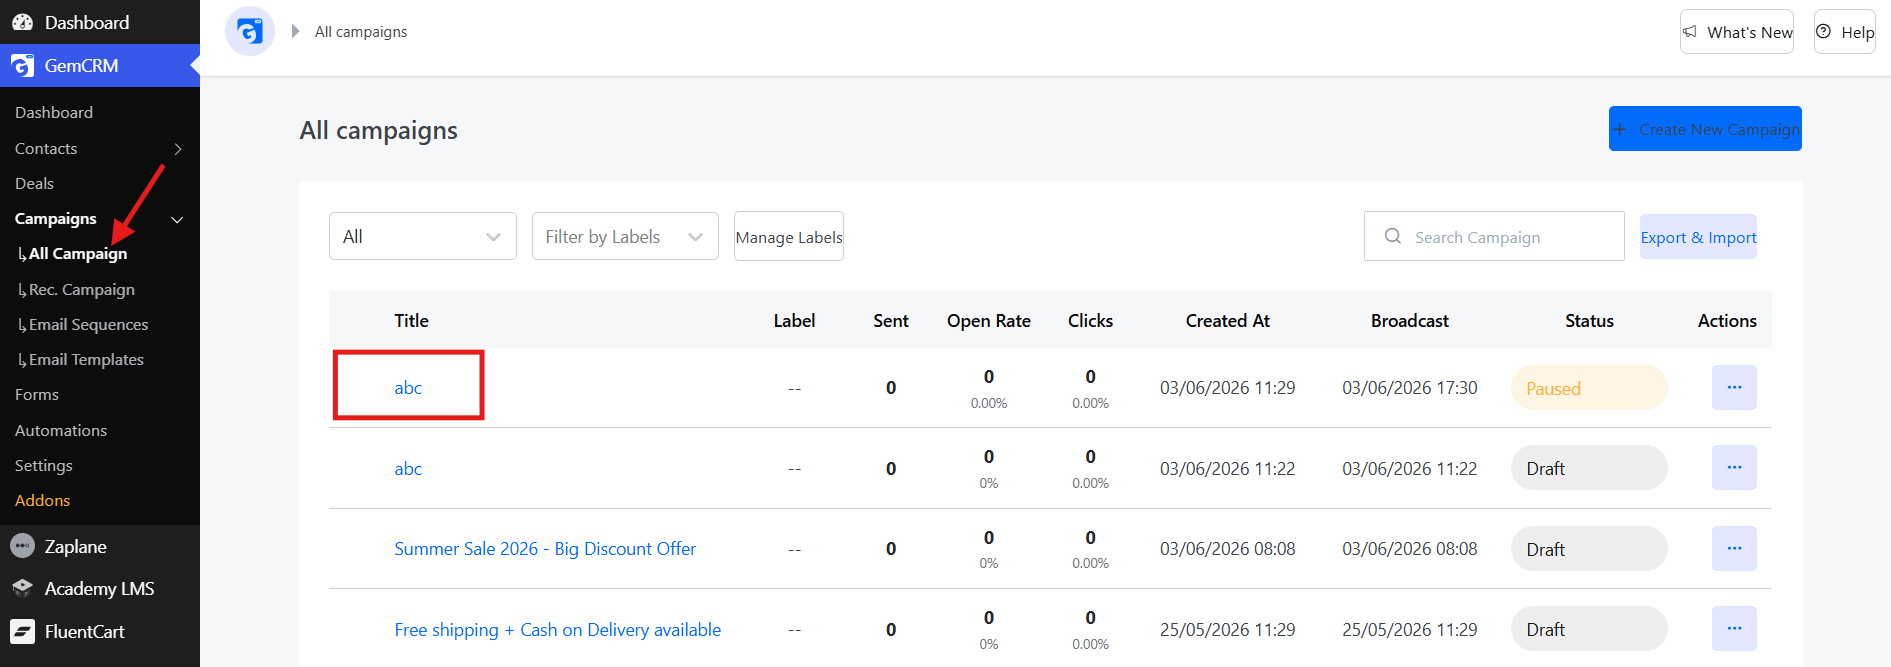
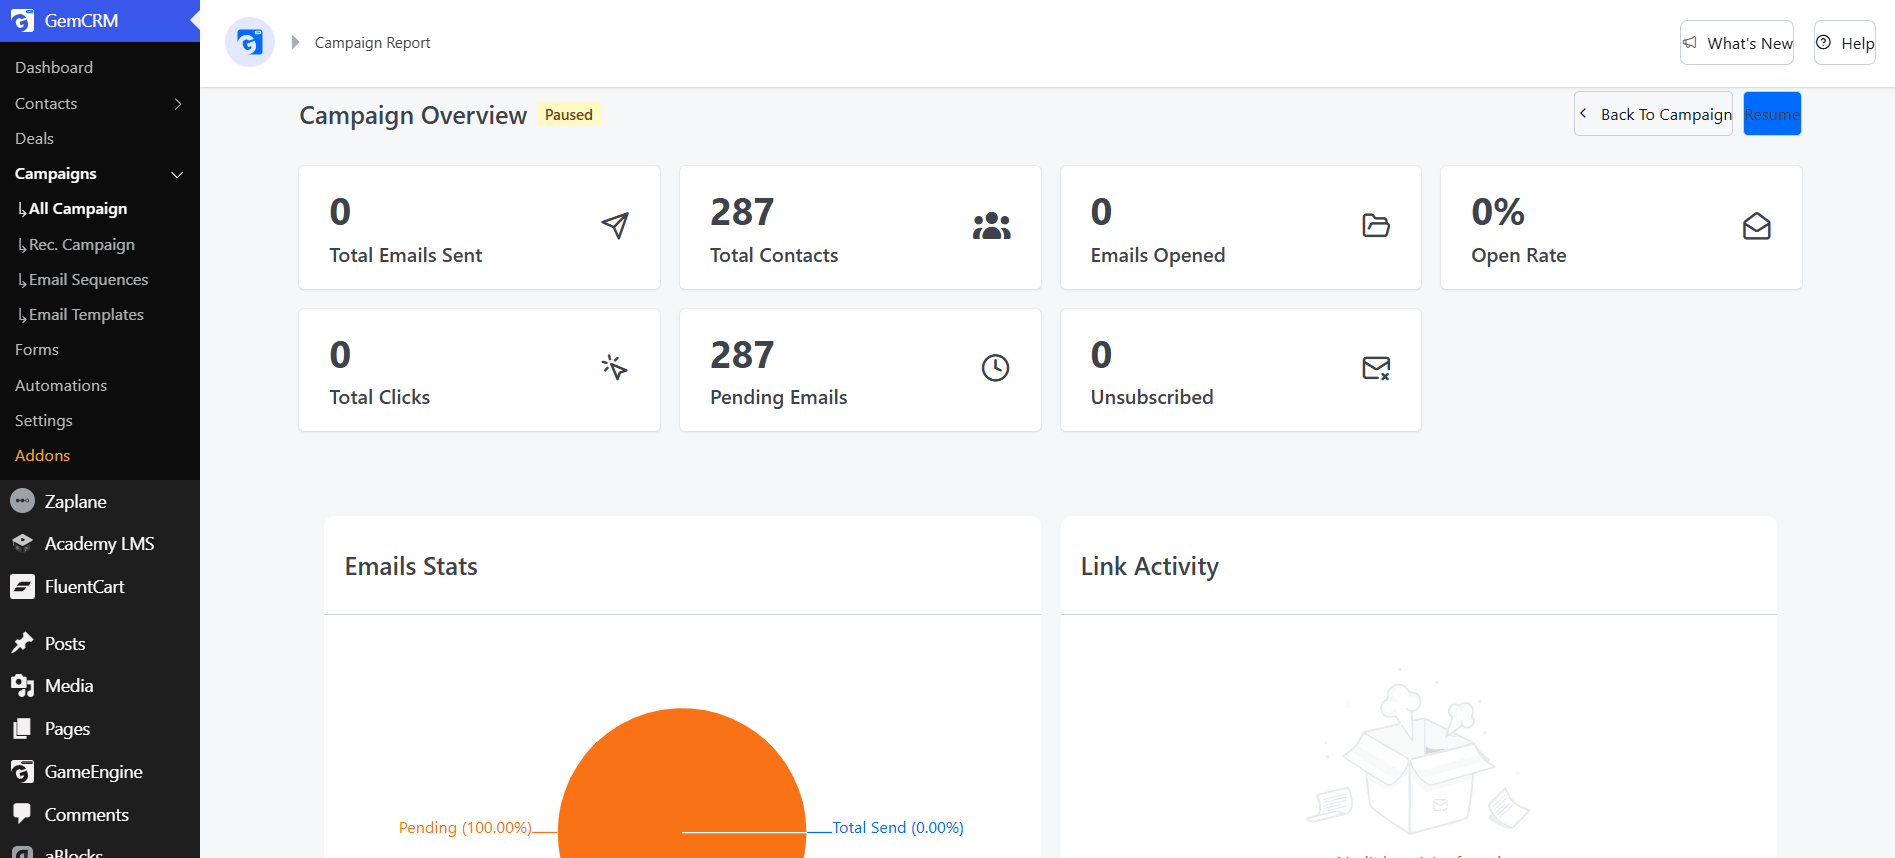
Click on any campaign to open its Campaign Report and monitor key metrics:
- Open Rate — Are certain segments engaging more than others?
- Total Clicks — Which calls-to-action are resonating?
- Unsubscribed — Are some segments receiving irrelevant content?
To run an A/B test, click Create New Campaign and go to Subject & Settings. You’ll find the A/B test subject lines toggle — enable it to send two subject line variations and track which gets more opens.
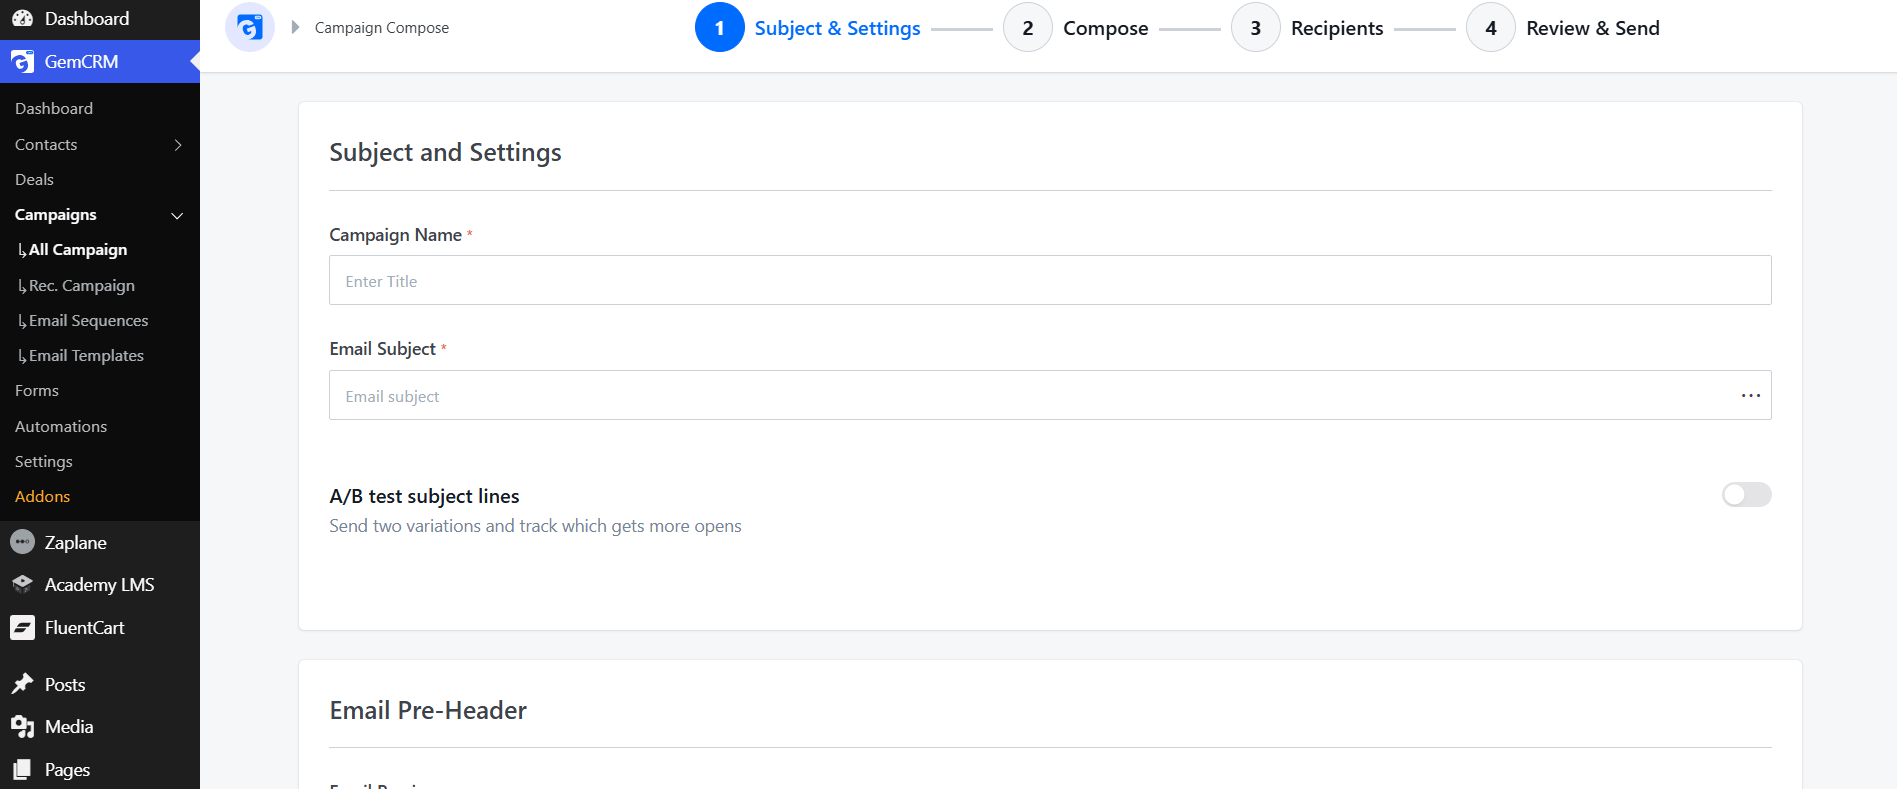
Over time, this data helps you refine your segments, update automation triggers, and continuously improve your email performance.
Common Segmentation Mistakes to Avoid
Even with a powerful tool like GemCRM, marketers can fall into traps:
Too many segments too soon — Start with 3–5 key segments and expand as you learn. Overcomplicating things early leads to confusion and inconsistent messaging.
Ignoring segment decay — A subscriber who was “engaged” three months ago may now be cold. Set GemCRM rules to automatically move contacts between segments based on updated behavior.
Not personalizing beyond just the name — Real email personalization is about content relevance, not just inserting {{first_name}} in the subject line.
Failing to suppress converted subscribers — If someone buys, remove them from the “non-buyer” segment immediately. GemCRM handles this automatically when StoreEngine sync is active.
Final Thoughts
Email list segmentation in WordPress doesn’t have to be complicated — but it does require the right tool and a clear strategy. GemCRM gives WordPress site owners everything they need to collect the right data, build intelligent segments, and automate personalized campaigns that convert.
Start simple: create three or four foundational segments today, set up a welcome sequence for new subscribers, and build from there. As your list grows and your data gets richer, your segmentation will become more precise — and so will your results.
The marketers who win at email are not the ones sending the most emails. They’re the ones sending the right emails to the right people at the right time. With WordPress and GemCRM working together, that’s entirely within your reach.
Frequently Asked Questions (FAQ)
What is email list segmentation in WordPress?
Email list segmentation in WordPress is the process of dividing your email subscribers into smaller, targeted groups based on criteria like behavior, location, purchase history, or engagement level — so you can send more relevant emails that drive better results.
Why is email segmentation important for conversions?
Segmented campaigns send the right message to the right person at the right time. This relevance leads to higher open rates, more clicks, and ultimately more conversions compared to sending one generic email to your entire list.
How does GemCRM help with email segmentation in WordPress?
GemCRM integrates directly with WordPress and lets you build dynamic segments based on subscriber behavior, purchase data via StoreEngine, custom form fields, tags, and engagement history. It also includes automation workflows, so each segment receives a tailored email sequence automatically.