



If you’re running a WordPress blog or website in 2026, building an email list is one of the smartest moves you can make. Social media algorithms keep shifting. Ad costs keep climbing. But your email list? That’s yours — no platform can take it away.
The problem most bloggers face is that popular SaaS email platforms like Mailchimp, ActiveCampaign, or ConvertKit get expensive fast, especially as your subscriber count grows. Per-contact pricing models punish your success. That’s exactly why in 2026, more WordPress users are shifting to self-hosted CRM solutions — better data control, no recurring fees, and full ownership of your audience.
That’s where GemCRM comes in. It’s a WordPress-native CRM and email marketing plugin built specifically for bloggers, course creators, and small business owners who want to grow and manage their email list entirely from inside their WordPress dashboard — without paying monthly SaaS fees.
In this guide, you’ll learn exactly how to build an email list in WordPress using GemCRM, step by step.
Why Building an Email List Still Matters in 2026
Before we dive into the how, let’s talk about the why — and the numbers back it up strongly.
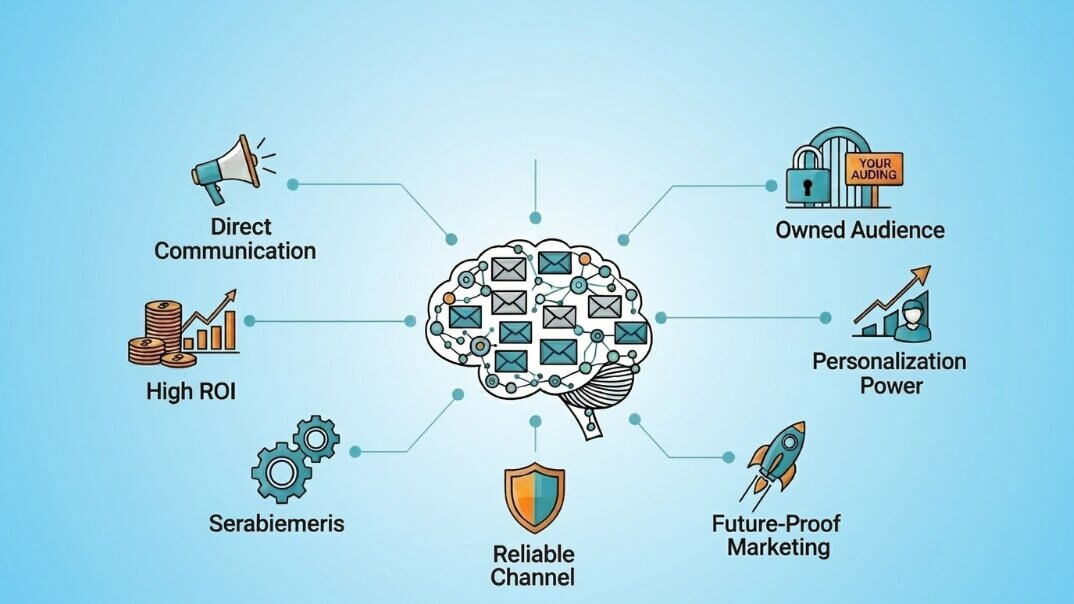
Email marketing delivers an average ROI of $36–$42 for every $1 spent in 2026, making it the highest-returning digital marketing channel available, outperforming paid search ($2 ROI) and social advertising ($2.80 ROI). As of 2026, there are 4.5 billion email users worldwide, and that number is projected to reach 4.8 billion by 2027. Roughly 99% of users check their inbox at least once a day, and 60% of consumers say they prefer email over social media when hearing from brands.
Perhaps most telling: automated emails drive 37% of all email-generated revenue despite making up only 2% of total sends. Set up your automation once, and it works for you around the clock.
Unlike social media followers, email subscribers have actively opted in to hear from you. That intentional relationship is what makes email marketing so powerful — and why building your list should be a top priority regardless of what platform or algorithm changes are happening around you.
What is GemCRM — and Why is It the Smart Choice in 2026?
GemCRM is a fully self-hosted WordPress CRM plugin built by the Academy LMS team. Its core promise: manage your entire subscriber base, email campaigns, and automation workflows from inside your WordPress dashboard — without sending your data to an external server or paying monthly fees.
In 2026, GemCRM has emerged as one of the strongest options in the WordPress-native CRM space, particularly because of its lifetime license model. Instead of annual renewals, you pay once and own it permanently — all plans include unlimited contacts, campaigns, and automations for a single payment.
Here’s what GemCRM gives you today:
- Contact management — store, organize, and tag your subscribers in a clean dashboard
- Email campaign builder — a modern template-driven builder with autosave, designed for non-technical users
- Lead capture forms — create opt-in forms to embed anywhere on your WordPress site
- Email drip sequences — automated follow-up sequences triggered by form submissions, user role changes, and more
- Segmentation — organize subscribers using tags and list filters
- WordPress-native triggers — syncs with WordPress user roles, captures leads from comment submissions, and auto-tags based on user activity
- Analytics — track open rates, click-through rates, and campaign performance
GemCRM also has a rapidly growing roadmap. Features like Dynamic Segmentation, Smart Links & Click Tracking, Abandoned Cart Automation, Custom Fields, and Webhook Automation are either recently launched or confirmed for 2026. You can see the full list on the GemCRM public roadmap. This positions GemCRM as a long-term, scalable tool, not just a basic starter option.
For bloggers and small business owners doing long-term cost planning, the math is simple: a one-time lifetime license with no per-contact limits beats any monthly SaaS plan as your list grows.
Step-by-step on how to build an email list in WordPress using GemCRM
1: Install GemCRM on Your WordPress Site
GemCRM runs entirely inside your WordPress installation. Here’s exactly how to install it:
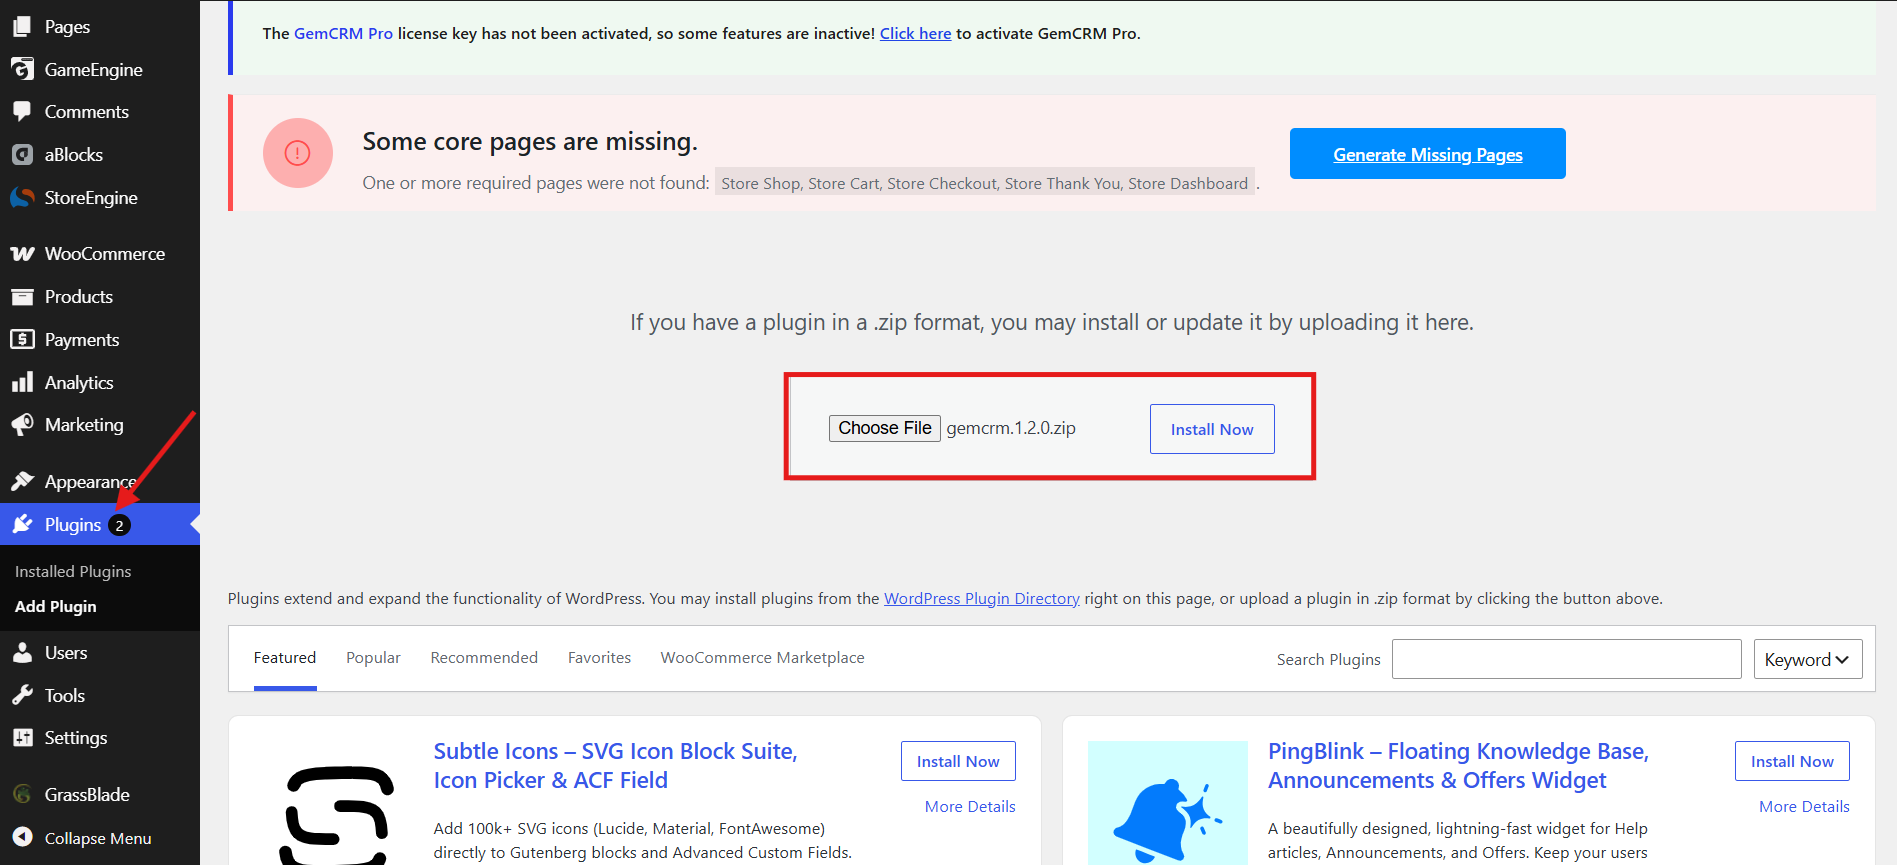
- Head to gemcrm.net, purchase your license, and download the plugin as a .zip file (e.g. gemcrm. 1.2.0.zip)
- In your WordPress dashboard, go to Plugins → Add New → Upload Plugin
- Click Choose File, select the downloaded .zip file, then click Install Now
- Once the installation completes, click Activate Plugin — and you’re ready to go
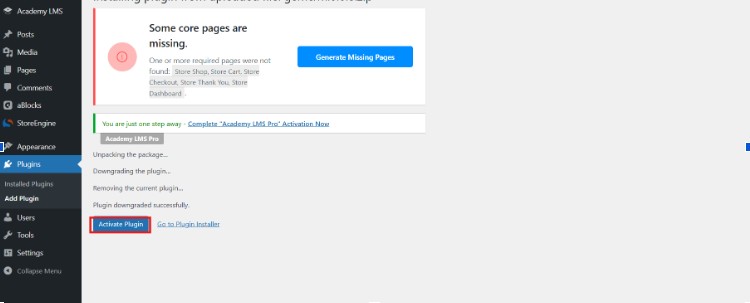
Note: After activation, GemCRM will prompt you to activate your Pro license key. Click the activation link shown at the top of your dashboard to unlock all Pro features.
2: Create an Opt-In Form in GemCRM
- Go to Forms in the left sidebar → Click + Create Form.
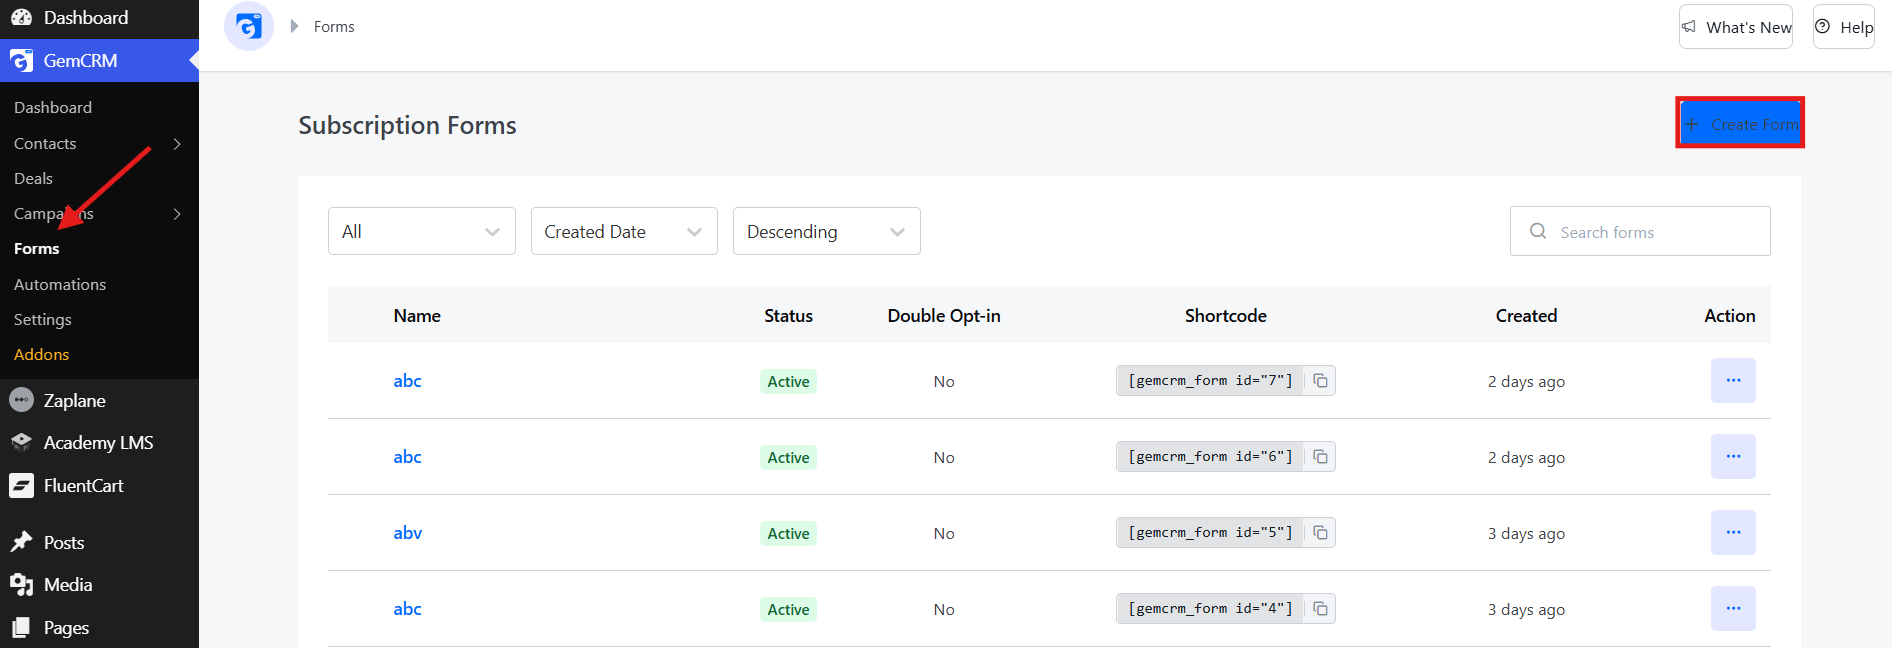
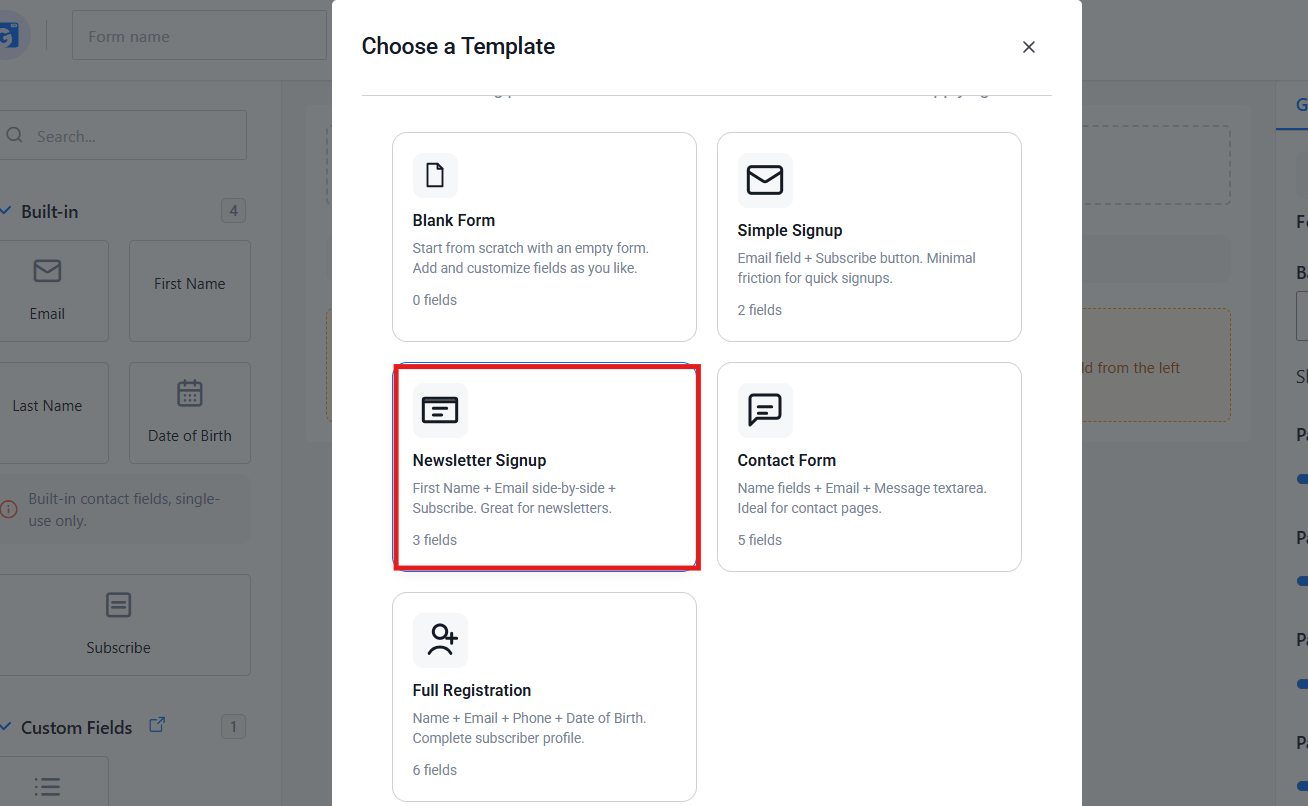
- In the template popup, select Newsletter Signup (First Name + Email + Subscribe).
- In the Form Builder:
- Enter Form Name (e.g., “Blog Newsletter Signup”)
- Change button text to something better (e.g., “Send Me the Tips”)
- Keep only First Name + Email fields
- Adjust style from the right panel if needed
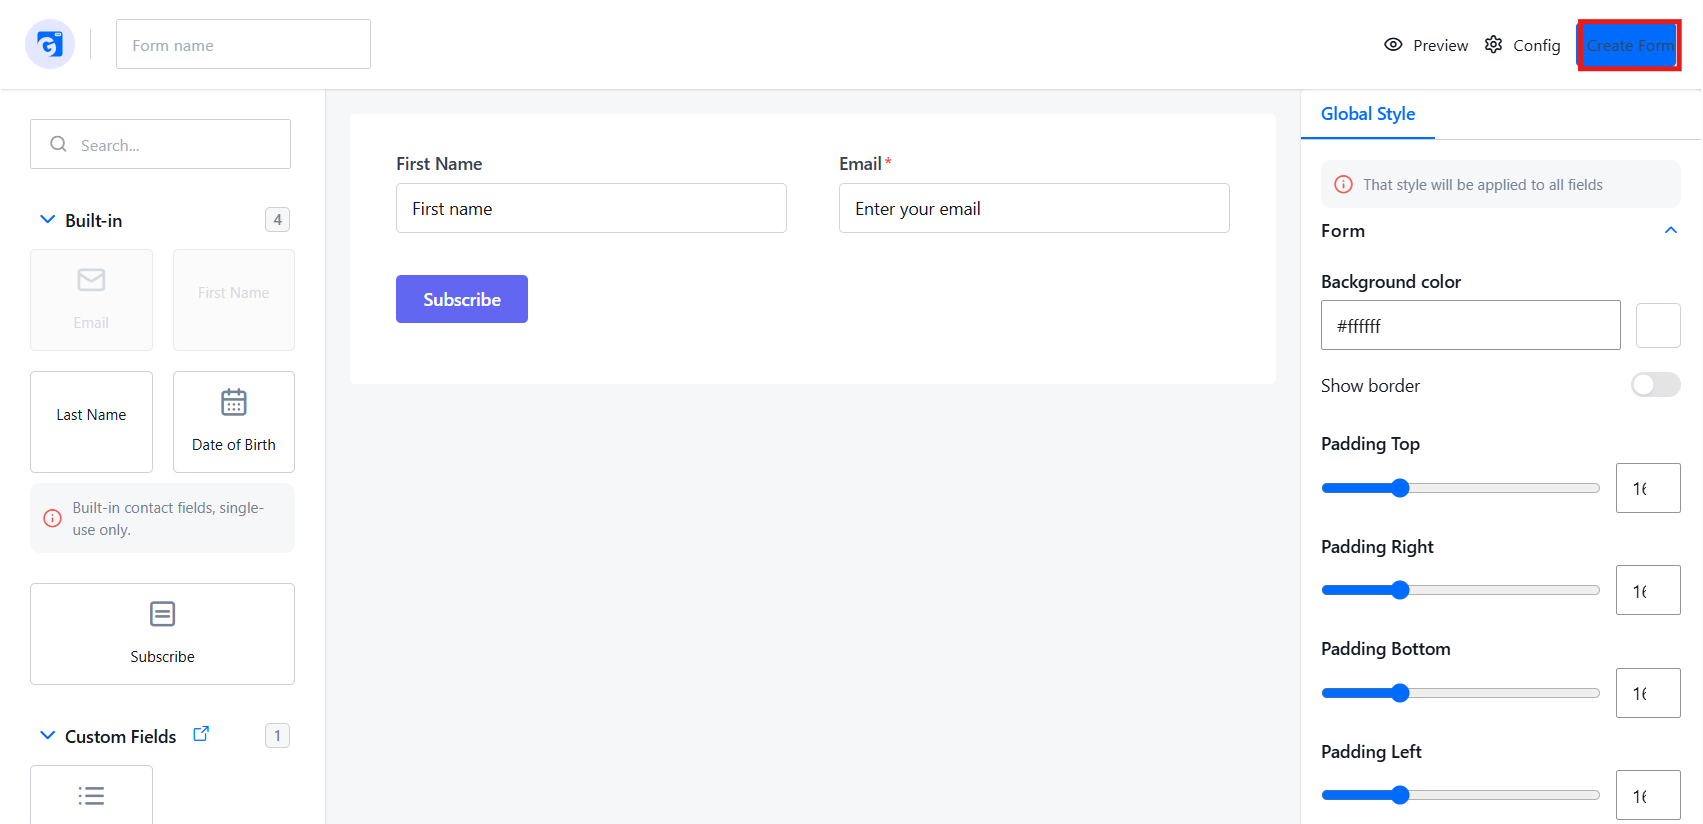
- Click Create Form / Update Form (top right).
- Copy the shortcode shown at the top.
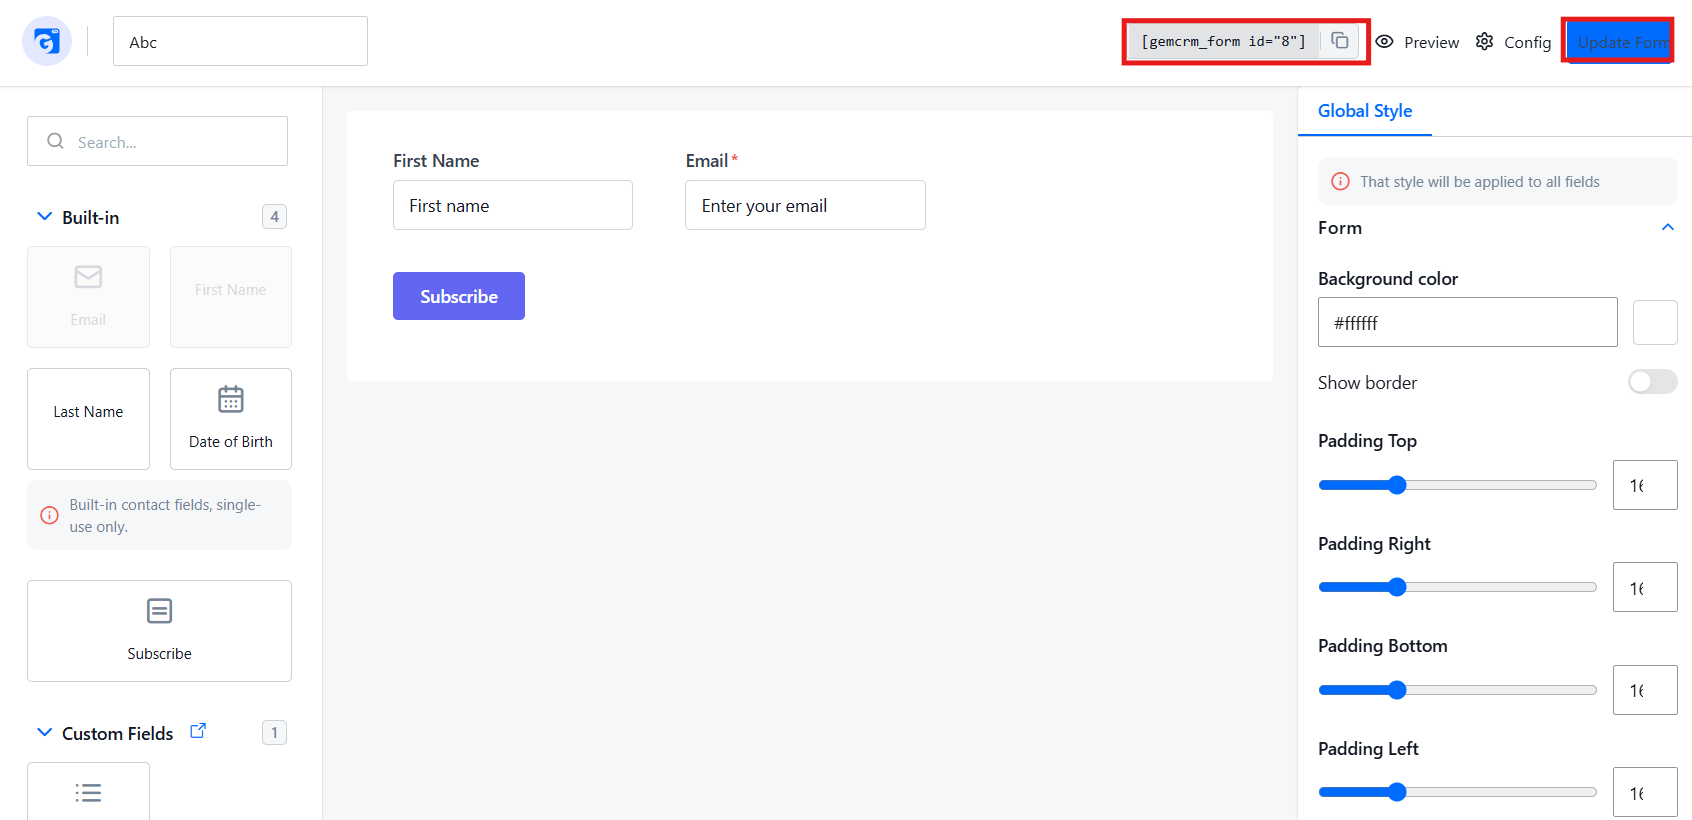
Copy the generated shortcode — you’ll need it for the next step.
3: Add the GemCRM Form to Your WordPress Site
Follow these steps to embed your GemCRM form using the Shortcode block in the WordPress aBlock editor:
- Open any page or post in the WordPress block editor.
- Add a Shortcode block to the editor.
- Paste your GemCRM shortcode (e.g., [gemcrm_form id=”9″]) into the shortcode field.
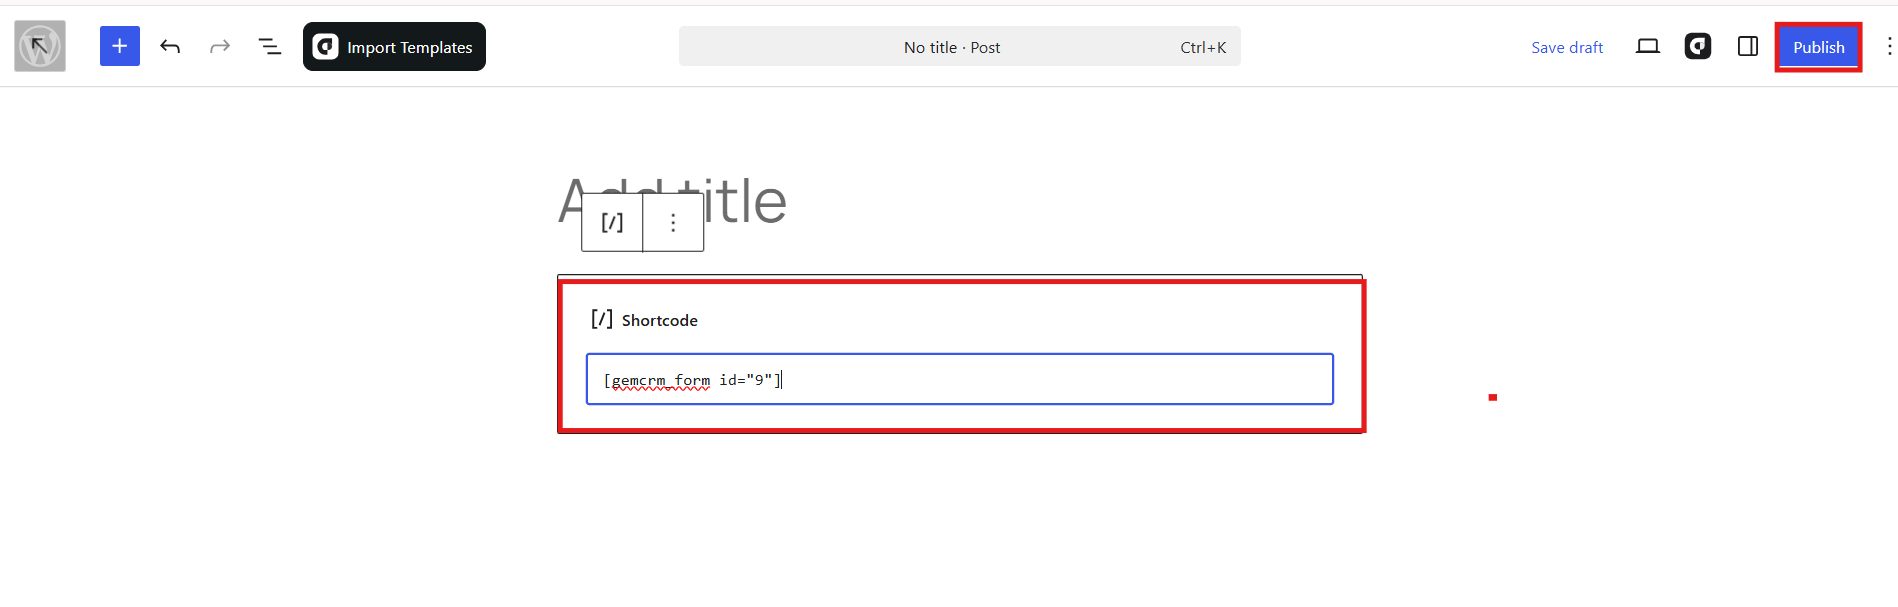
- Click the Publish button in the top-right corner to make the page live.
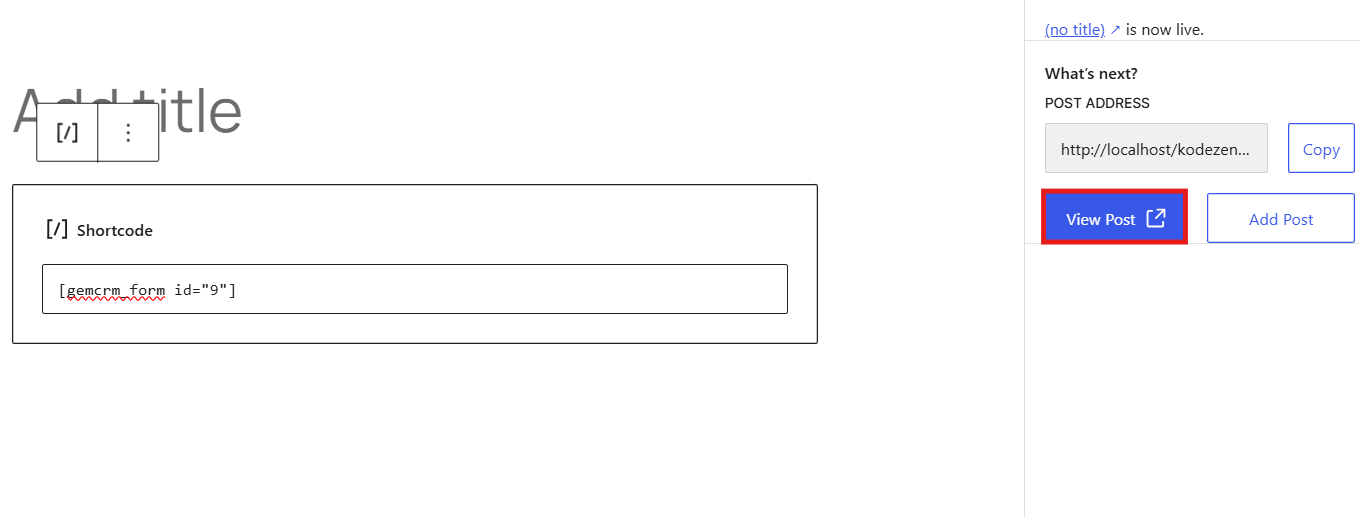
- Click View Post to verify that the form is displaying correctly on your site.
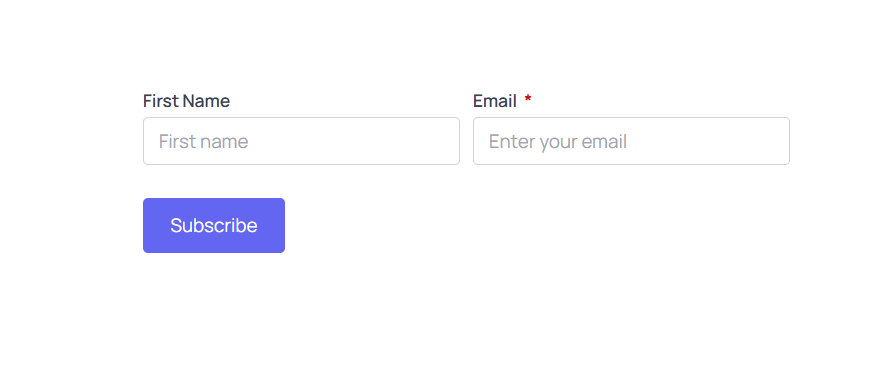
Note: GemCRM also supports Widget embedding (Appearance → Widgets) and Webhook integration with plugins like WPForms or Gravity Forms for more advanced setups.
4: Set Up Automated Lead Magnet Delivery in GemCRM
Once your lead magnet is ready, set up an automated welcome email inside GemCRM to deliver it instantly upon subscription. Follow these steps:
- From the GemCRM dashboard, click Automations in the left sidebar, then click Create Workflow in the top-right corner.
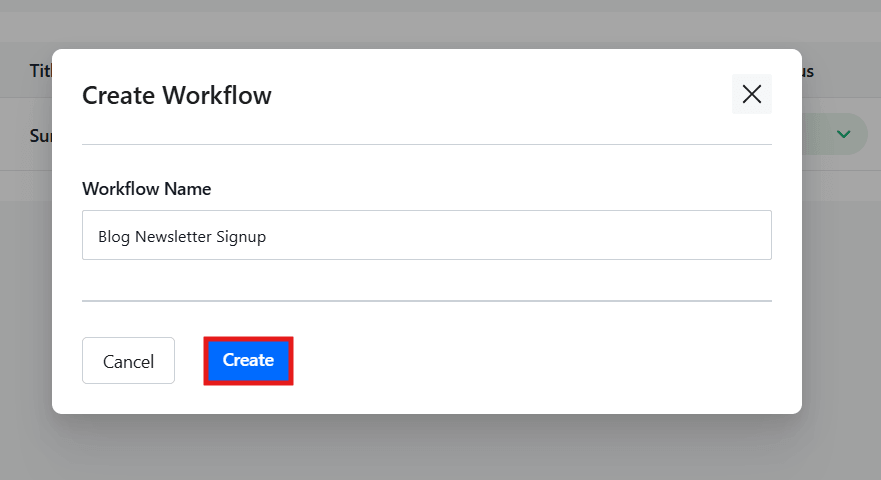
- A pop-up will appear. Enter a name for your workflow (e.g., “Welcome Email – Lead Magnet Delivery”) and click Create.
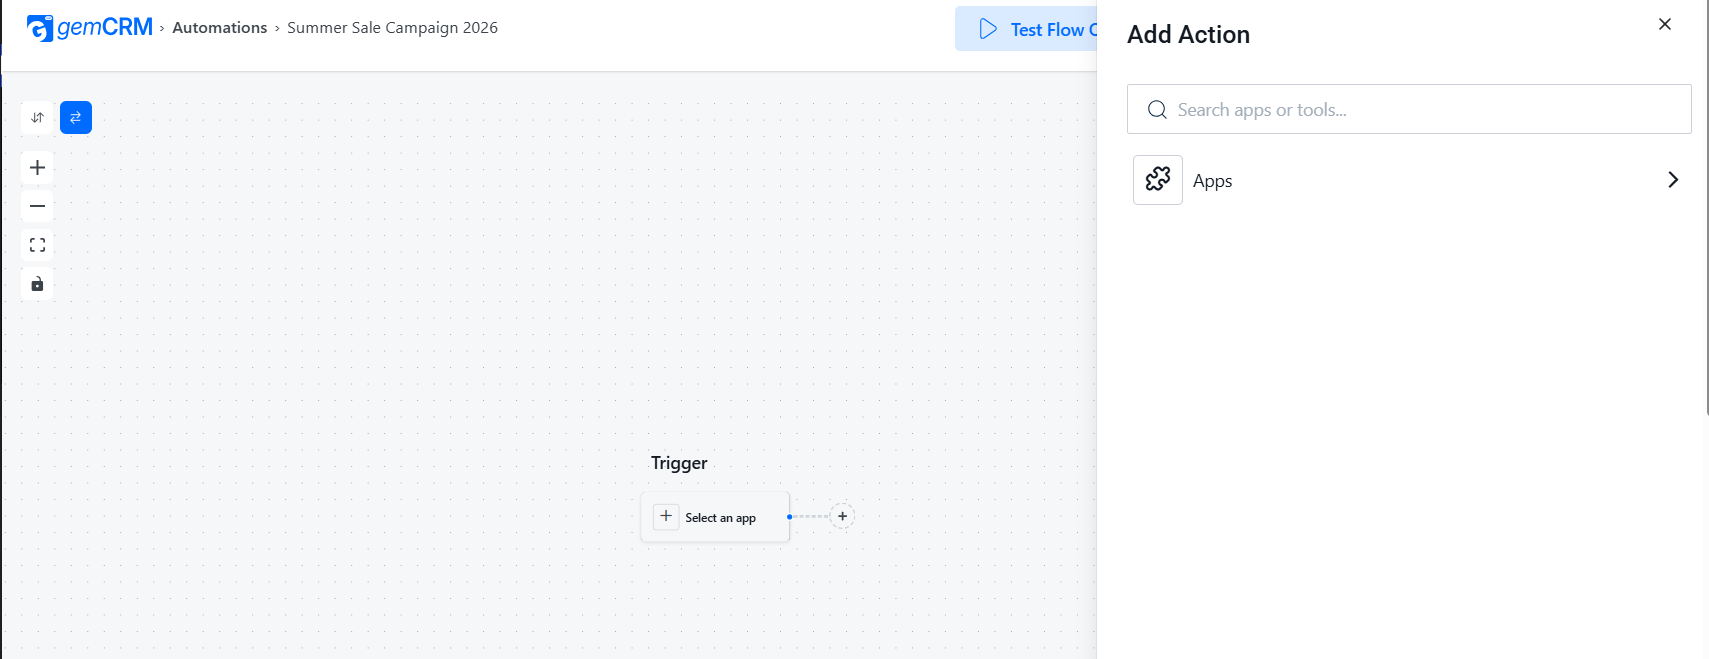
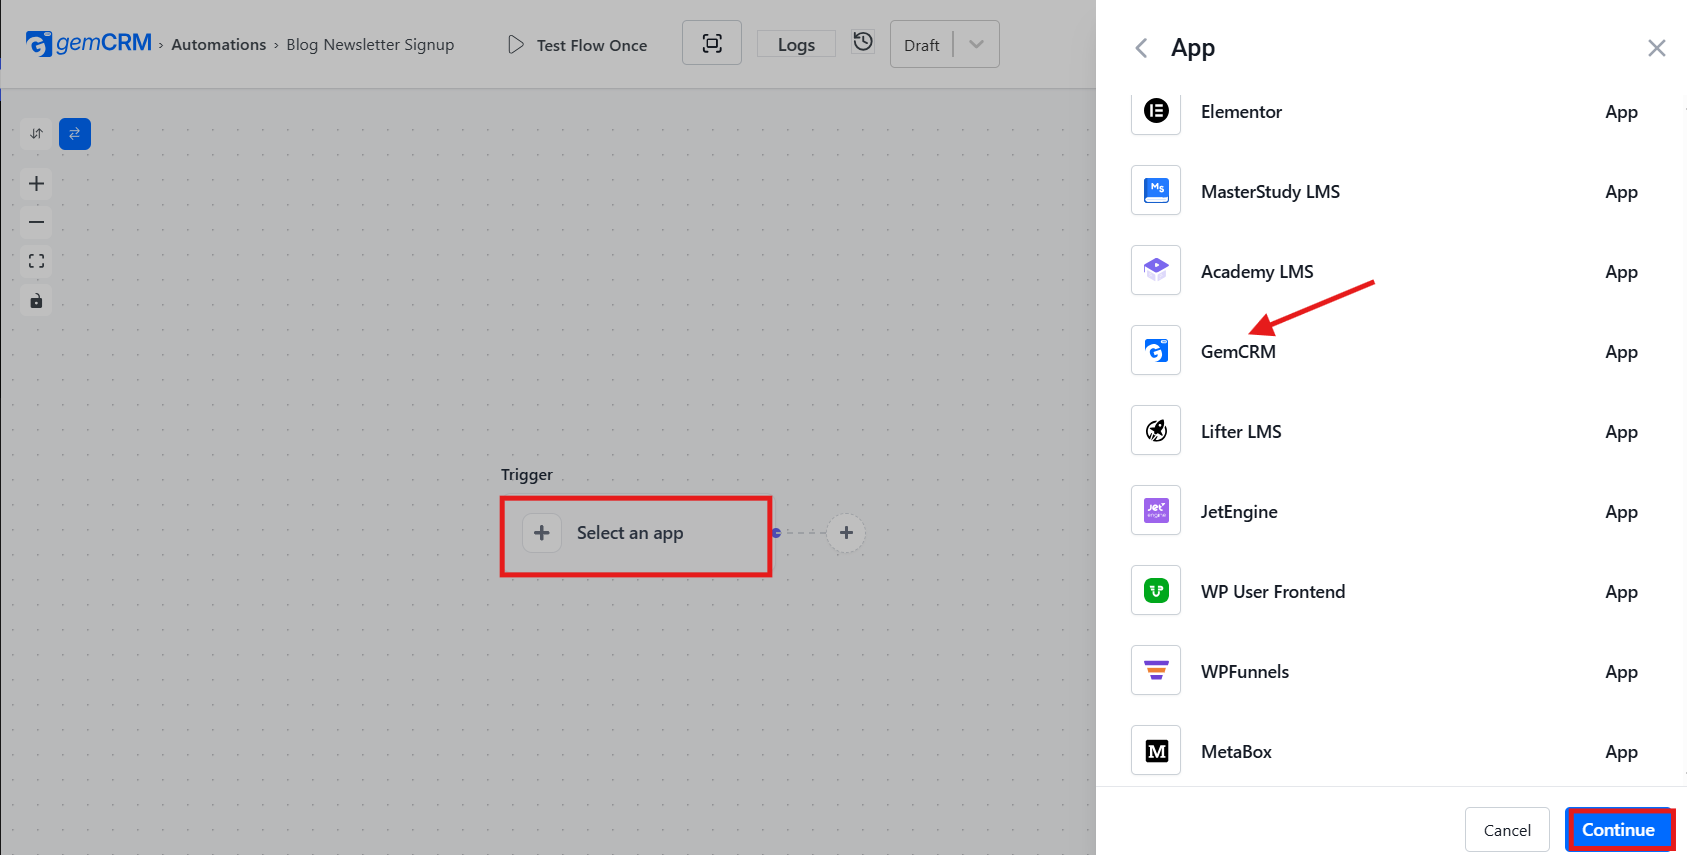
- You will be taken to the workflow builder. Click Select an app under the Trigger section. An Add Action panel will open on the right — click Apps.
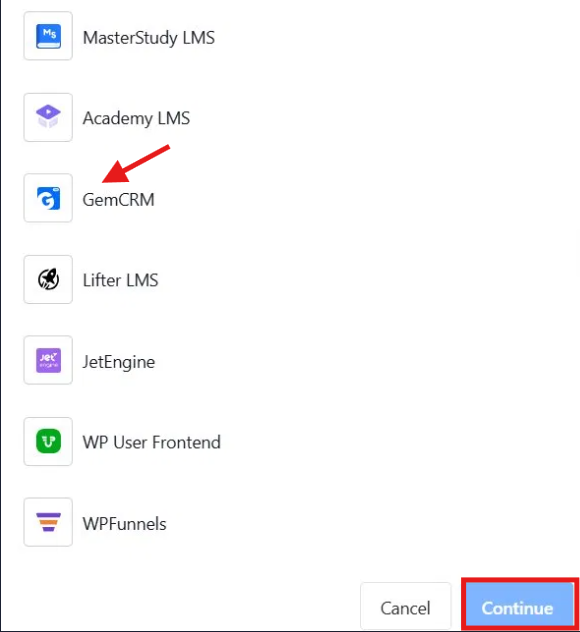
- From the app list, select GemCRM and click Continue.
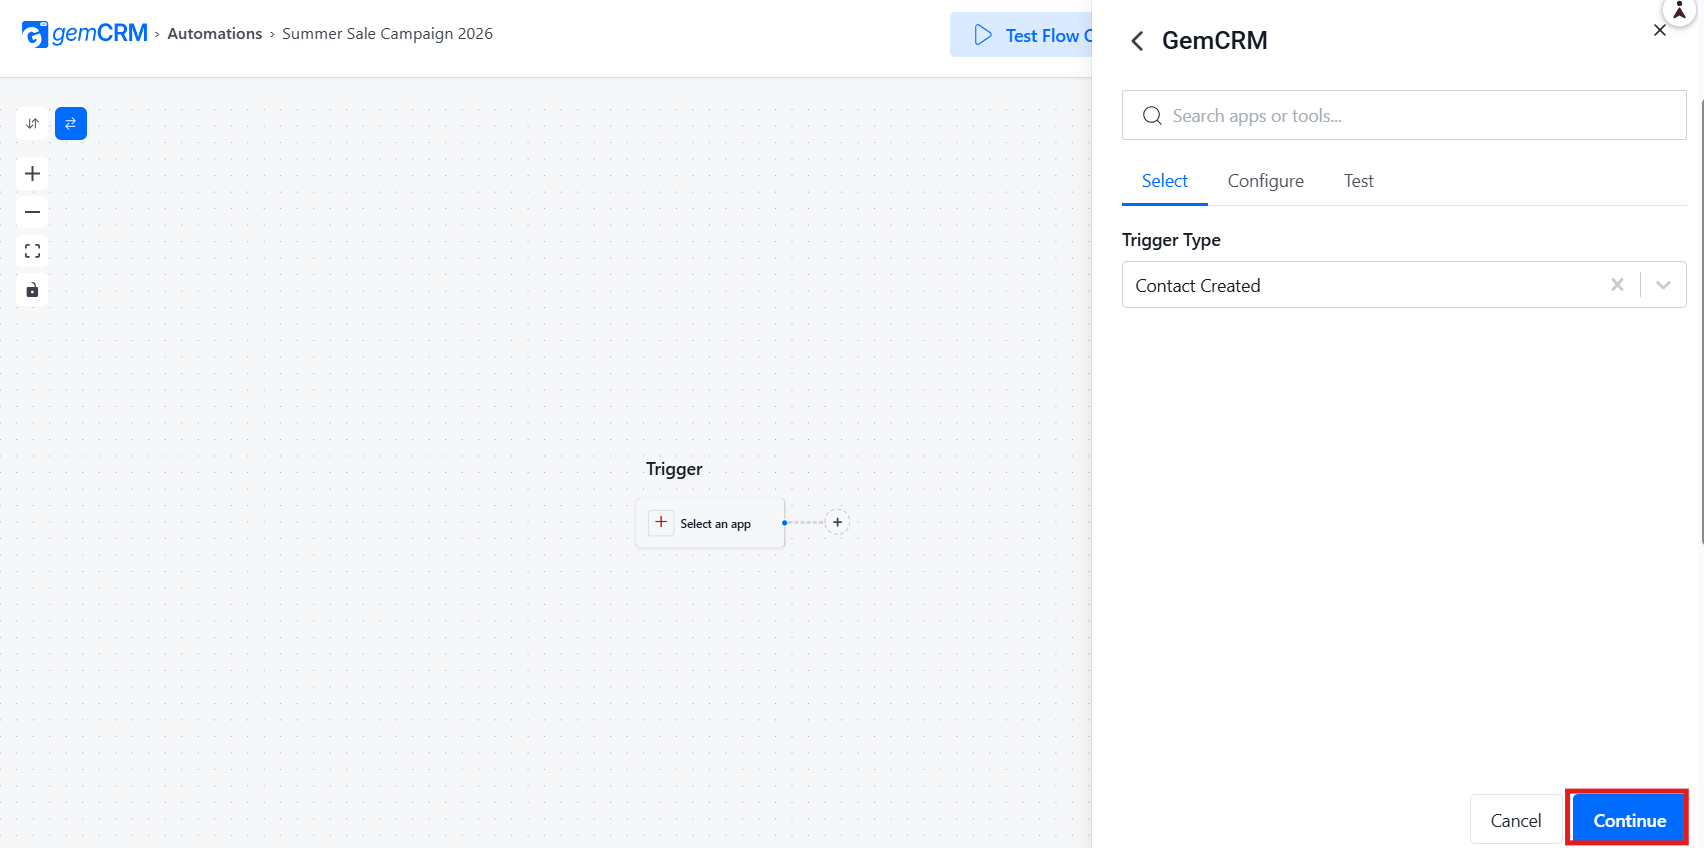
- Under Trigger Type, select Contact Created and click Continue.
- The Configure tab will confirm “No configuration required for this action.” Click Continue to proceed.
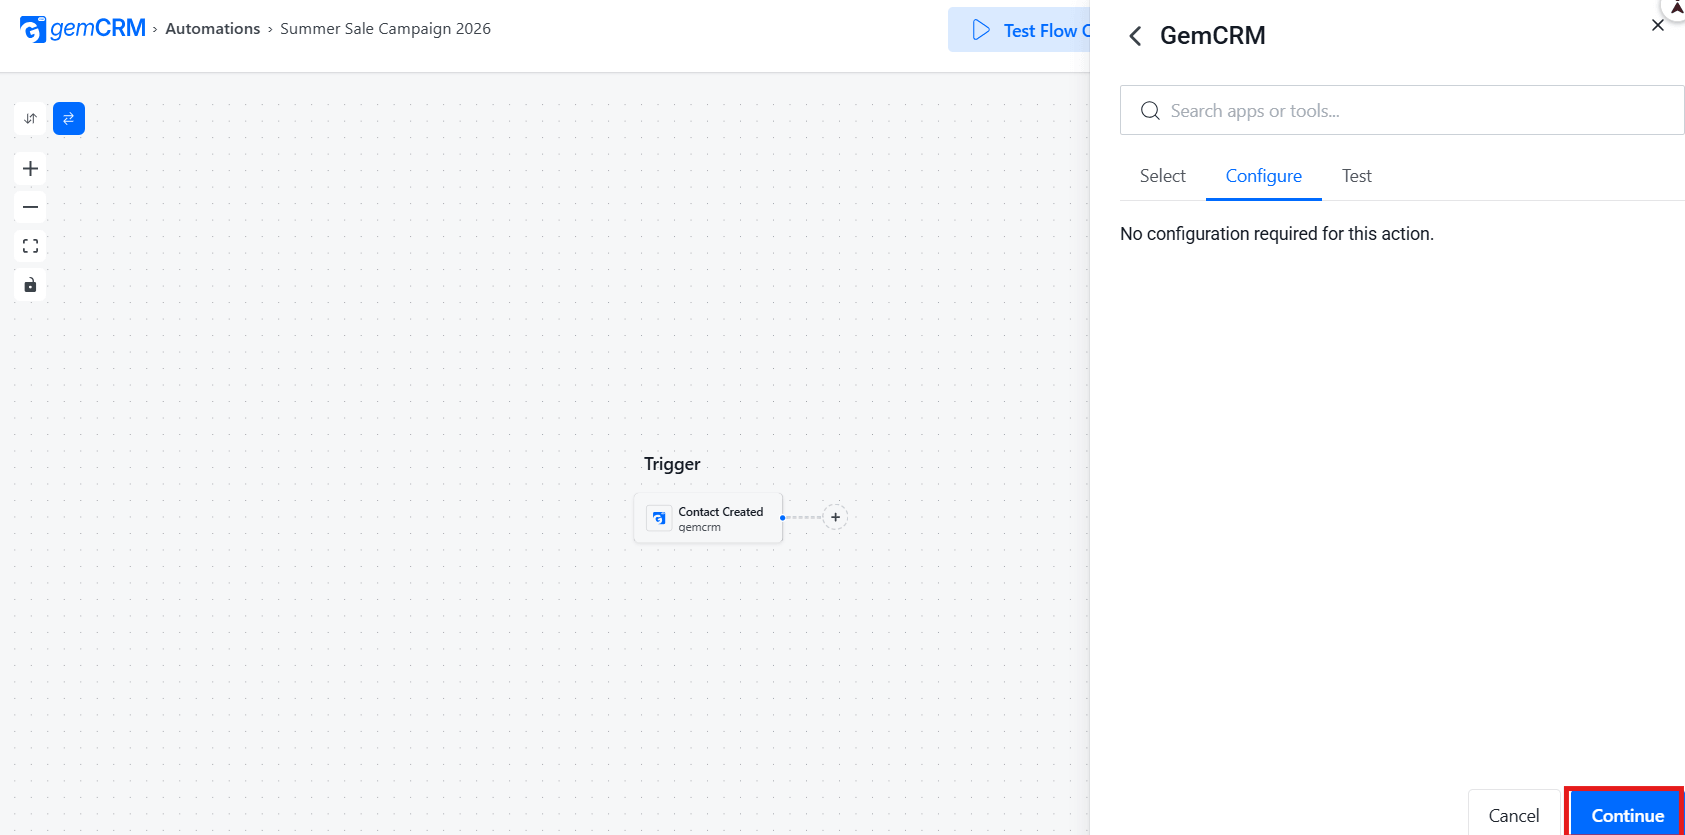
- Your trigger is now set. Click Update in the top-right corner to save the workflow.
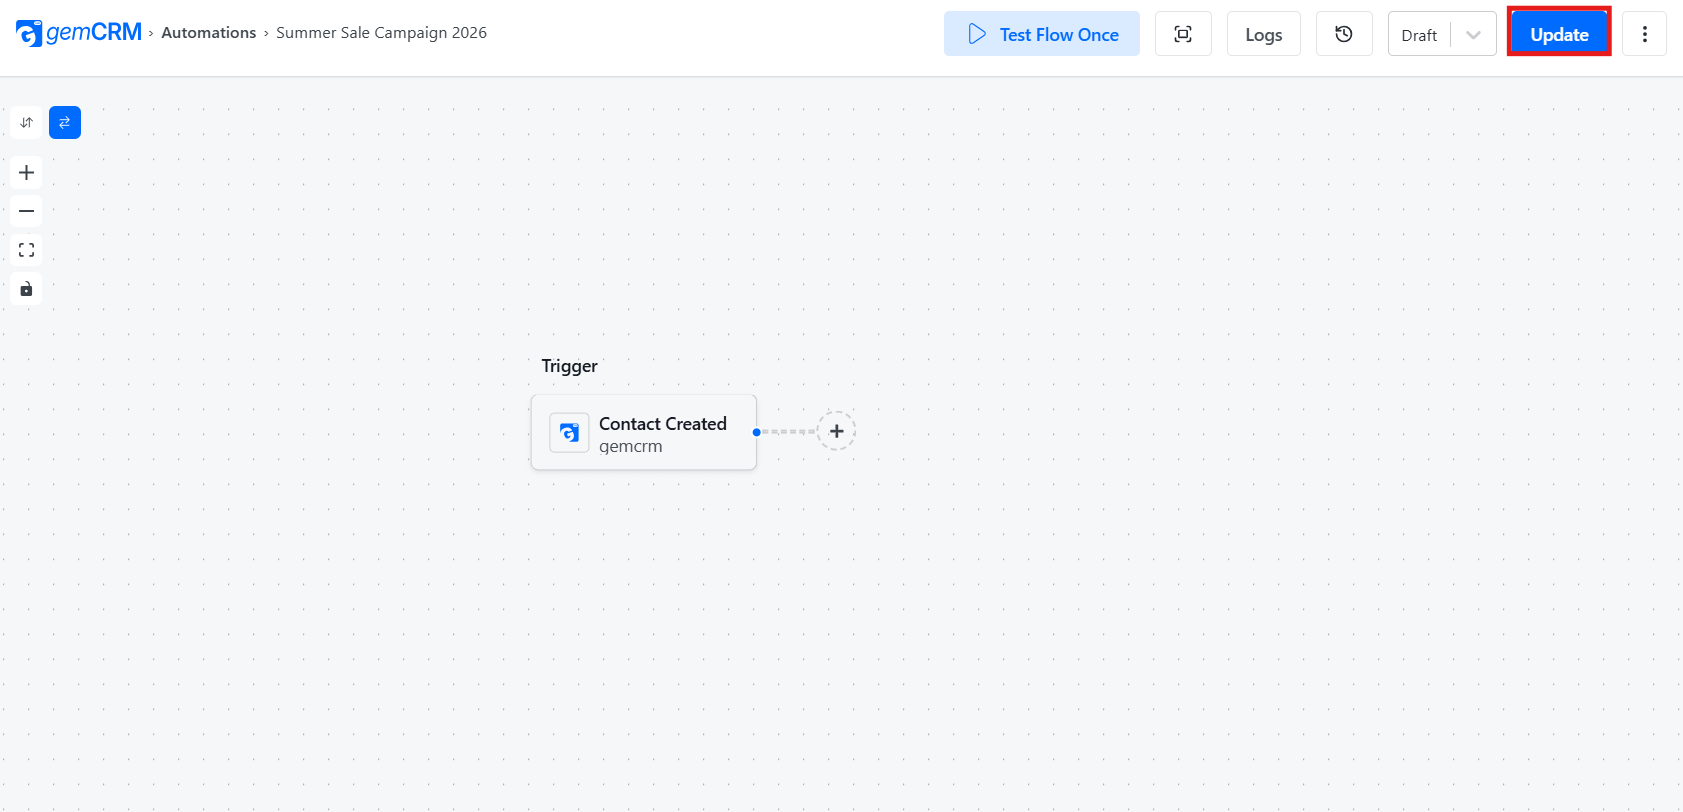
5: Build a Welcome Sequence in GemCRM
The moment someone subscribes, their interest in you is at its peak. A well-structured welcome sequence builds trust before you ever ask for anything in return.
Follow these steps to build a welcome sequence in GemCRM:
- From the GemCRM dashboard, navigate to Automations and open your existing workflow or create a new one.
- Click the “+” button on the workflow canvas, then select Apps → GemCRM and click Continue.
- Under Action Type, select Send Email and click Continue.
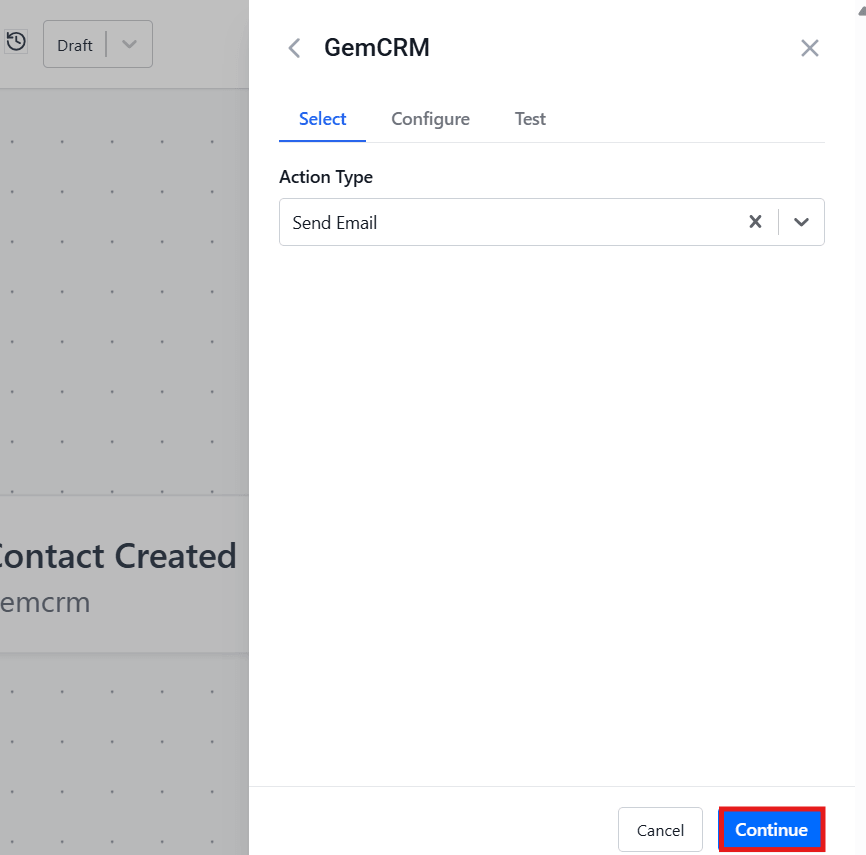
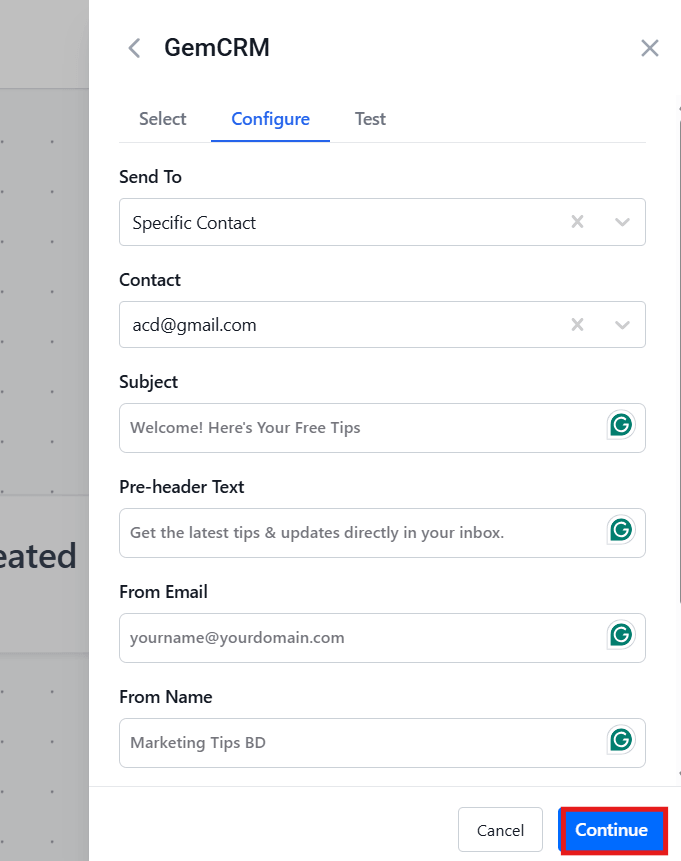
- Configure your first email — fill in the Subject, Pre-header Text, From Email, and From Name fields, then click Continue.
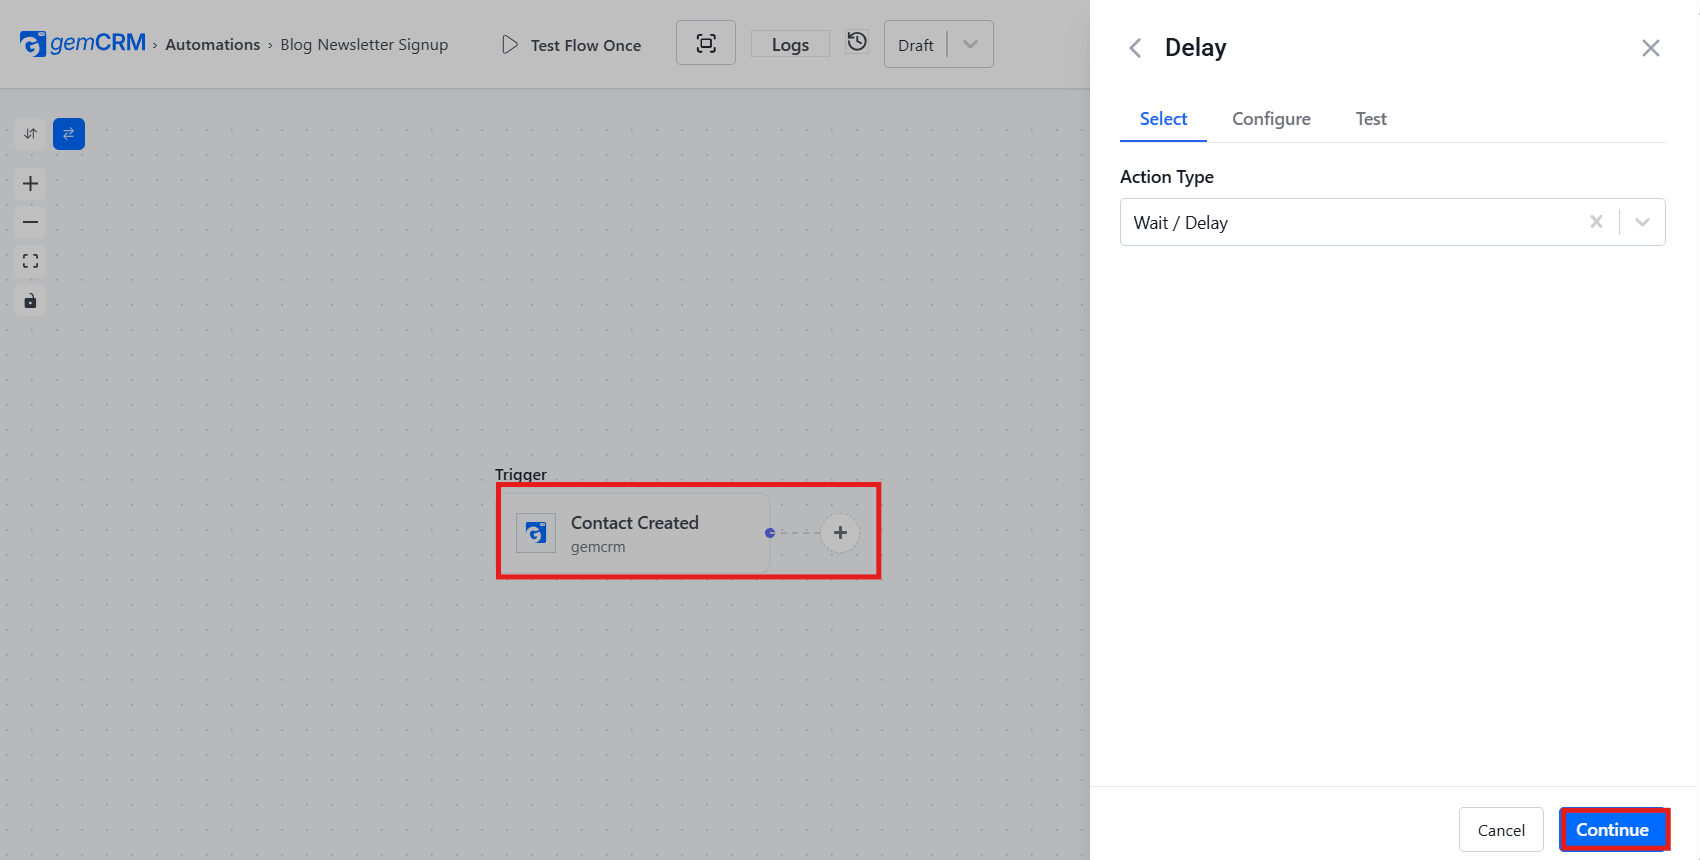
- Click “+” again on the workflow canvas, then select the Delay tool. Under Action Type, select Wait / Delay and click Continue.
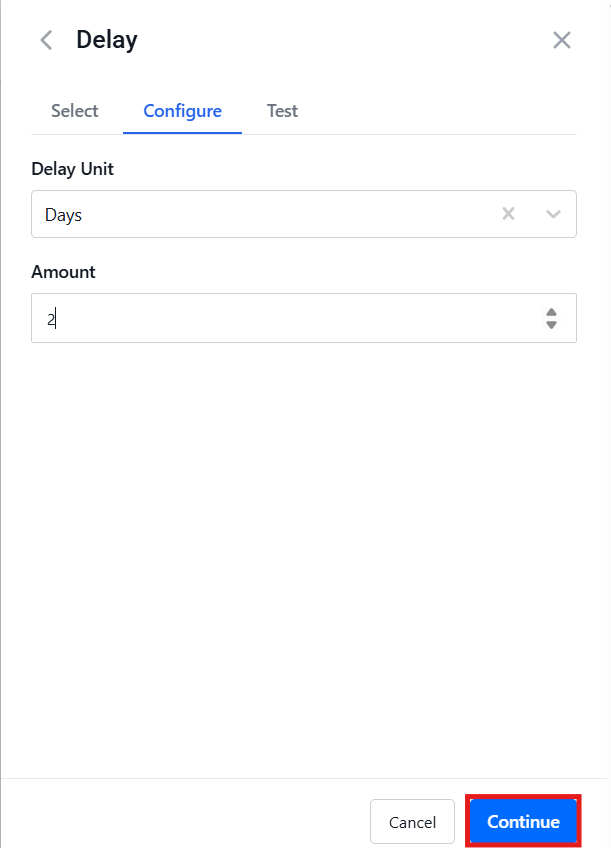
- Set the Delay Unit to “Days” and the Amount to “2”, then click Continue.
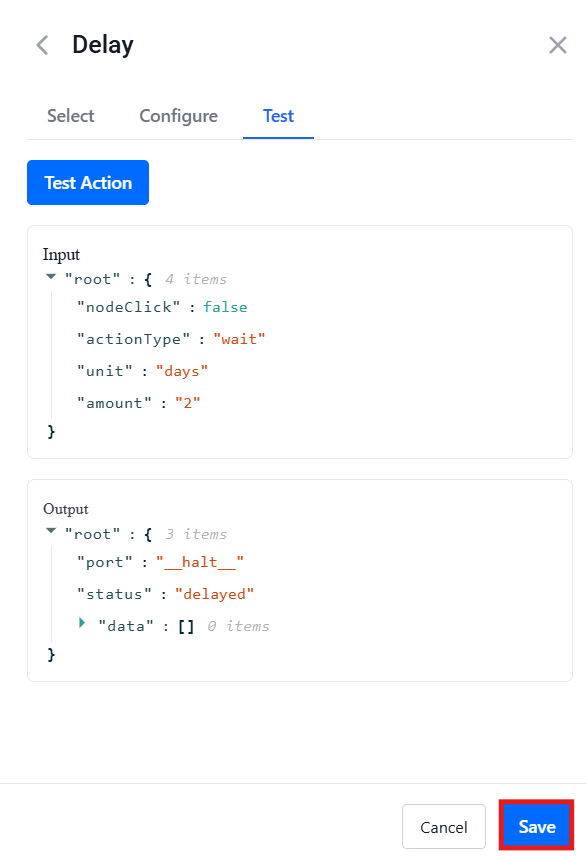
- Click Save to confirm the delay.
- Repeat steps 2–7 for the remaining 3 emails:
- Email 2 (Day 2): Share your single most popular blog post
- Email 3 (Day 4): Tell your story — who you are and why you write
- Email 4 (Day 7): Ask a question or invite a reply
- Click Update in the top-right corner to save the entire workflow.
GemCRM will now automatically run this sequence for every new subscriber, 24/7.
6:Use GemCRM’s Dynamic Segmentation
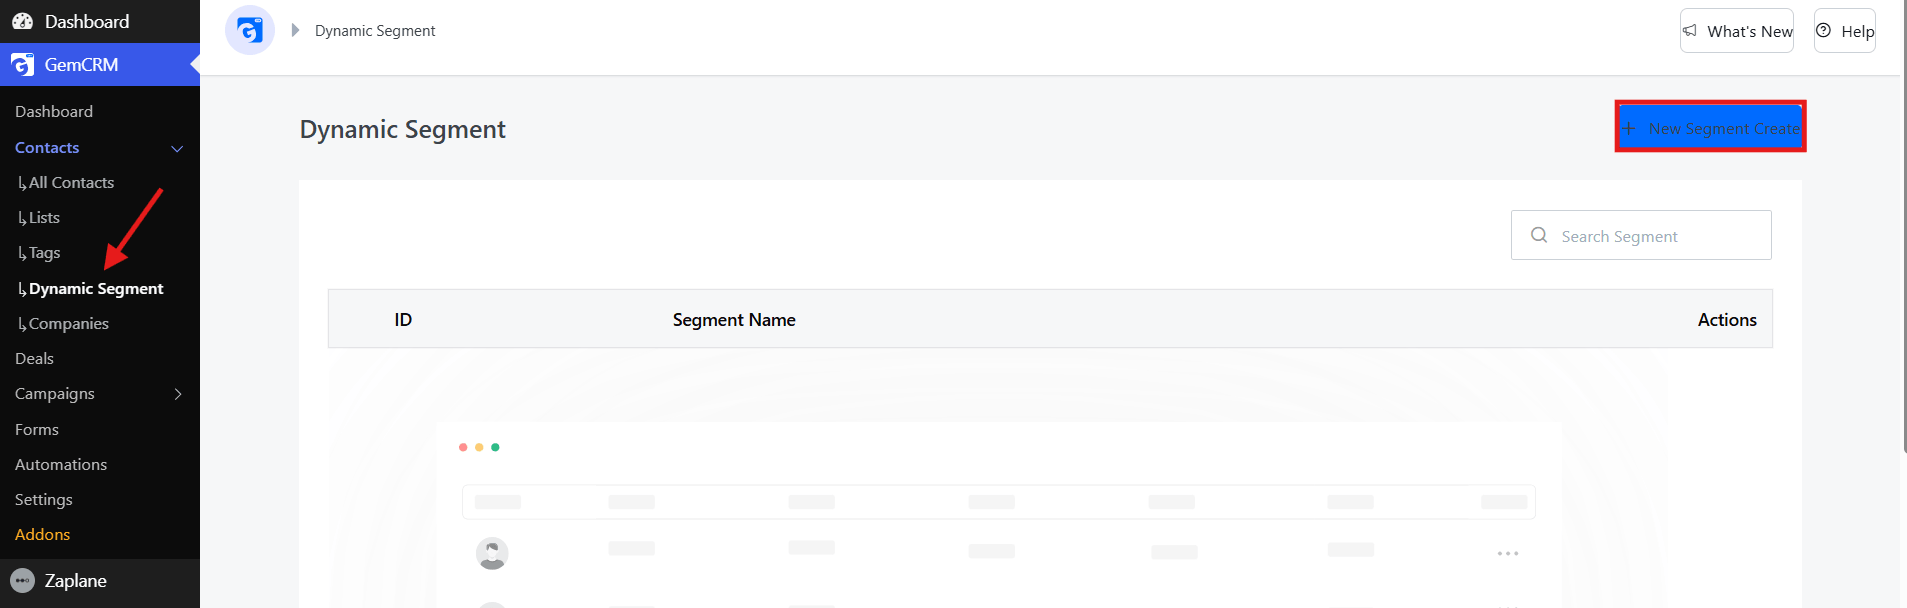
One of GemCRM’s most powerful features is Dynamic Segmentation — the ability to create audience segments that update automatically based on subscriber behavior, tags, and activity.
Follow these steps to create a new segment:
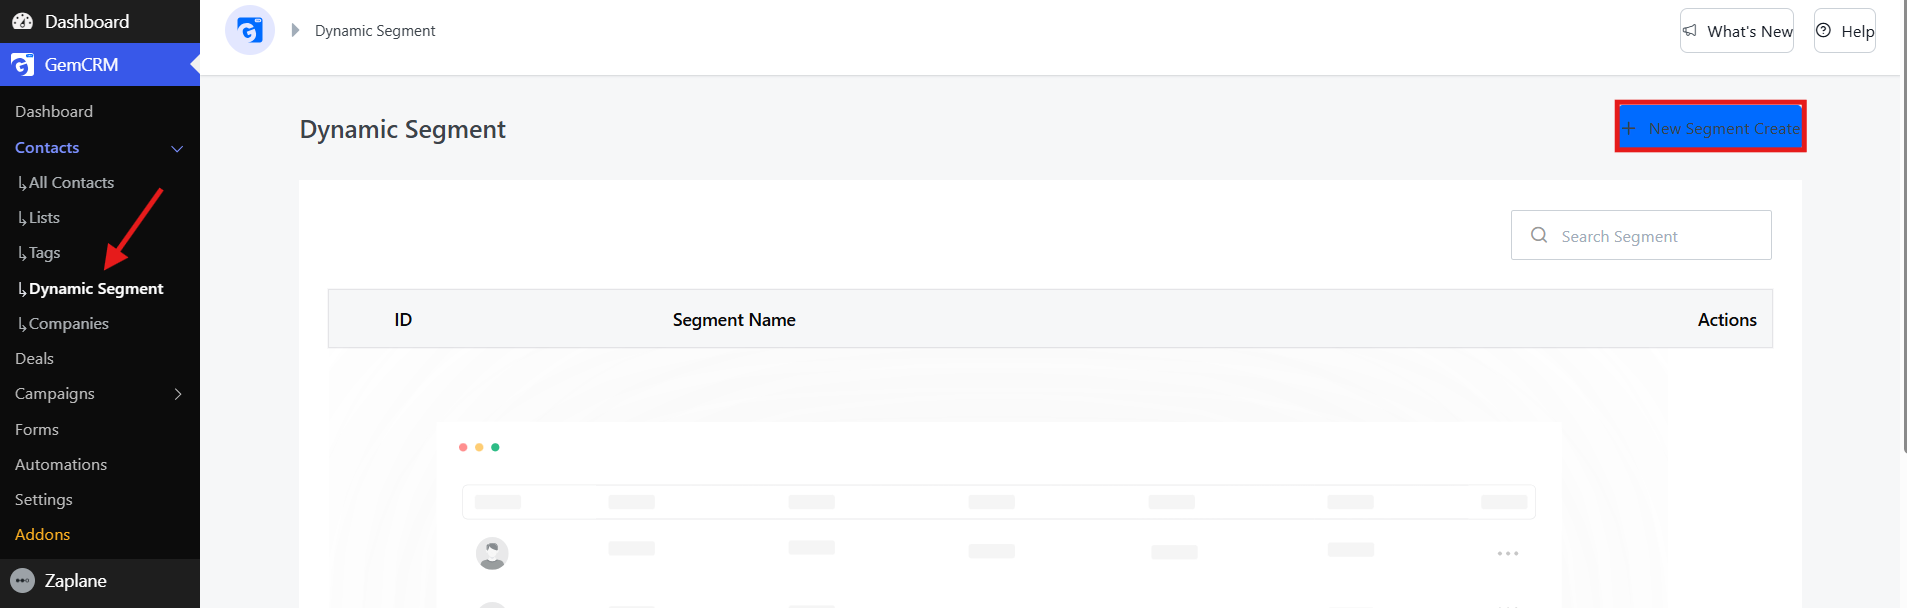
- From the GemCRM dashboard, navigate to Contacts → Dynamic Segment in the left sidebar, then click New Segment Create in the top-right corner.
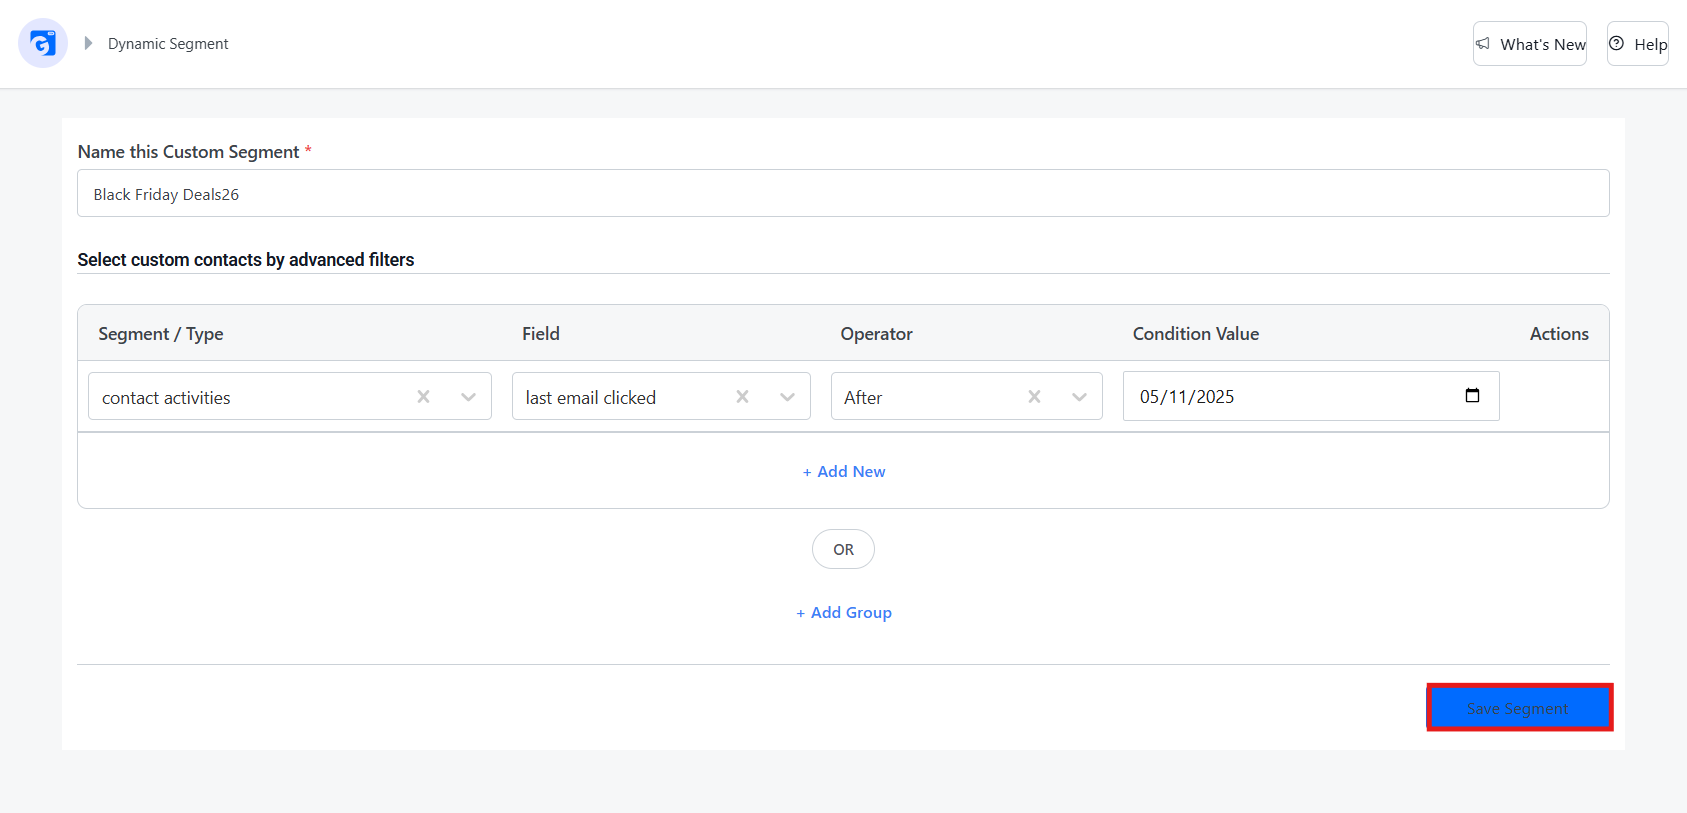
- Enter a name for your segment in the Name this Custom Segment field (e.g., “Black Friday Deals26”).
- Under Select custom contacts by advanced filters, configure your filter conditions — for example, set Segment/Type to “contact activities,” Field to “last email clicked,” and Operator to “After” with a specific date.
- Click + Add New to add additional filter conditions, or + Add Group to create an OR condition group for more advanced segmentation.
- Once your conditions are set, click Save Segment in the bottom-right corner.
GemCRM will now automatically populate this segment with matching contacts — no manual sorting required. This allows you to send highly targeted campaigns to the right audience, resulting in higher open rates, fewer unsubscribes, and better overall performance.
Why Self-Hosted Beats SaaS in 2026
The bigger picture worth understanding: in 2026, data privacy regulations are tightening globally, and SaaS subscription costs keep rising. A platform like Mailchimp can easily cost $50–$150/month once your list hits 5,000–10,000 subscribers — and those costs scale with every contact you add.
GemCRM flips that model. With a lifetime license, there are no per-contact fees, no monthly bills, and no risk of a pricing change wiping out your marketing budget. Your data stays in your own WordPress database, under your control.
For bloggers and small business owners building for the long term, owning your marketing stack is simply the smarter financial decision.
Final Thoughts
Building an email list in WordPress doesn’t need to be complicated or expensive. With GemCRM as your foundation, you get a modern, affordable, and genuinely powerful system to grow and nurture your audience — entirely within WordPress.
Start with one opt-in form, one lead magnet, and one welcome email sequence. Keep it simple. Stay consistent. As your list grows, layer in dynamic segmentation, behavioral triggers, and more sophisticated automations.
The bloggers and creators who win in the long run aren’t always the ones with the biggest budgets. They’re the ones who own their audience. In 2026, there’s no better time to start building yours.
Frequently Asked Questions (FAQ)
Can I build an email list in WordPress for free?
Yes — partially. GemCRM has a free version for the basics. For unlimited automations and contacts, you’ll need the paid lifetime license, which is still far cheaper than any monthly SaaS plan.
Do I need coding skills to use GemCRM on WordPress?
No. Everything — forms, campaigns, automations — works through a visual interface inside your WordPress dashboard. Zero coding required.
Is GemCRM better than Mailchimp for WordPress blogs?
For WordPress users, yes. GemCRM keeps your data on your own server, charges a one-time fee, and has no per-contact limits. Mailchimp is polished but gets expensive fast as your list grows.
Can I import my existing email list into GemCRM?
Yes. Export your contacts as a CSV from any platform (Mailchimp, ActiveCampaign, etc.) and import directly into GemCRM from the Contacts section.